
User's Guide


28
• To change the paper size, select Paper Size and choose the size of paper you loaded.
• To change the layout, select Layout and choose With Border to leave a small margin
around the image, or Borderless to expand the image all the way to the edge of the paper
(slight cropping may occur).
Note:
You cannot select Borderless when copying on plain paper.
• To adjust the copy size, select Reduce/Enlarge and choose either Actual, Auto Fit Page
(to automatically size the image to fit your paper), or Custom (to select a percentage using
or , or enter it on the numeric keypad).
Note:
If you placed legal-size originals in the ADF, select Legal->Letter to copy a legal-size
document on letter-size paper.
• If you chose Plain Paper as your Paper Type setting, you can change the copy quality.
Select Quality and choose Standard Quality, Best, or Draft.
• To adjust the darkness or lightness of the copy, select Copy Density and choose a higher
(darker) or lower (lighter) setting.
• To adjust the amount of image expansion when printing borderless photos, select
Expansion and choose Standard, Medium, or Minimum.
Note:
You may see white borders on your printed photo if you use the Minimum setting.
After you finish selecting your settings, press Menu.
6. Press the B&W or Color button to begin copying.
To cancel copying, press Stop/Clear Settings.
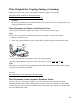
Copy Photos
You can copy photos onto 4 × 6-inch (102 × 152 mm), 5 × 7-inch (127 × 178 mm), letter-size, or
A4-size Epson special paper (various types available
) for instant photo reprints.
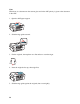
1. Load Epson special paper in the sheet feeder.
Note:
Load only the recommended number of sheets.
2. Place your original photo
on the scanner glass.
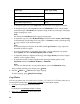
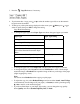
Epson Premium Photo Paper Glossy Prem. Glossy
Epson Premium Photo Paper Semi-gloss
Epson Ultra Premium Photo Paper Glossy Ultra Glossy
Epson Photo Paper Glossy Glossy
Paper type Paper Type setting