
Weighing Indicator User's Guide

X K 3 1 9 0 - A 1
+P
3. Calibration
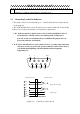
According to the Graph 2-3, connecting Indicator and loadcell, and the indicator enters
weighing mode.
1. Connecting calibration jumper to the 15- pin socket on the indicator back panel.
(There is a 15-pin plug in the packing carton with its 14-pin short connected with
15-pin. )
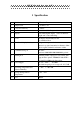
2. According to table 4-3, carry out calibration step by step.
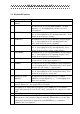
Table 4 - 1
step Operation Display Explanation
1 press [ CALB] after calibration jumper is inserted
2
press [1 ] [0 ]
press [Enter ]
[E ** ]
[E 10 ]
Enter division value selecting
1/2/5/10/20/50/100/200
Example: 10
3
press [ 0 ]
press [ Enter ]
[ dc * ]
[ dc 0 ]
Enter decimal point (0 -4)
Example: without Decimal point 0
4
press [ 2 ] [ 3 ]
press [ Enter ]
[pon XY ]
[ pon 23 ]
Enter Zero range
X: zero set range (1-5) it stands for
2% 4% 10% 20% 100% of F.S
Y: power on Zero set range it
Stands for (1-5)
2% 4% 10% 20% 100% of F.S
example 23
5
press [ 3 ] [ 0 ]
[ 0 ] [ 9 ] [ 0 ]
[F ***** ]
[ F 30090 ]
Enter overload warning value when
inputting F value,and re-pressing
[ Enter ] key, the calibration will begin.
directly pressing [ Enter ],will enter into
the tenth step. If pressing [ weighting ],
Indicator will return to weighing status.
6 press [ Enter ] Example: 30090
7
[ noLoAdn] Confirming Zero position. At this time
there is no load on the scale.Pressing
[Input] when the stable light is on.