640XL.
1640XL.book Page ii Wednesday, November 19, 2003 8:46 PM Copyright Notice All rights reserved. No part of this publication may be reproduced, stored in a retrieval system, or transmitted in any form or by any means, electronic, mechanical, photocopying, recording, or otherwise, without the prior written permission of SEIKO EPSON CORPORATION. The information contained herein is designed only for use with this EPSON scanner.
1640XL.
1640XL.
1640XL.
1640XL.
1640XL.book Page 1 Wednesday, November 19, 2003 8:46 PM Welcome The EPSON Expression® 1640XL is a 42-bit color, large-format professional scanner designed to meet the needs of graphic arts professionals and business graphics users. Using the EPSON® ColorTrue® II Imaging System, it reproduces images with amazingly accurate detail and color.
1640XL.book Page 2 Wednesday, November 19, 2003 8:46 PM About Your Software The EPSON Expression 1640XL scanner includes these leading-edge applications for professional-quality scans: EPSON Scan Exclusive professional-quality scanner driver with powerful features for controlling every aspect of your scan. Adobe ® Photoshop ® Elements Edit your photos with this version of the ultimate imaging application.
1640XL.book Page 3 Wednesday, November 19, 2003 8:46 PM LaserSoft ® SilverFast ® (1640XL Graphic Arts Edition only) Professional color scanning software for use with Adobe Photoshop. This high-end scanning program uses artificial intelligence to produce the finest images available from your scanner. By matching the prescan to the final scanned image, SilverFast ensures accurate, high quality scans.
1640XL.book Page 4 Wednesday, November 19, 2003 8:46 PM Macintosh ■ An Apple® Power Macintosh with one of these operating systems: ■ USB: Macintosh OS X 10.1.4 to 10.2.x, or OS 8.6 to 9.x. ■ SCSI: Macintosh OS X 10.1.4 to 10.2.x, or OS 8.6 to 9.x. ■ FireWire: Macintosh OS X 10.1.4 to 10.2.x, or OS 8.6 to 9.x with FireWire Update 2.1. Check the Apple web site for any updates for your operating system.
1640XL.book Page 5 Wednesday, November 19, 2003 8:46 PM Getting More Information There are several ways to learn more about your EPSON Expression 1640XL. In addition to the printed materials, help utilities and electronic manuals are available on your computer and CD-ROMs. Here’s where to look for help: ■ EPSON Expression 1640XL Reference Guide Provides information about scanner maintenance and troubleshooting tips.
1640XL.book Page 6 Wednesday, November 19, 2003 8:46 PM Warnings, Cautions, Notes, and Tips Please follow these guidelines as you read your documentation: Warnings must be followed carefully to avoid bodily injury. Cautions must be observed to avoid damage to your equipment. Notes contain important information about your scanner. Tips contain additional hints for great scanning.
1640XL.book Page 7 Wednesday, November 19, 2003 8:46 PM Reading the Reference Guide The electronic EPSON Expression 1640XL Reference Guide is on your EPSON Expression 1640XL Scanner Software CD-ROM. You need to install it on your hard drive to view it. See the Start Here poster for installation instructions. Opening the Reference Guide To open the Reference Guide in Windows or Macintosh, do the following: ■ Double-click the Exp1640XL Reference Guide icon on your desktop.
1640XL.book Page 8 Wednesday, November 19, 2003 8:46 PM Viewing the Photoshop Elements Manuals To view your electronic manual for Photoshop Elements, or any other PDF manuals, you’ll use Adobe Acrobat Reader. If Acrobat Reader is not already installed on your computer, you can install it from the Photoshop Elements CD. To learn about Acrobat Reader, do one of the following: ■ For Windows, select Reader Guide from the Acrobat Reader Help menu.
1640XL.book Page 9 Wednesday, November 19, 2003 8:46 PM Chapter 1 Using a SCSI Connection To connect the scanner to a computer using a SCSI interface, follow the instructions in this chapter.
40XL.book Page 10 Wednesday, November 19, 2003 8:46 PM Using a SCSI Connection to the Scanner SCSI Cables You can connect the scanner to the computer with a SCSI 2 cable not more than 19.7 feet (6 meters) long. If you’re connecting multiple SCSI devices, the total length of the SCSI bus (cables) should not exceed 9.8 feet (3 meters).
1640XL.book Page 11 Wednesday, November 19, 2003 8:46 PM Follow these steps to connect the scanner to a SCSI interface: 1. Make sure the scanner and computer are turned off. (The scanner is off when the P OPERATE button is out and the ERROR and READY lights are off.) Do not connect the scanner to the computer while either is turned on, or the scanner could be damaged. 2.
1640XL.
1640XL.book Page 13 Wednesday, November 19, 2003 8:46 PM Chapter 2 How To Scan This chapter gives you an overview of the scanning process and some tips for getting the best scan. It also includes step-by-step instructions for scanning with EPSON Scan.
1640XL.book Page 14 Wednesday, November 19, 2003 8:46 PM Placing Your Original Document This section explains how to position a photo or single-page document for scanning. If you’re scanning film or slides, see “Using the Film Guides” on page 37 for instructions on placing your transparencies (you must have the transparency unit installed). If you’re scanning a multi-page document using the optional automatic document feeder, see “Loading Paper in the Automatic Document Feeder” on page 48.
1640XL.book Page 15 Wednesday, November 19, 2003 8:46 PM Using EPSON Scan EPSON Scan provides three scanning modes to give you progressive levels of control over your scanned image: ■ Home Mode: Makes scanning quick and easy. It includes a simple interface, automatic image adjustments, and preset configurations for various types of scans. ■ Office Mode: Includes a basic interface with practical scan settings designed for documents.
1640XL.book Page 16 Wednesday, November 19, 2003 8:46 PM 2. Choose a mode from the Mode list at the top of the EPSON Scan dialog box. If you choose Home Mode, a preview scan opens automatically. (This is the default. If you don’t want an automatic preview, deselect Auto Preview on the EPSON Scan dialog box.) 3.
1640XL.book Page 17 Wednesday, November 19, 2003 8:46 PM 2. If you don’t see an automatic preview of your scan, click Preview. 3. Click the Auto Detect button in the Preview window to automatically select your entire photo or document, or click and drag to create a scanning selection area (marquee). For more information on using marquees, see page 25. If the scanned image in the Preview window has a blue box around it, you’re previewing in thumbnail mode and won’t be able to create a marquee.
1640XL.book Page 18 Wednesday, November 19, 2003 8:46 PM 18 ■ If you’re scanning from an application, the image opens in your application window. Click Close to close the EPSON Scan window. ■ If you’re scanning to your hard drive, you see a File Save Settings window. Type a name for your file in the Prefix field, then choose an image type and click OK. (For more details, see the EPSON Scan on-screen Help.
1640XL.book Page 19 Wednesday, November 19, 2003 8:46 PM Scanning With EPSON Scan in Office Mode 1. Start EPSON Scan and choose Office Mode from the Mode menu (see page 15). You see this dialog box: Select Office Mode 2. Click Preview to see a preview of your scan. 3. Click the Auto Detect button in the Preview window to automatically select your entire document, or click and drag in the Preview window to create a scanning selection area (marquee). For more information on using marquees, see page 25. 4.
1640XL.book Page 20 Wednesday, November 19, 2003 8:46 PM 5. Choose the Document Source: ■ Document Table for documents placed on the scanner’s document table (See page 14.) ■ ADF for documents loaded in the optional automatic document feeder (You must have the automatic document feeder installed to see this option; see page 45.
1640XL.book Page 21 Wednesday, November 19, 2003 8:46 PM ■ If you’re scanning from an application, the image opens in your application window. Click Close to close the EPSON Scan window. ■ If you’re scanning to your hard drive, you see a File Save Settings window. Type a name for your file in the Prefix field, then choose an image type. (For more details, see the EPSON Scan on-screen Help.) Scanning With EPSON Scan in Professional Mode 1.
1640XL.book Page 22 Wednesday, November 19, 2003 8:46 PM 2. Click Preview to see a preview of your scan. 3. Click the Auto Detect button in the Preview window to automatically select your entire document, or click and drag in the Preview window to create a scanning selection area (marquee). For more information on using marquees, see page 25. 4.
1640XL.book Page 23 Wednesday, November 19, 2003 8:46 PM Using Professional Mode To Customize Your Scan 1. Choose a color depth setting from the Image Type menu: ■ ■ ■ 48-bit Color 24-bit Color Color Smoothing ■ ■ ■ ■ 16-bit Grayscale 8-bit Grayscale Halftone Black & White Even though you can choose 48-bit color depth as an option, the Expression 1640XL can produce a maximum color depth of 42 bits. Click to see more options, then choose Best or Draft for the Scanning Quality setting. 2.
1640XL.book Page 24 Wednesday, November 19, 2003 8:46 PM For any of the settings windows above, you can click Reset to go back to the default settings for your image. See the EPSON Scan on-screen help for more information about the Adjustment options. 5. If you want to sharpen the image, select the Unsharp Mask Filter option. Click to see more options, then choose a Level to reduce or increase the effect. 6. Select the Descreening Filter option to reduce the moiré patterns in the image.
1640XL.book Page 25 Wednesday, November 19, 2003 8:46 PM Selecting the Scanning Area in the Preview Window The Preview window lets you select the area of your image that you want to scan with a marquee (a frame that you draw around the previewed image). You can create up to 50 marquees at one time. The currently selected marquee has a moving, dotted line. EPSON Scan adjusts the image quality settings to optimize each selected area.
1640XL.book Page 26 Wednesday, November 19, 2003 8:46 PM ■ To zoom to the selected area, click the Zoom button. If you have multiple marquees, the currently selected one appears in the Zoom preview. ■ To erase a marquee, click the marquee and click the ■ To create multiple marquees of the same dimensions, select one marquee, then click the Duplicate button. ■ To scan all marquees at once, click the All button. Delete button.
1640XL.book Page 27 Wednesday, November 19, 2003 8:46 PM system and hard disk drive when selecting a resolution. To keep your file size manageable, select the lowest possible resolution that gives acceptable quality. (If your final output is for on-screen viewing, you can scan at 72 dpi and reduce your file size.) ■ If you need to scan at a higher resolution, you can reduce the size of the resulting image file by scanning only part of the image.
1640XL.book Page 28 Wednesday, November 19, 2003 8:46 PM Scanning Color Images If the colors in your scanned image don’t match those in your original document, try experimenting with the Document Type/Image Type settings and Image Adjustment settings to adjust the colors. Also, try selecting just the area that you want to scan with a marquee (see page 25). This will let the scanner software choose the optimum color and exposure settings for that part of the image.
1640XL.book Page 29 Wednesday, November 19, 2003 8:46 PM Setting Up the a Start Button You need to assign an application to the a Start button before you use it the first time. If you’re running Windows XP, Windows Me, Windows 2000, or Windows 98, when you press the a Start button you’ll see a window asking you to choose which application to launch. To avoid seeing this window, make sure only one application is assigned to the a Start button. If you’re using Windows XP, continue with the next section.
1640XL.book Page 30 Wednesday, November 19, 2003 8:46 PM Windows XP Follow these steps to assign an application to the a Start button on the scanner: 1. Click the Windows Start button, then click My Computer. 2. Right-click the EPSON Expression 1640XL icon, and then click Properties. 3. Click the Events tab. You see the window to the right. 4. Make sure the Start Button is selected in the Select an event box. 5. Click Start this program and select a program from the list.
1640XL.book Page 31 Wednesday, November 19, 2003 8:46 PM Windows Me, Windows 2000, and Windows 98 Follow these steps to assign an application to the a Start button: 1. Double-click the Scanners and Cameras icon in the Windows Control Panel. 2. Select EPSON Expression 1640XL and click the Properties button. 3. Click the Events tab. You see the window to the right. 4.
1640XL.
1640XL.book Page 33 Wednesday, November 19, 2003 8:46 PM Chapter 3 Using Optional Equipment There are three options available for the EPSON Expression 1640XL color scanner: the transparency unit (B813202), the automatic document feeder (B813212), and the IEEE 1394 FireWire scanner interface card (B808342). You can purchase these options from your reseller or from the EPSON StoreSM at (800) 873-7766 or www.epsonstore.com (U.S. sales only). In Canada, please call (800) 463-7766 for dealer referral.
1640XL.book Page 34 Wednesday, November 19, 2003 8:46 PM Unpacking the Transparency Unit Make sure that all of the following items are included in the transparency unit box. If any items are missing or damaged, contact your EPSON dealer, or contact EPSON at (562) 276-4382 (in the United States) or (905) 709-3839 (in Canada). Keep all the packing materials so you can use them for storage when you are not scanning transparencies.
1640XL.book Page 35 Wednesday, November 19, 2003 8:46 PM Removing the Shipping Screws To prevent damage during shipping, two shipping screws are attached to the transparency unit to secure its lamp assembly. You must remove these screws before using the transparency unit. 1. Turn the transparency unit so the glass side faces up. 2. Use a Phillips head (cross head) screwdriver to remove the shipping screws, as shown at right. 3. Install the screws in the storage holes.
1640XL.book Page 36 Wednesday, November 19, 2003 8:46 PM 4. Align the transparency unit’s pins with the holes in the scanner and lower the unit until it rests securely. 5. Insert the guide pin and adjust pin that came with the transparency unit into the screw holes. Make sure the adjust pin’s arrow faces directly towards the center of the guide pin. Adjust pin Guide pin 6. Place the transparency guide on the scanner’s document table. 7. Gently close the transparency unit.
1640XL.book Page 37 Wednesday, November 19, 2003 8:46 PM 8. Connect the transparency unit’s connector to the option (ADF/TPU) connector at the back of the scanner. Tighten the attached screws to secure the connector. If you haven’t connected the scanner to your computer, see the Start Here sheet for instructions. Then plug the scanner in and turn it on. See Chapter 2 for scanning instructions.
1640XL.book Page 38 Wednesday, November 19, 2003 8:46 PM Loading 35 mm film Follow these steps to load 35 mm positive or negative film: 1. Place the 35 mm filmstrip guide on a flat surface and remove the cover from one of the strip holders. 2. Insert a filmstrip in the holder face down. 3. Replace the strip holder you removed in step 1. 4. Repeat steps 1 through 3 for all the film strips you scan.
1640XL.book Page 39 Wednesday, November 19, 2003 8:46 PM 5. Place the 35 mm filmstrip guide on the document table, and align it with the notch on the transparency guide as shown. 6. Close the TPU and begin scanning. If you’re using EPSON Scan, set the following options: ■ If you’re using Home Mode, select one of the following for the Document Type option: Positive Film, Color Negative Film, or B&W Negative Film.
1640XL.book Page 40 Wednesday, November 19, 2003 8:46 PM Loading 35 mm slides Follow these steps to load 35 mm slides: 1. Load slides in the 35 mm slide holder as shown. Make sure the glossy side of each slide faces down, and the film emulsion layer faces up. 2. Position the slide holder on the document table. Align the slide holder with the notch on the transparency guide as shown. 3. Close the TPU and begin your scan.
1640XL.book Page 41 Wednesday, November 19, 2003 8:46 PM Loading 4 × 5-inch film Follow these steps to load 4 × 5-inch film: 1. Place the 4 × 5-inch film guide on a flat surface and remove the cover from one of the film holders. 2. Insert the film in the film holder, making sure the glossy (smooth) side of the film faces down and the film emulsion layer faces up. Then close the cover. 3. Repeat steps 1 and 2 for all the film you scan. 4. Place the 4 × 5-inch film guide on the document table.
1640XL.book Page 42 Wednesday, November 19, 2003 8:46 PM Loading 120-size or 220-size (medium format) film Follow these steps to load 120-size or 220-size format film: 1. Place the 120/220-size film guide on a flat surface and open the cover for one of the film holders. 2. Insert the film in the film holder, making sure the glossy (smooth) side of the film faces down, and the film emulsion layer faces up. Then close the cover. 3. Repeat steps 1 and 2 for all the film you scan. 4.
1640XL.book Page 43 Wednesday, November 19, 2003 8:46 PM Loading non-standard sized film Follow these steps to load non-standard sized film: 1. Place the film directly on the document table making sure the glossy (smooth) side of the film faces down. Calibration area If the reflective document mat is installed in the transparency unit, remove it. 2. Close the TPU and begin your scan. If you’re using EPSON Scan, set the focus position to 0.0. An area 2±1.
1640XL.book Page 44 Wednesday, November 19, 2003 8:46 PM Scanning Reflective Documents To scan reflective documents with the transparency unit installed, insert the reflective document mat included with the transparency unit. 1. Open the transparency unit. If there’s a film guide or transparency unit on the document table, remove it. 2. Slide the mat into place and insert the tabs into the slots on the transparency unit. 3.
1640XL.book Page 45 Wednesday, November 19, 2003 8:46 PM Adjusting the Transparency Guide Scanning Angle If your scanned image’s edges are at a slight angle, adjust the scanning angle by turning the adjust pin. The direction and degree you adjust the angle depends on your individual scanner and the placement of the document to be scanned. You may want to experiment with this feature to determine the best angle.
1640XL.book Page 46 Wednesday, November 19, 2003 8:46 PM Installing the Automatic Document Feeder Because the automatic document feeder is heavy, you may want to have someone help you with this procedure. Also, the document feeder is large, so be sure to have adequate space around the scanner. Follow the steps below to install the automatic document feeder on your scanner: 1. Make sure your scanner is turned off and unplug the cables. 2.
1640XL.book Page 47 Wednesday, November 19, 2003 8:46 PM 5. Place the two knobs included with the ADF beside the scanner. 6. Align the installation screws with the holes in the ADF and slide together as shown. The ADF is heavy. Ask for assistance when lifting it. 7. Twist the knobs onto the ends of the screws and tighten them using the enclosed screwdriver tool. 8. Attach the ADF’s connector to the scanner’s option (ADF/TPU) interface. Secure the connection by tightening the connector screws.
1640XL.book Page 48 Wednesday, November 19, 2003 8:46 PM 9. Peel the backing from the stopper and from the paper eject support provided with the ADF. Then attach the stopper and paper eject support to the scanner as shown. Insert the tabs on the paper eject support into the slots at the right end of the document table. Stopper Paper eject support There are two stoppers included with the ADF, a light gray one and a dark gray one. Use the light gray stopper, not the dark gray stopper. 10. Close the ADF.
1640XL.book Page 49 Wednesday, November 19, 2003 8:46 PM ■ Is not bound. ■ Has no carbon coating. Follow these steps to load paper: 1. Slide the right edge guides all the way to the right. 2. Make sure that the switch on the lower left corner of the ADF is set with the switch towards the circular mark as shown. 3. Arrange your stack of originals face up.
1640XL.book Page 50 Wednesday, November 19, 2003 8:46 PM Insert the document until it meets resistance. Portrait A Landscape Insert left edge first A Insert bottom edge first If your document is large, slide out the paper support. 4. Slide the edge guides to the edges of your paper. 5. Scan your document. If you’re using EPSON Scan, follow these guidelines: ■ Select either Office Mode or Professional Mode in the Mode box. ■ Select ADF as the Document Source.
1640XL.book Page 51 Wednesday, November 19, 2003 8:46 PM Fixing Paper Jams If a paper jam occurs, follow these steps to clear it: 1. Open the ADF cover to determine where the paper jam occurred. 2. If paper is jammed in the feeder, open the cover on the left and slowly pull out the jammed paper as shown. Open jam release cover Be careful not to pull too hard or the paper may tear, making it more difficult to remove.
1640XL.book Page 52 Wednesday, November 19, 2003 8:46 PM 3. If paper jams in the paper eject position, open the cover on the right and slowly pull out the jammed paper as shown. Right cover Be careful not to pull too hard or the paper may tear, making it more difficult to remove. 4. After removing the jammed paper, close the ADF cover. IEEE 1394 FireWire Scanner Interface Card To use the IEEE 1394 FireWire scanner interface card (B808342), your Power Macintosh must be running Macintosh OS X 10.1.
1640XL.book Page 53 Wednesday, November 19, 2003 8:46 PM Installing the Card in Your Scanner Before you begin, turn off the scanner and disconnect the power cord and any cables. 1. Remove the two screws securing the shield plate to the scanner’s optional interface slot, and then remove the plate. Put the screws in a safe place in case you want to reinstall the shield plate later. Static electricity can damage electronic components like the IEEE 1394 FireWire scanner interface card.
1640XL.
1640XL.book Page 55 Wednesday, November 19, 2003 8:46 PM Chapter 4 Scanner Maintenance This section gives you basic maintenance instructions and tells you how to transport your scanner safely. Transporting the Scanner When you transport the scanner a long distance or store it for an extended time, follow the steps below to secure the carriage. 1. Make sure the transportation lock on the back of the scanner is in the unlocked position. Home position 2.
1640XL.book Page 56 Wednesday, November 19, 2003 8:46 PM 4. Turn the transportation lock at the back of the scanner to the locked position. Locked position If you are using a transparency unit and it is switched on, the scanner carriage will not move to the home position. Remove the transparency unit first, then perform the steps above. See the next section for instructions.
1640XL.book Page 57 Wednesday, November 19, 2003 8:46 PM Cleaning the Scanner To keep your scanner operating at its best, you should clean it periodically. Before cleaning, unplug the power cord. Use a soft cloth to clean the outer case with mild detergent dissolved in water. If the document table glass gets dirty, clean it with a soft, dry cloth. If the glass is stained with grease or other hard-to-remove material, use a small amount of glass cleaner on a soft cloth to remove it.
1640XL.
1640XL.book Page 59 Wednesday, November 19, 2003 8:46 PM Chapter 5 Solving Problems This chapter explains how to interpret the signals from your scanner indicator lights, and gives you the basics for diagnosing and solving scanner problems. It also provides instructions on how to handle scanning quality problems and tells you how to contact EPSON and other software manufacturers. There are additional troubleshooting tips in your electronic EPSON Expression 1640XL Reference Guide.
1640XL.
1640XL.book Page 61 Wednesday, November 19, 2003 8:46 PM Error conditions ERROR light READY light Error type N on N on Command error: The scanner has received incorrect commands from your scanning software. Try rescanning the document. F flashing O off Interface error: Check that your scanner is securely connected to your computer, and then turn the scanner off and back on again.
1640XL.book Page 62 Wednesday, November 19, 2003 8:46 PM Problems and Solutions ■ The IEEE 1394 FireWire interface only supports Macintosh, or Windows Me, 2000, and XP. The Windows operating system must be preinstalled on your system, not upgraded, and the computer must have an OHCI-compliant IEEE 1394 port or card. There is no IEEE 1394 support for Windows 98. ■ If your scanner is connected to a USB hub, try connecting it directly to the computer’s USB port. ■ Make sure your scanner is on.
1640XL.book Page 63 Wednesday, November 19, 2003 8:46 PM ■ If you’ve replaced your SCSI board or changed the SCSI ID, you may need to uninstall and reinstall your scanner software. See the instructions beginning on page 70. ■ Check for IRQ conflicts with built-in options. ■ Windows users: check the System Device Manager in the Windows Control Panel. If there is an Unknown Device icon, select it and click Remove. ■ Macintosh OS 8.6 to 9.
1640XL.book Page 64 Wednesday, November 19, 2003 8:46 PM If you attempt to preview or scan before the scanner is ready, EPSON Scan may stop responding. If this happens, restart your computer. ■ Make sure the scanner’s transportation lock is in the unlocked position. ■ Windows users: check the Device Manager in the Windows Control Panel. If there is an Unknown Device icon, select it and click Remove.
1640XL.book Page 65 Wednesday, November 19, 2003 8:46 PM ■ Make sure your transparency unit or automatic document feeder is closed (lying flat against the document table). computer. Turn both the scanner and computer off, then turn on the scanner before you turn on the computer. ■ If paper is jammed in your automatic document feeder, see “Fixing Paper Jams” on page 51. Make sure the SCSI interface board is installed correctly in your computer.
1640XL.book Page 66 Wednesday, November 19, 2003 8:46 PM resident programs, or have many device drivers, the computer may not have enough memory. (See your software and computer manuals.) If you’re scanning a large image or scanning at a high resolution, your computer may not have enough memory to process the image. ■ Make sure that your software is correctly installed and set up. If all else fails, uninstall your software, then reinstall it. Scanning Problems Your scanned image is faint or has gaps.
1640XL.book Page 67 Wednesday, November 19, 2003 8:46 PM Your scanned image is blurred or distorted. ■ Check the position and condition of your document. Make sure the document is placed flat against the scanner’s document table glass. If only part of the image is blurred, part of your document may be wrinkled or warped. ■ Make sure the document table glass is clean. ■ Make sure the scanner is on a flat, stable surface. The edges of the document aren’t scanned. ■ Check the position of your document.
1640XL.book Page 68 Wednesday, November 19, 2003 8:46 PM A line of dots is missing from the image. ■ When a line of dots is missing from the scanned image on your screen, the scanner sensor has malfunctioned. Contact your EPSON dealer. ■ When a line of dots is missing from your printouts, your printer has malfunctioned. See your printer manual. The colors in your scanned image look different from the colors in the original document.
1640XL.book Page 69 Wednesday, November 19, 2003 8:46 PM Moiré (cross-hatch) patterns appear in the image when you perform halftone scanning. ■ ■ Make the image size slightly smaller. In EPSON Scan, select the Descreening Filter checkbox in Home Mode or the Unsharp Mask Filter checkbox in Professional or Office Mode. ■ Use a transparent sheet between the document and the document table to defocus the image. ■ Reposition the document on the document table.
1640XL.book Page 70 Wednesday, November 19, 2003 8:46 PM Uninstalling and Reinstalling EPSON Scan If you’ve tried every other solution and your system still doesn’t recognize your scanner, try uninstalling and reinstalling the scanner software (EPSON Scan). Follow a procedure below to uninstall EPSON Scan. Windows 1. Double-click the Add or Remove Programs utility in the Windows Control Panel. 2. Select EPSON Scan, and then click the Change/Remove (or Add/Remove) button. 3.
1640XL.book Page 71 Wednesday, November 19, 2003 8:46 PM 4. Double-click EPSON Scan Installer. 5. Enter a name and password in the Authenticate dialog box. 6. Click Accept in the License dialog box. The EPSON Scan Installer window appears. 7. Click Easy Install to drop down the list, and then click Uninstall. 8. Click the Uninstall button. 9. Click Continue and OK on any confirmation messages. 10. Click Quit and then remove the CD-ROM. See the Start Here sheet to reinstall EPSON Scan.
1640XL.book Page 72 Wednesday, November 19, 2003 8:46 PM To speak to a technical support representative, dial (562) 276-4382 (U.S.) or (905) 709-3839 (Canada), 6 AM to 6 PM, Pacific Time, Monday through Friday. Toll or long distance charges may apply.
1640XL.book Page 73 Wednesday, November 19, 2003 8:46 PM Appendix A Specifications This appendix includes general, electrical, environmental, and interface specifications. It also includes specifications for the transparency unit, automatic document feeder, and IEEE 1394 FireWire scanner interface card. Scanner General Scanner type Flatbed, color Photoelectric device Color MatrixCCD™ line sensor Effective pixels 19520 × 27520 pixels at 1600 dpi, 100% scaling Optical density 3.
1640XL.
1640XL.book Page 75 Wednesday, November 19, 2003 8:46 PM Rated current 100 to 120 VAC: 220 to 240 VAC: SCSI Interface 1.2 A 0.
1640XL.book Page 76 Wednesday, November 19, 2003 8:46 PM Option (ADF/TPU) Interface Connector Interface type For use with the optional automatic document feeder (B813212) and transparency unit (B813202) Output voltage 21.6 to 26.4 VDC 4.75 to 5.25 VDC Output current 0.6 A (24 V) 0.
1640XL.book Page 77 Wednesday, November 19, 2003 8:46 PM Automatic Document Feeder (B813212) General Paper input/output Load face up; eject face down Paper quantity 100 pages (55 g/m2 paper, maximum total thickness under 0.
1640XL.
1640XL.book Page 79 Wednesday, November 19, 2003 8:46 PM Appendix B Notices This chapter includes system requirements, safety instructions, your Epson America Limited Warranty, and other important information about your EPSON Expression 1640XL.
1640XL.book Page 80 Wednesday, November 19, 2003 8:46 PM Important Safety Instructions Read all of these instructions and save them for later reference. Follow all warnings and instructions marked on the scanner. ■ Unplug the scanner before cleaning. Clean with a damp cloth only. Do not spill liquid on the scanner. ■ Do not place the scanner on an unstable surface or near a radiator or heat source. ■ Do not block or cover the openings in the scanner’s cabinet. Do not insert objects through the slots.
1640XL.book Page 81 Wednesday, November 19, 2003 8:46 PM Declaration of Conformity According to 47CFR, Part 2 and 15 for Class B Personal Computers and Peripherals; and/or CPU Boards and Power Supplies used with Class B Personal Computers: We: EPSON AMERICA, INC.
1640XL.book Page 82 Wednesday, November 19, 2003 8:46 PM ■ Connect the equipment into an outlet on a circuit different from that to which the receiver is connected. ■ Consult the dealer or an experienced radio/TV technician for help. Warning The connection of a non-shielded equipment interface cable to this equipment will invalidate the FCC Certification of this device and may cause interference levels which exceed the limits established by the FCC for this equipment.
1640XL.book Page 83 Wednesday, November 19, 2003 8:46 PM What This Warranty Does Not Cover: This warranty covers only normal use in the United States and Canada. This warranty does not cover damage to the EPSON product caused by parts or supplies not manufactured, distributed or certified by EPSON. This warranty does not cover third party parts, components or peripheral devices added to the EPSON product after its shipment from EPSON, e.g., dealer-added boards, chips or drives.
1640XL.
1640XL.
1640XL.
1640XL.
1640XL.
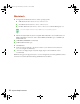
Scanning Overview Network Scanning Scanning Overview Overview Network These are the basic steps you perform when you scan an image. For step-by-step instructions, see Chapter 3. This illustration shows the hardware and software you need to install to use the EPSON Expression s a network scanner. For details, see Chapter 4. 1 Start your host application. 3 5 Start your scanner software. Scanner Server PC * 2 Scan your image.
Scanning Overview These are the basic steps you perform when you scan an image. For step-by-step instructions, 1 Start your host application. 3 5 Start your scanner software. Network Scanning Overview This illustration shows the hardware and software you need to install to use the EPSON Expression as a network scanner. For details, see Chapter 4. Scanner Server PC * 2 Scan your image. Your scanner software closes, and the scanned image appears in your application window.