
User`s guide


Maintenance 84
1. Pressing the # button when the printer is ready to print displays the Maintenance
menu.
Pressing the # button when printing is paused takes you to step 3.
2. Use the d/u buttons to select Cleaning and press the Z button.
3. Choose the nozzles to be cleaned.
All Nozzles
Choose this option if all patterns in the printed nozzle check results contain faint or
missing segments. If you select All Nozzles, proceed to step 5.
Selected Nozzles
Choose this option if only some of the numbered patterns (nozzle arrays) in the printed
nozzle check results contained faint or missing segments. You can select multiple
nozzle arrays.
4. Choose the nozzle arrays to be cleaned.
5. Select a cleaning level and press the Z button.
The menu will close when cleaning is complete. Print a nozzle pattern and inspect the
results to determine whether the problem has been resolved. See “Checking for
Clogged Nozzles” on page 81.
If you paused the printer in step 1, printing will resume when head cleaning is complete;
check the printout to confirm whether the problem has been resolved.
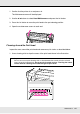
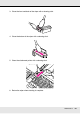
Maintenance Around the Print Head
The printer requires cleaning and part replacement around the print head to maintain print
quality; the maintenance schedule depends on the frequency with which the printer is
used.
Failure to perform appropriate maintenance will shorten product life.
❏ Use the d/u buttons to choose the nozzle arrays with faint or missing segments in the nozzle
check pattern and press the Z button.
❏ After selecting the arrays you wish to clean, select Proceed and press the Z button.