
Service manual


EPSON Stylus Photo 870/1270 Revision B
ADJUSTMENT Adjustment 128
5.2.6 Head angular adjsutment
During production process, tolerance in carriage unit and printhead size
occurs, which may cause the printhead to be installed at an incorrect
angle. Therefore, if you do not make this adjustment, color overlapping is
not performed correctly and color/white line problem occurs as a result.
To change the head angle, use the adjust lever on the right side of the
carriage unit.
You are required to make this adjustment under any of the following
circumstances:
!
You replace the printhead.
!
You replace the carriage unit.
!
You change the adjust lever setting.
The adjustment lets you run a test pattern to which you refer to obtain the
suitable head angle.
1. Loosen the two screws (CBP, 3x6) securing the head fastener to the
carriage and the one screw (CBB Sems W2, 2.5x6) securing the
printhead to the carriage. (Refer to Chapter 4.)
2. Start the service program and get to the main menu.
3. Select
Head angular adjsutment
from the main menu. You see the
Head angular adjustment window.
Figure 5-16. Head Angular Adjustment Window
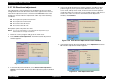
4. From the head angular adjustment menu, select
Print
head angular
adjustment pattern
and click
OK
. The following test pattern prints.
Figure 5-17. Head Angular Adjustment Pattern Example
CAUTION
Before/after this adjustment, perform all necessary
adjustments listed in Table 5-2.