
Service manual


EPSON Stylus Photo 870/1270 Revision B
ADJUSTMENT Adjustment 127
4. Click
OK
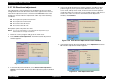
, and the head ID read from the EEPROM appears as in the
example below:
Figure 5-14. Head ID Display Window
5. Click
Continue
to return to the head ID input window.
5.2.5.3 Change Data
1. Start the service program and get to the main menu.
2. Select
Head voltage ID input
from the menu. The head voltage ID
input window appears. (See Figure 5-12.)
3. Select
Change data
and click
OK
. The change data window appears.
4. Type the head ID and click
OK
. You see the typed head ID in the small
window as in the example below:
Figure 5-15. Change Data Window
5. To return to the
Head voltage ID input
menu, click
Continue
. If you
need to continue to the next adjustment, select it from the menu.
CAUTION
The ID input to EEPROM is not effective until the printer is
next turned on.
Type the head ID here.
Head ID is displayed here.