
Service manual


EPSON Stylus Photo 870/1270 Revision B
ADJUSTMENT Adjustment 126
5.2.5 Head voltage ID input
This function lets you write the head ID to the EEPROM on the main
board. You need to make this adjustment if you replace any of the
following parts:
!
Printhead
!
Control board
!
Printer mechanism
5.2.5.1 Where to Find the Head ID
You can find the head ID on the following units.
"
Printhead
A 14-digit head ID is marked on the label at the right of the printhead
as shown in Figure 5-11:
"
Printer mechanism
The head ID is shown on the label attached to the packing box surface
in the same way as for the printhead.
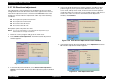
5.2.5.2 Check Present Data
1. Start the service program and get to the main menu.
2. Select
Head voltage ID input
from the main menu. The Head voltage
ID input window appears.
Figure 5-12. Head Voltage ID Input Menu
3. Select
Check present data
and click
OK
. The following window
appears:
Figure 5-13. Check Present Data Window
CAUTION
!
If you replace the printhead, control board, or printer
mechanism, make this adjustment prior to any other
adjustment items.
!
This adjustment is very important to keep good printer
performance. If an wrong ID is input, the printer will
exhibit a dot missing problem or does not print at all.
!
After making this adjustment, perform all other necessary
adjustments listed in Table 5-2.
The ID starts from the top left
and continues to the right.
So, in the example on the
right, the head ID is
“
W2XU3Y2UTK1Q1L
”.
Figure 5-11. Head ID Sample
W2XU3
Y2UTK
1Q1L