
Service manual


EPSON Stylus Photo 870/1270 Revision B
ADJUSTMENT Adjustment 120
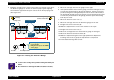
4. Bring the carriage to the center of the printer mechanism. Then place
the thickness gauges (1.14 mm) on the front paper guide aligning
them with the right and left square cutouts in the front paper guide.
(See Figure 5-2.)
Figure 5-2. Placing the Thickness Gauge
5. Move the carriage unit over the gauge on the right.
6. If the printhead does not touch the gauge, turn the bushing to the rear
to make the printhead touch the gauge and then, from the touching
position, bring the bushing back by one notch. On the other hand, if
the printhead already touches the gauge, turn the bushing to the front
to make the printhead touch the gauge, and then push the bushing
back by one notch.
7. Move the PG lever to the rear (+).
8. Move the carriage unit over the thickness gauge on the left.
9. Bring the PG lever to the font (0).
10. Make the adjustment as in the same manner as in step 6.
11. Bring the PG lever to the rear (+).
12. Move the carriage back over the thickness gauge on the right.
13. Move the PG lever back to the front (0).
14. Make the adjustment again on the right parallelism adjustment
bushing. If the result is good, the adjustment is completed.
15. Fix the both bushings with screws.
CHECK
PO INT
!
To move the carriage unit, pull the timing belt with your
hand.
!
Be careful not to damage the CR scale (linear encoder).
Cutout
Thickness
Gauge
Carriage Unit
Left Edge
Right Edge
(Home Position Side)
Front Paper Guide
PF Roller
Front Paper Guide
Gauge Aligning Position
Cutout
• Set the gauge on the horizontal
top of the ribs.
• Bring the rib tops to the middle
of the gauge.