
User Setup Information

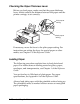


Testing the Printer
Before continuing, test the printer to ensure it is functioning
properly. For the self test, use paper that is at least 8.25 inches
(210 mm) wide.
1. Press the
POWER
switch to turn off the printer.
c
Caution:
Never turn off the printer by unplugging it or turning off
a power strip. Always turn off the printer by pressing the
POWER
switch.
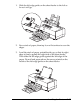
2. Hold down the
Load/Eject
button while you press the
POWER
switch to turn on the printer. Keep holding down
Load/Eject
until the printer feeds a page.
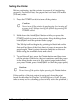
The 360 dpi self test begins by printing in black ink on the
first and last lines of the first sheet of paper to measure the
page length. Then it prints character samples on the next
sheet using the available fonts and colors.
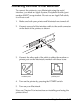
3. To end the self test, press the
Pause
button and then turn
off the printer. Otherwise, the test continues until the paper
in the sheet feeder runs out. (If a partial page feeds before
you press
Pause
, press
Load/Eject
to clear the paper path.)
c
Caution:
Do not turn off the printer before pressing the
Pause
button.
If the quality of the test output is not good, clean the print
heads as described in Chapter 3 of the
Reference Guide
. (It may
take as many as five cleaning cycles to fully solve the problem.)
1-12
Installing the Printer