
User Setup Information

Removing the Protective Materials
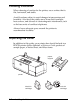
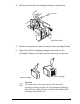
You must remove all protective materials packed around and
inside your printer before you set it up and turn on the power.
Save all packaging and protective materials in case you need to
transport the printer in the future. It should always be
transported in its original packaging or equivalent materials.
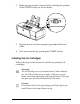
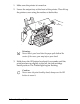
First remove the transportation screw securing the print head
to the carriage. Flip down the output tray and lift up the
printer cover. Loosen the transportation screw by turning its
handle counterclockwise; then lift it off the carriage. Save the
screw so you can reinstall it if you transport your printer later.
(See Chapter 3 of the
Reference Guide
for more information on
transporting the printer.)
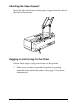
Follow the directions on the Notice Sheet (packed with the
printer) to remove the rest of the protective materials.
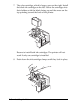
Setting Up the Printer
The following installation procedures describe how to set up
and test the printer before you connect it to your PC. Refer to
the illustrations on the inside front cover of this manual to
identify the main components while setting up the printer.
Installing the Printer
1-3