COLOR INK JET PRINTER Setup and Software Guide for Windows ® All rights reserved. No part of this publication may be reproduced, stored in a retrieval system, or transmitted in any form or by any means, electronic, mechanical, photocopying, recording, or otherwise, without the prior written permission of Seiko Epson Corporation. No patent liability is assumed with respect to the use of the information contained herein.
FCC Compliance Statement For United States Users This equipment has been tested and found to comply with the limits for a Class B digital device, pursuant to Part 15 of the FCC Rules. These limits are designed to provide reasonable protection against harmful interference in a residential installation. This equipment generates, uses, and can radiate radio frequency energy and, if not installed and used in accordance with the instructions, may cause harmful interference to radio or television reception.
Contents Introduction Getting the Most Out of Your Printer . Three Resolutions to Choose From Special Papers . . . . . . . . . . . . Specially Formulated Ink . . . . . . Automatic Printer Driver Settings . If You Are New to Color Printing . . . Where to Get Help . . . . . . . . . . . Electronic Support Services . . . . Important Safety Instructions . . . . . . . . . . . . . . . . . . . . . . . . . . . . . . . . . . . . . . . . . . . . . . . . . . . . . . . . . . . . . . . . . . . . . . . . . . . . .
Chapter 2 Installing and Using the Printer Driver Installing the Windows Printer Software . . . . . . Installing the Printer Software for Windows 3.1 Installing the Printer Software for Windows 95 Installing a Driver for DOS Programs . . . . . . . . Using the Windows Printer Driver . . . . . . . . . . Accessing the Driver . . . . . . . . . . . . . . . . Using the Driver Dialog Box . . . . . . . . . . . Changing Settings . . . . . . . . . . . . . . . . . Document Type . . . . . . . . . . . . . . . . . . .
Introduction The EPSON® Stylus® COLOR II is an affordable, high-quality ink jet printer that can print up to 16 million colors at a resolution of 720 × 720 dpi to produce full-color, photo-quality images. The printer also produces realistic grayscale images, sharp text, and line art. The printer’s ink jet technology allows it to operate quietly, keeping your workspace peaceful. The Stylus COLOR II is easy to install and use.
Getting the Most Out of Your Printer The printer supports a wide variety of settings that let you improve print quality or speed up printing. You can customize these settings using the printer driver to produce a variety of image types with EPSON’s specially formulated inks and papers. Three Resolutions to Choose From Resolution is a measure of the amount of detail that can be represented. The higher the resolution, the more detailed and realistic the image, and the longer it takes to print.
Specially Formulated Ink EPSON’s black and color ink cartridges are specially formulated to work with EPSON papers and the driver to deliver the best looking images. Always use genuine EPSON ink cartridges and do not refill them. Other products may cause damage not covered by EPSON’s warranty. Automatic Printer Driver Settings The printer driver includes an automatic Document Type option that sets the Ink, Color Matching, and Halftone printer driver settings for you, as described in Chapter 2.
❑ Color printing takes time because of the complex processing required to create a color image. How much time depends on the size and type of your image, the resolution you use, the speed of your computer, and the interface type. (Serial printing takes longer than parallel printing.) However, the fantastic results make the time spent well worth it.
Where to Get Help If you purchased your printer in the United States or Canada and you need technical assistance, you can call an EPSON Color Specialist at (800) 788-0343.
Electronic Support Services If you have a modem, the fastest way to access helpful tips, specifications, drivers, application notes, DIP switch or jumper settings, and bulletins for EPSON products is through the online services below. World Wide Web If you are connected to the Internet and have a Web browser, you can access EPSON’s World Wide Web site at http://www.epson.com. EPSON’s home page links users to What’s New, EPSON Products, EPSON Connection, Corporate Info and EPSON Contacts.
This membership entitles you to: ❑ An introductory credit on CompuServe ❑ Your own user ID and password ❑ A complimentary subscription to CompuServe Magazine, CompuServe’s monthly publication. To take advantage of this offer, call (800) 848-8199 in the United States and Canada and ask for representative #529. In other countries, call the following U.S. telephone number: (614) 529-1611, or your local CompuServe access number.
❑ If you use an extension cord with the printer, make sure the total ampere rating of the devices plugged into the extension cord does not exceed the cord’s ampere rating. Also, make sure the total of all devices plugged into the wall outlet does not exceed 15 amperes. ❑ Except as specifically explained in the Reference Guide, do not attempt to service the printer yourself.
Chapter 1 Installing the Printer This chapter tells you how to do the following to get your printer up and running: ❑ Make sure your computer system meets the recommended requirements for use with the printer ❑ Choose the best possible location for your system ❑ Unpack your printer ❑ Set up the printer for use ❑ Connect the printer to your computer. System Requirements To use your printer and its driver, we recommend you have: ❑ 80386/25 MHz or faster processor ❑ Microsoft Windows 3.
Choosing a Location When choosing a location for the printer, use a surface that is flat, horizontal, and stable. Avoid locations subject to rapid changes in temperature and humidity. Also keep the printer away from direct sunlight, heat sources, and sources of electromagnetic interference, such as the base units of cordless telephones. Always leave adequate space around the printer to accommodate its cables.
Removing the Protective Materials You must remove all protective materials packed around and inside your printer before you set it up and turn on the power. Save all packaging and protective materials in case you need to transport the printer in the future. It should always be transported in its original packaging or equivalent materials. First remove the transportation screw securing the print head to the carriage. Flip down the output tray and lift up the printer cover.
Attaching the Paper Support Insert the tabs on the base of the paper support into the slots at the back of the printer. Plugging In and Turning On the Printer Follow these steps to plug in and turn on the printer: 1. Make sure you have removed all protective packing materials from inside the printer. (See page 1-3 for more information.
2. Make sure the printer is turned off by checking the position of the POWER switch, as shown below. 3. Plug the power cord into a properly grounded electrical outlet. 4. Turn on the printer by pressing the POWER switch. Installing the Ink Cartridges Follow the steps in this section to install your printer’s ink cartridges. w Warning: The ink cartridges are self-contained units. Under ordinary use, ink will not leak from a cartridge. If ink gets on your hands, wash them thoroughly with soap and water.
1. Make sure the printer is turned on. 2. Lower the output tray at the front of the printer. Then lift up the printer cover using the notches at both sides. 2 1 w Warning: Never insert your hand into the paper path behind the center of the cover; you may injure your hand. 3. Hold down the Alt button for about five seconds until the print head moves slightly to the left, the ink cartridge install position. The Pause light begins flashing.
4. Pull up each of the ink cartridge clamps to open them. protective sheet 5. Remove the protective sheet from the color cartridge holder. 6. Open the foil ink cartridge packages and take out the cartridges. Remove the tape seal from the top of each one. black cartridge c color cartridge Caution: You must remove the tape seal from the top of the cartridges; leaving the tape on will permanently damage them. Do not remove the tape seal from the bottom of the cartridge; ink will leak out.
7. The color cartridge, which is larger, goes on the right. Install the black ink cartridge on the left. Lower the cartridges into their holders with the labels facing up and the arrow on the top pointing toward the back of the printer. Be sure to install both ink cartridges. The printer will not work if only one cartridge is installed. 8. Push down the ink cartridge clamps until they lock in place.
c Caution: Once you install the ink cartridges, do not open the clamps or remove the cartridges except to replace them with new ones. Once you remove a cartridge, do not reuse it. Reusing a cartridge that has been removed may damage the print head. 9. Press the Alt button again to return the print head to its home position. (Even if you do not press Alt, the print head moves back to its home position about 30 seconds after you close the clamps.
Checking the Paper Thickness Lever Before you load paper, make sure that the paper thickness lever, which controls the distance between the paper and the printer carriage, is set correctly. thick paper setting plain paper setting If necessary, move the lever to the plain paper setting. For instructions on setting the lever for special paper or other media, see Chapter 1 of the Reference Guide. Loading Paper The following procedure explains how to load plain bond paper.
1. Slide the left edge guide on the sheet feeder to the left as far as it will go. 2. Fan a stack of paper; then tap it on a flat surface to even the edges. 3. Load the stack of paper, printable side up, so that its right edge is firmly against the right side of the sheet feeder. Then slide the left edge guide against the left edge of the paper. Do not load paper above the arrow printed on the inside of the left edge guide on the sheet feeder.
Testing the Printer Before continuing, test the printer to ensure it is functioning properly. For the self test, use paper that is at least 8.25 inches (210 mm) wide. 1. Press the POWER switch to turn off the printer. c Caution: Never turn off the printer by unplugging it or turning off a power strip. Always turn off the printer by pressing the POWER switch. 2. Hold down the Load/Eject button while pressing the POWER switch to turn on the printer.
Connecting the Printer to Your PC You need a shielded, twisted-pair parallel cable (6 to 10 feet long) to connect your computer to the printer’s built-in parallel interface. The cable must have a D-SUB, 25-pin male connector for your computer and a 36-pin, Centronics compatible connector for the printer. 1. Make sure both the printer and computer are turned off. 2. Plug the 36-pin end of the cable securely into the printer’s interface connector.
1-14 Installing the Printer
Chapter 2 Installing and Using the Printer Driver This chapter describes how to install the Windows printer driver and its utilities and how to use the driver to control printer settings such as media type, document type, printing mode, and halftoning. (To install a driver for DOS programs, see page 2-7.) Installing the Windows Printer Software A printer driver is software that allows your computer to control the printer. You must install a printer driver to use the printer.
Installing the Printer Software for Windows 3.1 Follow these steps to install the printer software for Windows 3.1: 1. Turn on your printer and computer. 2. Make sure Windows is running. 3. Insert the Windows printer driver diskette in a diskette drive. 4. In the File menu, select Run. You see the Run dialog box. 5. In the Command Line box, type A:SETUP (or B:SETUP if you inserted the diskette in drive B). Press Enter or click OK. You see the EPSON Printer Driver Setup dialog box. 6.
Note: If you installed the printer driver using Windows 3.1 and will upgrade to Windows 95, be sure to reinstall the driver using the steps beginning on page 2-4 after you install Windows 95. This sets up the driver correctly for Windows 95. Now you can access the driver from your Windows programs to control your printer settings; see page 2-7 for instructions.
9. Click Close to exit the Printers dialog box. 10. Exit the Control Panel. See page 2-7 for instructions on using the printer driver. Installing the Printer Software for Windows 95 Follow these steps to install the printer driver using the Windows 95 plug-and-play capabilities. Then follow the steps in the next section to run the EPSON Printer Driver Setup program to install the printer driver utilities and create an EPSON folder on your hard disk. 1.
8. If you inserted the diskette in drive A, click OK. Otherwise, change the drive letter in the Copy manufacturer’s files from box and click OK. You see the Select Device screen. 9. Make sure your printer model name is selected in the Models pull-down list and click OK. 10. At the next screen you can give the printer a unique name. We recommend that you keep the model name, but you can type a new one in the Printer name box, if desired.
Running the setup program Follow these steps to install the printer software and create an EPSON folder on your hard disk: 1. If necessary, insert the Windows printer driver diskette in a diskette drive. 2. Click Start; then select Run. You see the Run dialog box. 3. In the Open pull-down menu, type A:SETUP (or B:SETUP if the disk is in drive B), and click OK. You see the EPSON Printer Driver Setup dialog box. 4. Highlight your printer model name in the Printer Driver pull-down menu and click Continue. 5.
Installing a Driver for DOS Programs Most DOS software programs include drivers for EPSON ESC/P 2 printers. If the Stylus COLOR II driver is not listed in your software, choose the first printer available in the lists below. Also check with your software manufacturer to see if a Stylus COLOR II driver is available or is included with a new version of your software.
The driver includes an Automatic option (default) for the Document Type setting. This option lets the printer driver analyze each page of the document you will print and select the appropriate printing mode (resolution), color matching, and halftoning settings automatically. Accessing the Driver You can access the driver in different ways, depending on how you want to use the settings you select.
2. Double-click the Printers icon. 3. Double-click the EPSON Stylus COLOR II icon. 4. Pull down the Printer menu and select Properties. 5. Click the Details tab. 6. Click the Setup button. You see the printer driver dialog box shown on page 2-10. Accessing the driver from Windows applications You can access the driver by choosing Print or Print Setup from the File menu of your software program. If you choose Print Setup, you access the printer driver directly and see the dialog box shown on page 2-10.
The Print dialog box contains the settings you change most often, including the number of copies and the print range. To access the printer driver settings, choose the Printer, Setup, or Options button. (You may need to select another option, depending on your software program. Note: The printer driver settings you select through your Windows application apply only for the duration of your session with that application.
At the top of the screen are tabs that open various dialog boxes. The following table summarizes the settings in each dialog box. (Factory defaults are in bold type.) Detailed descriptions of each setting follow the table.
* Dialog box Setting Options Image Settings Brightness –50% - 0% - +50% Contrast –50% - 0% - +50% Color Matching * Off Vivid Photo-realistic Standard Halftoning Halftone * No halftoning Error diffusion Dithering A Dithering B About — Gives driver version information These options have no default setting; the setting is determined automatically depending on the Document Types setting. Changing Settings To change a printer setting, open the appropriate dialog box by choosing the tab.
Document Type These settings tell the printer what type of document you are printing and whether to print in monochrome (black) or color. Document Types Select the document type that most closely matches the type of document you will be printing or let the printer driver select it automatically. Automatic is the default setting and produces the best printed results.
Each of the manually set document types select predefined settings for Color Matching and Halftone, as listed in the following table. Document Types setting Color Matching setting Halftone setting Presentation Vivid Error diffusion Photograph Photo-realistic Error diffusion Drawing Standard Error diffusion Text Standard Error diffusion If you change a predefined Color Matching or Halftone setting, the driver erases the currently selected document type and uses your settings instead.
Paper Settings The Paper settings determine the size of the document, its orientation, and copying information. Paper Size By default, the printer expects letter-size (8.5 × 11 inches) paper.
Portrait or Landscape Select either the Portrait or Landscape button to specify the orientation of the image on the page. In portrait orientation, the top of the page is parallel with the short edge of the paper. In landscape orientation, the top of the page is parallel with the long edge of the paper. Normally you should select the page orientation in your software application, not with the driver. Paper source For your printer, the paper source is always Auto Sheet Feeder.
Printing Mode setting Super - 720 dpi Best - 360 dpi Draft - 180 dpi * Media Type setting Default Print Options * Special coated paper for 720 dpi MicroWeave On High Speed Off High quality glossy paper MicroWeave On High Speed Off Plain paper MicroWeave On High Speed Off Special coated paper for 360 dpi MicroWeave On High Speed Off Special coated paper for 720 dpi MicroWeave On High Speed Off Plain paper MicroWeave Off High Speed On Transparency MicroWeave On High Speed Off Plain paper
When speed is important and draft quality is good enough, use Draft - 180 dpi resolution. Note: Printing at lower resolutions also conserves ink. Media Type Sets up the printer for the type of paper you loaded. Depending on your Printing Mode setting, Media Type can be one of the following: Plain paper Special coated paper for 360 dpi Special coated paper for 720 dpi High-quality glossy paper Transparency For specific information on when to use each media type, see Chapter 1 of the Reference Guide.
Note: If the vertical lines appear misaligned when you print using High Speed mode, calibrate the printer as described in Chapter 3. Image Settings The Image Settings options allow you to adjust the brightness, contrast, and color correction features of your printed images. Whenever possible, use your software program to make these adjustments. If you use the printer driver, it is best to let its Automatic Document Types setting select the appropriate image settings for you.
Contrast Controls the degree of difference between the light and dark areas of an image. When you increase contrast, the light areas become very light and the dark areas become very dark. When you decrease contrast, the difference in intensity is more subtle, making the whites and bright colors more muted and the blacks appear very dark gray. Color Matching Controls the printer’s color correction features based on the selected Document Type.
Halftoning Settings You achieve the best halftoning results when you let the printer driver’s Document Type setting select the appropriate halftone method. If you selected the Automatic document type option, the driver selects the halftone setting appropriate to each page as it prints. If you selected one of the other document types, the driver selects a predefined halftone setting.
2-22 Installing and Using the Printer Driver
Chapter 3 Using the Printer Driver Utilities This chapter explains how to manage print jobs that you send to the printer using the EPSON Spool Manager. It also tells you how to calibrate the printer using the Bi-D Calibration Utility if vertical lines in your printed output become misaligned. When you install the printer driver, the EPSON Spool Manager is automatically copied to your hard disk drive. You can copy the Bi-D Calibration Utility to your hard disk or run it from the diskette when needed.
The Despooler status box, which is similar to the one shown below, allows you to monitor the progress of the print job and cancel ( ), pause ( ), or restart ( ) the print job. If you do not want the Despooler status box to appear each time you print, double-click the EPSON Spool Manager icon to open it. Then open the View menu and select Show Despool Popup to turn it off; the check mark next to the option disappears.
Note: If you get error messages while trying to print, the problem may be caused by conflicts with other temporary files or directories. See “Troubleshooting” in Chapter 4 of the Reference Guide for more information. Calibrating the Printer with Bi-D Calibration Your printer has been calibrated at the factory so that vertical lines in your text and graphics are properly aligned. If you notice misaligned images in printouts, however, you can calibrate the printer with the Bi-D Calibration Utility.
4. In the Command Line field (Windows 3.1) or Open field (Windows 95), type the disk and directory for the utility (such as A:CALIBRAT or C:\directory\CALIBRAT if on your hard disk). Then press Enter or choose OK. 5. When you see the Calibration Utility screen, verify that Stylus COLOR II is selected as the printer for calibration. If it isn’t, use ↑ or ↓ to select it. Also make sure Print calibration pattern is selected at the bottom of the screen. (Use the Tab key to move down, if necessary.) 6.
Index A About tab, printer driver, 2-12 Accessories, purchasing, Intro-5 Aligning vertical lines, 2-19, 3-1, 3-3–4 Auto sheet feeder, 1-11–12, 2-11, 2-16 Automatic option, Intro-3, 2-8, 2-11, 2-13, 2-19–21 B Banding, 2-18 Bi-D Calibration Utility, 2-1, 3-1, 3-3–4 Bidirectional printing, 2-18 Black ink cartridge, see Ink cartridges Brightness setting, 2-12, 2-19 Bulletin Board Service, Intro-6 C Cable, printer, 1-13 Calibrating the printer, Intro-4, 2-19, 3-1, 3-3–4 Canceling print jobs, 3-2 Cartridges, se
F L Fast printing, 2-18 Feeder, see Auto sheet feeder Film, see Transparencies Landscape setting, 2-11, 2-16 Left edge guide, 1-11 Lever, paper thickness, 1-10 Lines, aligning, see Vertical lines, aligning Location, choosing for printer, 1-2 G Glossy paper, Intro-2, 2-11, 2-17–18 Grayscale, Intro-1, 2-14, 2-18 H Halftoning settings, Intro-3, 2-12–14, 2-21 Hard disk space, Intro-3, 1-1 Help, where to get, Intro-5 High Speed mode, 2-11, 2-17–19 Humidity, 1-2 I Image settings, 2-12, 2-19–20 Ink conservin
P Page order, reverse, 2-11, 2-16 Paper centered, 2-15 coated, Intro-2, 2-11, 2-17–18 copies setting, 2-11, 2-16 glossy, Intro-2, 2-11, 2-17–18 height, 2-15 loading plain paper, 1-10–11 ordering EPSON, Intro-2 orientation setting, 2-11, 2-16 printable area, 2-15 printable surface, 1-10 samples, 1-2 selecting size, 2-15–16 selecting type, 2-11, 2-16–18 source setting, 2-11, 2-16 special, Intro-2, 2-11, 2-18 transparencies, 2-11, 2-18 user-defined option, 2-15 width, 2-15 Paper support, 1-2, 1-4 Paper thickne
Printing Mode setting, 2-11, 2-13, 2-16–18 Protective materials, removing, 1-3 Q Quality, improving, Intro-2, 1-9, 2-18 R RAM requirements, 1-1 ReadMe icon, Intro-1, 2-12 Reference Guide, Intro-1, 1-2 Requirements, system, 1-1 Resolution definition, Intro-2 selecting, 2-11, 2-13, 2-16–18 Restarting print jobs, 3-2 Reverse page order, 2-11, 2-16 RGB method, Intro-4 S Safety instructions, Intro-7 Scanners, Intro-4 Self test, 1-12 Serial interface, Intro-1 Service, Intro-5–6 Sheet feeder, auto, 1-11–12, 2-1
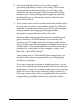
Printer Parts sheet feeder paper support control panel notch printer cover notch output tray extension paper thickness lever power switch output tray serial interface connector parallel interface connector ink cartridge clamps thickness adjustment lever