
User's Manual


Table Of Contents
- Contents
- Introduction to Your Printer
- Wi-Fi or Wired Networking
- Media Handling
- Printing from a Computer
- Printing with Windows
- Selecting Basic Print Settings - Windows
- Selecting Print Layout Options - Windows
- Selecting Advanced Settings - Windows
- Selecting Additional Settings - Windows
- Printing Your Document or Photo - Windows
- Saving, Sharing, and Customizing the Printer Settings
- Selecting Default Print Settings - Windows
- Changing the Language of the Printer Software Screens
- Changing Automatic Update Options
- Printing with the Built-in Epson Driver - Windows 10 S
- Printing on a Mac
- Printing CAD Drawings
- Printing with Windows
- Printing from a USB Memory Device
- Using Your Printer as a Copier
- Using the Control Panel Menus
- Replacing Ink Cartridges and Maintenance Boxes
- Adjusting Print Quality
- Maintenance and Transportation
- Solving Problems
- Technical Specifications
- Notices
52
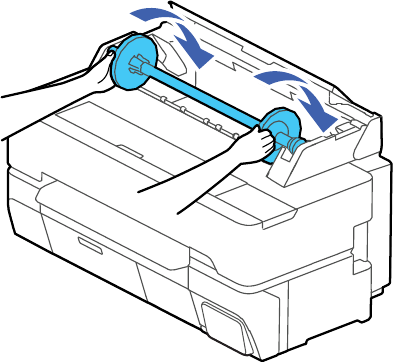
8. Place the spindle back into the printer.
9. Close the roll paper cover and the cut sheet cover.
Note: To prevent dust from accumulating inside the printer, always keep the roll paper cover and cut
sheet cover closed unless you are loading or unloading media.
Parent topic: Roll Paper Handling
Loading Single Cut Sheets
You can print on a variety of cut sheet paper types and sizes up to 24 inches (61 cm) [SureColor T3475]
or 36 inches (91 cm) [SureColor T5475] wide and 0.1 inch (0.3 mm) thick. You can load and print on one
sheet at a time.
Before printing on cut sheets, remove any loaded roll paper.
1. Make sure Load paper is displayed on the home screen. If it is not shown, make sure to remove any
roll paper or cut sheet paper from the printer.
2. Select Paper Setting > Cut Sheet (1 sheet) on the LCD screen.