
Operation Manual


D
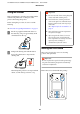
Hold the cartridge horizontally and shake it in
both directions about 5 cm 15 times in 5 seconds.
In the case of OR, WH, or MS, shake it well
approx. 50 times in 15 seconds.
E
Match the color of the cartridge to the color of
the label on the printer and insert.
F
Lower the lock lever to engage the latch.
Repeat Steps 2 to 6 to replace other ink cartridges.
c
Important:
Install all ink cartridges into each slot. You
cannot print if any of the slots are empty.
DisposalU “Disposal of used consumables”
on page 75
Disposing of Waste Ink
Preparing and Replacement
Timing
Prepare empty waste ink bottle. is displayed
Prepare a new Waste Ink Bottle as soon as possible.
When you want to replace the Waste Ink Bottle at this
stage due to night operations and so on, select Replace
Ink Bottle from the setup menu, and then replace the
bottle. If you perform the replacement without
selecting Replace Ink Bottle, the waste ink counter
will not operate correctly.
Maintenance menu U “The Maintenance Menu” on
page 100
Waste Ink Counter U “Waste Ink Counter” on
page 69
c
Important:
During printing or while the printer is running
the operations shown below, do not remove the
Waste Ink Bottle unless instructed to do so by the
on-screen instructions. Failure to observe this
precaution could cause ink to leak.
❏ Head Cleaning
❏ Head Washing
❏ Pre-Storage Maint.
Replace waste ink bottle and press . is displayed
Replace the Waste Ink Bottle with a new bottle
immediately.
Replacement procedure U “Replacing the Waste Ink
Bottle” on page 69
SC-S80600 Series/SC-S60600 Series/SC-S40600 Series User's Guide
Maintenance
68