User’s Guide 1
No part of this publication may be reproduced, stored in a retrieval system, or transmitted in any form or by any means, electronic, mechanical, photocopying, recording, or otherwise, without the prior written permission of Seiko Epson Corporation. The information contained herein is designed only for use with this Epson product. Epson is not responsible for any use of this information as applied to other products.
Contents Introduction Warnings, Cautions, and Notes. . . . . . . . . . . . . . . . . . . 5 Chapter 1 Getting Started Unpacking Your Camera. . . . . . . . . . . . . . . . . . . . . . . . . . . . . . 6 Camera Parts and Functions. . . . . . . . . . . . . . . . . . . . . . . . . . . 7 Attaching the Strap to the Camera . . . . . . . . . . . . . . . . . . . . 11 Using the Battery . . . . . . . . . . . . . . . . . . . . . . . . . . . . . . . . . . . 11 Charging the Battery . . . . . . . . . . . . . . . . . . . . .
Chapter 4 Customizing the Settings Accessing the Settings Menu . . . . . . . . . . . . . . . . . . . . . . . . . .33 Setting Items . . . . . . . . . . . . . . . . . . . . . . . . . . . . . . . . . . . . . . . .33 Settings Menu. . . . . . . . . . . . . . . . . . . . . . . . . . . . . . . . . .33 Basic Setup Menu . . . . . . . . . . . . . . . . . . . . . . . . . . . . . .34 Chapter 5 Opening RAW Images on Your Computer Software Overview . . . . . . . . . . . . . . . . . . . . . . . . . . . . . . . . . .
Introduction The Epson R-D1s offers the convenience of digital imaging technology with the classic features of a traditional rangefinder camera to produce high-quality photographs and an enjoyable shooting experience. Traditional rangefinder design If you are already familiar with rangefinder photography, you will be up to speed in no time with the R-D1s.
Chapter 1 Getting Started Unpacking Your Camera Make sure you have these items: 6 Camera body Lens hole cover Battery Strap Getting Started Battery charger Power cord (for battery charger) Quick Reference Guide CD-ROM
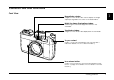
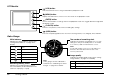
Camera Parts and Functions 1 Front View 1 Rangefinder window Images from this window are used to display the image superimposing field in the center of the finder frame. 1 Bright-line frame illumination window Receives light to illuminate bright-line frames in the viewfinder. 1 Viewfinder window Images from this window are displayed in the viewfinder. 1 X-sync contact 1 Used to connect an external flash unit. (See the flash’s manual for details on how to attach the flash.
Top View Power switch Shutter charge lever Switches the power on or off. (See “Turning the Camera On and Off” on page 18 for details.) Used to cock the shutter before taking each picture. (See “Cocking the Shutter” on page 18 for details.) Shutter speed/ISO sensitivity dial Sets the shutter speed, exposure compensation (in AE mode), and ISO sensitivity (when pulled up). (See “Setting the Exposure” on page 21 and “Setting ISO Sensitivity” on page 20 for details.
Back View 1 Rangefinder eyepiece Used to compose your pictures and to focus on the subject. 1 AE-lock button Locks the shutter speed at the metered value when using automatic exposure. (See “Locking the Exposure Setting (AE-lock)” on page 23 for details.) 1 Image quality/WB lever Used when setting image quality or white balance. (See “Setting White Balance” on page 19 and “Setting Image Quality” on page 19 for details.
LCD Monitor (LCD) button Switches between the shooting mode and the playback mode. (MENU) button Displays the Main menu on the LCD monitor when in the playback mode. (ENTER) button Sets the selected item or settings when in the playback mode. Also toggles between single and tile display modes. (CANCEL) button Returns to the previous menu without making any settings. (USER) button Executes the preassigned function from the following: Delete, Lock, Magnify, Print, and Film.
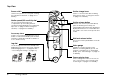
Attaching the Strap to the Camera 1. 4. Lace the strap end through the two plastic fasteners. 1 Remove the protective pads and metal rings from the strap. 1 Metal ring 1 Protective pad 2. Attach the protective pad and the metal ring to one side of the camera. 5. Repeat these steps to attach the other end of the strap to the other side of the camera. 1 Using the Battery c 3. Lace the end of the strap through the holes in the protective pad and the metal ring.
1. 12 Connect the power cord to the battery charger, then plug it into an electrical outlet. Getting Started 2. Insert the battery into the battery charger with the terminal end first. The red indicator light on the charger lights up to indicate the battery is being charged. 3. When the indicator light turns off, the battery is fully charged. Remove the battery from the charger. 4. Disconnect the battery charger from the power outlet.
Installing the Battery in the Camera 1. Make sure the camera’s power switch is in the Off position, then open the battery cover. Using a Memory Card You cannot take pictures unless a memory card is installed in the camera. The camera accepts SD memory cards of up to 2 GB capacity. c Caution: ❏ Make sure there is no dirt or dust on the memory card terminal. If it is dirty, you may not be able to read from or write to the card.
Inserting a Memory Card Removing the Memory Card 1. 1. Make sure that the memory card is not locked. Slide the write protect switch to unlock the card if needed. Make sure the memory card access light is off, then open the memory card slot cover. Write protect switch DUMMY 2. Make sure that the memory card access light is off, then open the memory card slot cover. Insert the memory card all the way into the slot until it clicks. 2. DUMMY 3.
Mounting and Removing Lenses Mounting an M-mount Lens 1. Align the dot on the lens with the red dot on the lens release button. The camera accepts a wide variety of M-type bayonet mount (M-mount) lenses. You can also use L-type screw mount (L-mount) lenses by attaching a third-party adapter ring. 1 Incompatible Lenses 1 Certain lenses are not compatible with the camera due to physical constraints: ❏ Lenses that project more than 20.5 mm into the camera body.
Removing an M-mount Lens 1. Press the lens release button and turn the lens body counterclockwise. Mounting and Removing an L-mount Lens For an L-mount lens, you need an optional M-bayonet adapter ring. Attach the adapter ring to the lens, then install the lens on the camera as you would an M-mount lens. When you want to remove the lens, the procedure is the same as for an M-mount lens.
Determining the Effective Focal Length 1 The CCD sensor in this camera is an APS-C size, about 34% smaller than the area covered by a 35 mm film. This effectively increases the working focal length of the attached lens by 1.53x to produce the equivalent 35 mm focal length. 1 For example, if you use a 50 mm lens with this camera, the effective focal length would be 50 × 1.53 = 76.5 mm.
Chapter 2 Taking Photos Turning the Camera On and Off Turn on Turn off DUMMY When you turn on the camera the first time, you need to set the current date (month, day, and year) and time (hours and minutes) on the LCD monitor. Once these settings are made, the camera automatically records the date and time for each picture taken. For instructions, see “Setting the Time and Date” on page 39. c 18 Caution: Never turn off the power while the memory card access light is on.
The selected setting is indicated on the status gauge: Setting White Balance Setting The white balance feature adjusts the camera for different types of ambient light. You can either set the white balance to be adjusted automatically, or select the particular setting to suit the ambient light type. 1. A (Auto) Pull down and hold the image quality/WB lever at the WB position. 3.
JPEG is a universal image format that can be viewed on most computers without using proprietary software. Files saved in JPEG format are compressed and smaller than those saved in RAW format. They do lose varying degrees of picture quality when compressed, and are less suited for postprocessing because resaving a JPEG file further degrades its quality. JPEG format is fine for viewing on a regular computer screen and can also produce good quality prints if saved in a high enough resolution.
Setting the Exposure Follow these steps: 1. 2 Rotate the shutter speed dial to AE. You can set the exposure automatically or manually. Automatic exposure is a convenient feature that works sufficiently under most conditions. With manual exposure, you have more control over how your pictures will be exposed. 2 2 Setting the Shutter Speed Automatically Use the aperture priority automatic exposure (AE) feature to automatically set the shutter speed for the selected aperture setting.
Setting the Shutter Speed Manually For more information, see the documentation included with your flash. You can specify the shutter speed from 1 to 1/2000 sec., or B (Bulb). To set the shutter speed, rotate the shutter speed dial to the desired shutter speed value. Note: ❏ To avoid blurring, set the shutter speed faster than "1/focal length (mm)." If using a slower shutter speed, the use of a tripod is recommended.
With Manual Exposure Locking the Exposure Setting (AE-lock) When manual exposure is selected, the current shutter speed is lit, and the metered speed flashes. You can lock the exposure setting at the metered value using the AE-lock button. This is useful, for example, when you create a single panoramic picture from a series of images, to make sure they all have the same level of exposure.
Focusing Releasing the Shutter The camera’s viewfinder has a magnification of 1.0x, which allows you to keep both eyes open when focusing on your subject. When you are ready to shoot, gently press the shutter release button. You should hear a clacking sound that indicates the shutter release. When focusing, keep your eye in the center of the rangefinder eyepiece for the best result.
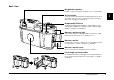
Chapter 3 3 Viewing and Managing Photos Opening the LCD Monitor 1. 3. 3 Push the panel back into place. 3 Pull open the rear panel using the notch at the bottom. 3 DUMMY DUMMY c Notch 2. 3 Caution: ❏ Do not pick up or handle the camera by the rear panel. ❏ 3 Do not operate the camera while the rear panel is left open. Gently rotate the panel clockwise until the LCD monitor faces outward.
Viewing Images 1. Make sure the camera is on. 2. Press the (LCD) button. The camera enters playback mode and displays the newest recorded image. 3. Rotate the jog dial (lower position) clockwise or counterclockwise to display the image you want to view. Image display Monitor icons Current image/ total images (up to 9999) Monitor Icons The icons displayed at the bottom of the LCD monitor indicate the following functions or operations.
Icon Description Indicates you can magnify or shrink the image by rotating the jog dial (lower position). Displayed only for the Magnify feature. Appears when the (ENTER) button is active. Appears when the (CANCEL) button is active. Viewing Photo Information 3 Follow these steps to see more photo information: 1. Display an image on the LCD monitor. 2. Pull up the jog dial to the upper position, then rotate it to display the desired set of information about the image.
Highlight General Information File sequence number Outlines and flashes highlight areas. Image quality Indicates this image is locked Number of prints (if DPOF is set) Date and time this image was taken Composition Grid Shows the grid to aid composition. Exposure Histogram Shows the densities of shadow and highlight areas occupied in the image.
Detailed Information Magnifying Images 3 Follow these steps to zoom in on an image displayed on the LCD monitor (up to 16x). 1. Display an image on the LCD monitor. 2. Press the 3. Select (Magnify) using the jog dial, then press the (ENTER) button. The Magnify mode ( ) icon is displayed at the top left corner of the screen. 3 (MENU) button. 3 3 Lists the following information: ❏ File name (file number and format) ❏ Image size (image quality) ❏ Color (color/monochrome) setting.
Running a Slide Show This feature allows you to view all the images in a slide show format, with a three-second interval between images. Managing Images 1. Display an image on the LCD monitor. Deleting Images 2. Press the In playback mode, you can delete the currently displayed image or all the images saved on the memory card. 3. Select (Slide Show) using the jog dial, then press the (ENTER) button. 4. (MENU) button. Display an image on the LCD monitor. 2. Press the 3. Select button. 4.
5. In the confirmation screen, select OK using the jog dial, then press the (ENTER) button. c Caution: This operation cannot be undone. 4. Select Lock/Unlock 1 image, Lock all images, or Unlock all images using the jog dial (upper position), then press the (ENTER) button. When the image is locked, the lock ( of the image. 3 ) icon is displayed at the top right Note: This procedure does not securely delete the data from the memory card.
3. Select (Print Order) using the jog dial, then press the (ENTER) button. 4. Select Set DPOF for one for the displayed image, or Set DPOF for all for all the images using the jog dial (upper position), then press the (ENTER) button. Note: 5. 32 ❏ To select another image, rotate the jog dial in the lower position. ❏ To view the current DPOF setting, select View current DPOF. Specify the number of prints using the jog dial, then press the (ENTER) button.
Chapter 4 4 Customizing the Settings Accessing the Settings Menu 1. Press (LCD) then LCD monitor. 4 Setting Items (MENU) to display the Main menu on the 4 Settings Menu Setting 2. Select (Settings) using the jog dial, then press the button to display the Settings menu. 3. Select the desired setting using the jog dial, then press the (ENTER) button. The selected setting is displayed. If you select (Basic Setup), select the desired setting and press the (ENTER) button again. 4.
Setting (Long Exp Noise Reduction) (Color Space) Description Reduces noise that appears on an image taken with a long exposure. The shooting time may become longer depending on shooting conditions. Selects the color space from sRGB or Adobe RGB. Adobe RGB is a wider color space than sRGB and encompasses the colors that can be printed with CMYK inks. Select Adobe RGB if you have a printer that supports it. (RAW Setting) Sets the image format recorded when shooting in RAW mode.
Setting Description Calibrate Needles Displays the Needle Calibration menu to adjust the status gauge needles: E (number of remaining shots), R (image quality), E (remaining battery power), and A (white balance). Dead Pixel Correction Corrects non-functional pixels so they are less conspicuous on the LCD monitor. Repeat this procedure every few months as necessary. For the pixels that cannot be corrected with this setting, try the Long Exp Noise Reduction feature.
Chapter 5 Opening RAW Images on Your Computer Software Overview System Requirements To open RAW format images, you need to install the Epson PhotoRAW software included on the CD-ROM that came with your camera: Windows: OS: Microsoft Windows 98 Second Edition, Me, 2000 Professional, XP Home Edition, XP Professional ❏ EPSON PhotoRAW is a standalone application that can process multiple RAW images at one time using the batch feature.
Installing the Software EPSON RAW Plug-In 1. To install the software, you need administrator privileges. EPSON PhotoRAW 1. Insert the software CD-ROM into your CD-ROM drive. Uninstalling PhotoRAW If you need to uninstall PhotoRAW, do one of the following: ❏ Click Start, point to Settings, and select Control Panel, Add/Remove Programs, and then click EPSON PhotoRAW. ❏ Click Start, point to Programs, and select EPSON PhotoRAW, and then click Uninstall.
Opening a RAW Image Be sure to copy your RAW image files to your hard disk before trying to open and process them. Working with them while they are still on the memory card will take a very long time. For Macintosh Start Adobe Photoshop and open the RAW file you want to process. The main window for EPSON RAW Plug-In is displayed. Using EPSON PhotoRAW Click Start, point to All programs (or Programs), and select EPSON PhotoRAW, and then click EPSON PhotoRAW.
Chapter 6 6 Maintenance and Troubleshooting Setting the Time and Date 1. Press (LCD), then LCD monitor. (MENU) to display the Main menu on the 3. 6 Use the following to set the time and/or date: Jog dial Changes the value. 6 (ENTER) button Moves the cursor forward. Pressing this button on the minutes slot applies the change and returns to the previous menu. (CANCEL) button Moves the cursor backward. Pressing this button on the year slot returns to the previous menu without setting time or date.
Calibrating the Status Gauge The gauge readings may deviate slightly from the set positions over time. If this happens, follow the steps below to calibrate the gauge needles. 1. Press (LCD) then LCD monitor. (MENU) to display the Main menu on the 5. Select Finish using the jog dial, then press 6. Repeat steps 2 through 4 if you want to calibrate the other needles. 7. Select Finish using the jog dial, then press (ENTER). (ENTER).
c Caution: Do not remove the memory card from the camera while the card is being formatted. c Note: Quick Format does not securely delete the data from the memory card. To securely “flush” the memory card so that no data can be recovered from the card, use Full Format to format the card. Cleaning the Camera Body Clean your camera thoroughly several times a year to keep it in good working condition.
Storing the Camera If you are not planning to use the camera for a long period of time, remove the battery and store it at room temperature in a dry location. Store the camera in its case. Do not store the camera in following conditions: ❏ Direct sunlight or bright light ❏ High humidity ❏ High heat ❏ Excessive dirt or dust ❏ Excessive vibrations ❏ Strong magnetic fields Troubleshooting Error Messages Message Remedy Cannot delete. The image is locked.
Contacting Customer Support If your Epson product is not operating properly and you cannot solve the problem using the troubleshooting information in your product documentation, contact customer support for assistance. If customer support for your area is not listed below, contact the dealer where you purchased your product. For Users in Singapore Sources of information, support, and services available from Epson Singapore are: World Wide Web (http://www.epson.com.
Technical Support Hotline You can also contact our technical staff at the following telephone and fax numbers: Phone: (852) 2827-8911 Fax: (852) 2827-4383 For Users in Korea If you need help with your digital camera, contact the shop where you purchased it.
Appendix Standards and Approvals Specifications Camera General EMC Directive 89/336/EEC EN55022 Class B EN55024 Model type: Lens-interchangeable rangefinder digital camera Dimensions: Height: Lithium-ion Battery EMC Directive 89/336/EEC EN55022 Class B EN55024 Battery Charger Low Voltage Directive 73/23/EEC EN60950 EMC Directive 89/336/EEC EN55022 Class B 88.5 mm (3.54 in.) Width: 142 mm (5.68 in.) Depth: 39.5 mm (1.58 in.) Weight: Approx. 560 g (1.
JPEG compression ratio: Locked at 1/4 PRINT image matching: Supports PRINT Image Matching III Optical System Image sensor: Primary-color filter CCD (APS size: 23.7 × 15.6 mm) Pixels: 6.1 M Lens mount: EM mount (M-type bayonet mount; L-type screw mount with an optional adapter ring) Viewfinder: Real image range finder type see-through viewfinder Viewfinder magnification: 1.0x Rangefinder: Rangefinder baseline length: Visual field frame: Combined coincidence-type (interlocking range: 0.
Battery charge life-cycle: Number of shots possible Under shooting conditions 1*: Up to about 900 shots Under shooting conditions 2**: Up to about 360 shots (compliant with the CIPA standard) Optional Accessory The following option is available for the camera.
Index A customer support, 43 accessory shoe, 8 adapter ring, 15 AE-lock, 23 AE-lock button, 9 aperture setting, 22 D dial-lock release button, 8 display icons, 26 M E B EPSON PhotoRAW, 37 battery charging, 11 installing, 13 lithium-ion battery, 11 bright-line frame illumination window, 7 selecting, 16 bulb setting, 22 button CANCEL button, 10 ENTER button, 10 LCD button, 10 MENU button, 10 USER button, 10 F C Jog dial, 8 calibrating status gauge, 40 cleaning camera, 41 CCD sensor, 41 contacting E