
User manual


MAN0051-01 30 JUN 2000 PAGE 41
APPENDIX D
APPENDIX D: PC CARD INSTALLATION PROCEDURE
This chapter, Appendix D, describes in step-by-step format the procedure to install a 3Com
Etherlink
III PCMCIA. This particular network card, a card that Horner APG has thoroughly tested, may be utilized
with the PC CPU in network communications.
D.1 PC Card Installation Procedure
This installation procedure was used to install a 3Com
Etherlink
III PCMCIA. To enable this PC Card
the following steps were taken;
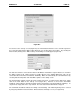
1) From Windows
95 Desktop, go to
My Computer/Control Panel/System/Device Manager
, Then
remove the PC Card Adapter from the screen.
2) next, go to
My Computer/Control Panel/Add new hardware
. Windows
95 should be able to detect
the PC Card. Click finished
3) Next, the PC Card Wizard should appear. Choose
NO
for the questions, then click
Finished
.
4) Shut the computer down and restart, as indicated. When Windows
95 restarts, a message should
appear that indicates that the new device was found. Click
Finished
.
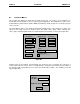
5) Go to
My Computer/Control Panel/System Properties/Device Manager
. Next, manually select the
proper device to install (3Com
Card in this case). Go to
Other Devices/3Com
Corporation-3C589D
Driver/Update Device Driver Wizard.
Choose the option of manually selecting a driver from the list. I
choose
Network Adapters/3Com
/3Com
Etherlink
III PCMCIA (3C589/3C589B).
Windows
95
then proceeded to copy the necessary files from the Windows
95 CD-ROM.
6) After these steps are completed, configure the Network settings to your specific protocols and restart
the computer. Windows
95 should then successfully load and should prompt you for your network
password.