Copyright Notice All rights reserved. No part of this publication may be reproduced, stored in a retrieval system, or transmitted in any form or by any means, electronic, mechanical, photocopying, recording, or otherwise, without the prior written permission of Seiko Epson Corporation. The information contained herein is designed only for use with this Epson product. Epson is not responsible for any use of this information as applied to other products.
Contents 5 Registration and Warranty Projector Parts Projector Controls Optional Accessories About This Manual Getting More Information 5 6 7 8 9 9 Using the Projector 11 Choosing a Location Adjusting the Picture Controlling Your Presentation Adjusting the Volume Freezing the Action Turning Off the Picture and Sound Using the Projector’s Menu System Changing Menu Settings Adjusting the Appearance of the Picture Using Advanced Picture Settings Using On-screen Display Features Customizing Projector Opera
Cleaning and Replacing the Air Filters Replacing the Lamp Resetting the Lamp Timer Storing the Projector Transporting the Projector 26 27 29 29 29 Problem Solving 31 What To Do When the Lights Flash Solving Projector Problems Solving Picture Problems Where To Get Help 31 32 34 38 Specifications and Notices 39 Projector Specifications Important Safety Information FCC Compliance Statement 39 42 44 Declaration of Conformity Epson America, Inc.
Welcome! The Epson® PowerLite® Home 20 Theater Projector lets you enjoy high-quality projection in the relaxing environment of your own home.
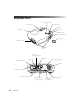
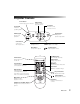
Projector Parts Horizontal lens shift Vertical lens shift Control panel Zoom ring Focus ring Lamp cover Infrared receiver (for remote control) Lens cover Ventilation slots Adjustable feet Video port (composite video) Audio ports S-video port Lamp cover release slot Input B (computer) Speaker Infrared receiver Component video port Control port (for service use only) 6 Welcome! Kensington security lock AC power inlet
Projector Controls Power button Turns the projector on and off Menu button Displays or hides projector menus Power light Indicates operating status Aspect button Changes the picture’s aspect ratio Warning light Alerts you to problems Source button Switches the video input source Power buttons Turn the projector on and off Source buttons Switch between equipment connected to the projector Esc button Exits the current function or menu udlr Arrow buttons Navigate menus Keystone correction buttons Adju
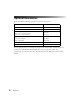
Optional Accessories Epson provides the following optional accessories for the projector: Product Part number Replacement lamp ELPLP33 Air filter replacement ELPAF09 Customized carrying cases: Samsonite® wheeled soft case Samsonite soft shoulder bag ELPKS35 ELPKS43 Ceiling mount ELPHT020 Suspension adapter ELPHTAPL False ceiling plate ELPHTFCP Kensington security lock ELPSL01 S-video cable F8V308X25 You can purchase these accessories from an Epson authorized reseller.
About This Manual See the Quick Setup sheet to connect the projector to your video or computer equipment. This book contains information on using the projector, in addition to maintenance instructions, troubleshooting tips, important safety instructions, specifications, and warranty information. Please follow these guidelines as you read through the manual: Warnings: Must be followed carefully to avoid bodily injury. Cautions: Must be observed to avoid damage to your equipment.
Welcome!
Using the Projector Follow the instructions in this section to choose a location for the projector, adjust the picture, control projector operation, and use the menu system. Choosing a Location You can set up the projector for these four viewing arrangements: Front/Ceiling Rear/Ceiling Front Rear If you install the projector in a rear or overhead position, you need to invert and/or mirror the image by selecting the correct Projection option (see page 20).
To project a rectangular (non-distored) image, you do not need to align the projector exactly with the center of the screen. By using the horizontal lens shift dial, you can place the projector to the left or right of the screen’s center, by up to 25 percent of the image’s width when projecting with a 16:9 aspect ratio. Make sure the projector faces straight ahead (at a 90-degree angle to the screen).
Adjusting the Picture Follow the steps on the Quick Setup sheet to connect the projector to your equipment, turn it on, and select the image source. Once you see your picture, you may need to make certain adjustments. Note: If you don’t see a picture, or the picture doesn’t look right, see page 34 for troubleshooting instructions. 1. Rotate the focus ring to sharpen the picture, or the zoom ring to reduce or enlarge it. Focus ring Focus and zoom rings Zoom ring 2.
3. If you still need to raise the height of the image after using the vertical lens shift dial, lift the front of the projector and rotate the adjustable feet until the image is positioned correctly. You can also use the feet to correct the angle of the image if it’s tilted horizontally. 4. If you raise or lower the image by tilting the projector, the image becomes “keystoned” and looks like or . To return the image to a rectangular shape, use the or Keystone button on the projector or remote control. 5.
Controlling Your Presentation Use these settings to control the projector’s speaker volume, temporarily freeze the picture, or turn off the picture and sound. Adjusting the Volume When an audio source is connected to the projector’s Audio port, use the and Volume buttons on the projector or remote control to adjust the sound output from of the projector’s speaker. Freezing the Action To freeze the action temporarily on the screen, press the Still button on the remote control.
Using the Projector’s Menu System You can use the projector’s on-screen menus to fine-tune the image quality, check lamp usage, and customize projector features. ■ The Image menu controls the look and quality of the picture. It offers several ways to adjust the color and improve the sharpness and clarity of the picture. ■ The Settings menu lets you set the child lock or sleep mode, adjust the position and size of the picture, select front or rear projection, and customize other projector features.
3. If you see a list of options, use the u and d arrow buttons to highlight the option you want, then press Enter to select it. (Enabled settings are indicated by a green light.) If you see a slider bar like the one shown below, use the l and r arrow buttons to adjust the setting. 4. Press the Esc button to return to the previous menu, or the Menu button to exit the menu system.
Using Picture Quality Settings Before adjusting the image with these settings, make sure you have already selected the best Color Mode, as described on page 17. Note: All settings apply to (and are retained for) only the currently selected input source (Input A, Input B, Video, or S-Video). If you use more than one source, you should adjust the settings separately for each one. Press the Menu button.
■ Sync Select Image > Picture Quality > Sync. Corrects fuzziness by synchronizing the projector with the computer’s tracking signal. For best results, adjust the tracking first. Saving and Recalling Picture Settings You can use the projector’s Memory feature to save the current picture quality settings as a group. This lets you quickly recall them for future use. 1. Press the Menu button, then select Image > Save Memory. 2.
■ Output Scaling (component video only) Lets you see the edges of the image that are not normally visible. Select Larger to view both the hidden and visible parts of the image. Normal displays images at standard size. ■ Keystone Corrects vertical keystone distortion (when your image looks like the projector). Makes the image somewhat smaller.
Using On-screen Display Features Use these settings to control the appearance of the on-screen menus, display a background image or color, create a startup screen, and choose a menu language. Press the Menu button. Select Settings > On-Screen Display and then choose from these options: ■ Menu Color Use this option to change the color scheme of the menu from purple and orange (Color 1) to black and white (Color 2).
Customizing Projector Operation Use these settings to activate the Direct Power ON feature, set the child lock or sleep mode, and make the fan run faster for high-altitude operation. Press the Menu button. Select Settings > Operation and then choose from these options: ■ Direct Power ON Use this feature to turn on the projector automatically when you plug it into an electrical outlet.
Viewing Lamp Usage and Other Information Use the Info menu to view information about the display settings of your input source and the number of hours the lamp has been used. Press the Menu button and select Info. If the projector is connected to video equipment, you see these settings: If the projector is connected to a computer, you see these settings: The life span of the lamp is about 3000 hours if the Color Mode is consistently set to Theatre Black, and 2000 hours if any other Color Mode is used.
Restoring the Default Settings The Reset menu lets you reset the lamp timer, clear the projector’s Memory settings, or return all the projector settings to their factory default values. Note: The Image menu and Settings menu also have their own Reset function that lets you clear only the settings in those menus. The Reset function in the Settings menu clears all settings except for Aspect, Child Lock, Fan Speed, Input A, and Language. Press the Menu button, then select Reset.
Caring for the Projector Your projector needs little maintenance. All you need to do on a regular basis is keep the lens clean. You also need to clean the air filter periodically to prevent overheating. Warning: Before you clean any part of the projector, turn it off and unplug the power cord. Never open any cover on the projector, except the lamp and filter covers. Dangerous electrical voltages in the projector can injure you severely.
Cleaning and Replacing the Air Filters Clean the air filters on the bottom of the projector after every 100 hours of use. If they’re not cleaned periodically, they can become clogged with dust, preventing proper ventilation. This can cause overheating and damage the projector. 1. Turn off the projector and wait for the P power light to stop flashing. 2. Unplug the power cord and disconnect any cables. 3. Turn the projector over.
Replacing the Lamp The life span of the lamp is about 3000 hours if the Color Mode is consistently set to Theatre Black, and 2000 hours if any other Color Mode is used. You can check how long the lamp has been used, as described on page 23. If the number shown is close to the limit, make sure you have a spare lamp handy. Note: Lamp life results vary depending on environmental conditions and usage. Turn the projector off when not in use.
5. Loosen the two silver screws holding the lamp in place. (You can’t remove these screws.) 6. Grasp the lamp as shown and pull it straight out. Note: The lamp(s) in this product contain mercury. Please consult your state and local regulations regarding proper disposal or recycling. Do not place in the trash. 7. Gently insert the new lamp and tighten its screws.
Resetting the Lamp Timer 1. Press the Menu button on the projector or remote control. 2. Select the Reset menu, and then select Lamp-Hours Reset. 3. When you see a prompt asking whether you want to execute the command, highlight Yes and press the Enter button. 4. When you’re finished, press Esc or Menu. The lamp usage timer displays 0H (zero hours) until you’ve used the lamp for at least 10 hours.
Caring for the Projector
Problem Solving This section explains how to interpret the projector’s status lights, solve problems with the picture and remote control, and contact technical support. What To Do When the Lights Flash The lights on top of the projector indicate the projector’s status and let you know when a problem occurs. If the projector isn’t working correctly, first turn it off, let it cool, and unplug it. Then plug the power cord back in and turn on the projector.
The warning light is flashing orange. High-speed cooling is in process. If the projector gets too hot again, projection stops automatically. Make sure there is plenty of space around and under the projector for ventilation. Clean or replace the air filters if necessary (see page 26). If you are using the projector at an altitude above 5000 feet (1500 meters), switch the Fan Speed setting to High (see page 22). The warning light is red. The projector is too hot and has turned itself off.
The projector turns itself off after a period of time. The projector’s Sleep Mode function may be turned on. This causes the projector to turn itself off if it hasn’t received any input signals for a specified period of time. You can turn the Sleep Mode setting off. See page 22. The projector turns on by itself. If you are using the Direct Power ON feature, the projector turns on automatically when you plug it into an electrical outlet (see page 22).
Solving Picture Problems You see a screen with the message No Signal displayed. ■ Make sure your video equipment is turned on. ■ Make sure your cable(s) are connected correctly, as described in the Quick Setup sheet. ■ Use the Source button(s) on the projector or remote control to select the correct input source. Allow a few seconds for the projector to sync up. ■ Press the Menu button and select Info.
If you’re using a Macintosh® laptop with OS X: 1. Select System Preferences from the Apple® menu and click Displays. 2. Click Detect Displays. 3. To display the entire desktop on both your projector screen and LCD screen, click the Arrange (or Arrangement) tab. (If you don’t see this tab, make sure it isn’t hidden by another window.) 4. Click Mirror Displays in the lower corner of the screen. One of the monitor icons automatically moves on top of the other.
The picture is upside-down or reversed. Change the setting for the Projection option in the Settings menu. See page 20. The image doesn’t fit on the screen correctly, or it is stretched or compressed. ■ Press the Aspect button to select a different aspect ratio. See page 14. ■ Check the Zoom Caption and Output Scaling settings. See pages 19 and 20. ■ Use the Position setting in the Settings menu to reposition the image on the screen. See page 19. The picture is wider at the top or bottom.
The picture is blurry. ■ There may be dirt on the lens. Clean the lens as described on page 25. ■ Make sure the lens is not fogged by condensation. If you’ve just moved the projector from a cold environment, wait a couple of minutes before using it. ■ Adjust the focus using the focus ring. See page 13. ■ Make sure the projector is placed the correct distance from the screen: no closer than 2.4 feet (73 cm) and no farther than 45.7 feet (13.9 m). ■ Adjust the Sharpness setting in the Image menu.
Where To Get Help Epson provides technical assistance 24 hours a day at http://support.epson.com. Here you can access troubleshooting information, download product documentation, and receive technical advice through e-mail. To use the Epson PrivateLine Support service, call (800) 637-7661 and enter the PIN on the Epson PrivateLine Support card that came with your projector. This is the fastest way of speaking to a live representative, and it’s free.
Specifications and Notices This section includes projector specifications, safety instructions, and other important information about your projector. Projector Specifications General Type of display Poly-silicon TFT active matrix Size of LCD panels 0.55 inch (14 mm) wide Lens F=1.7 to 2.1, f=13.7 to 20.5 mm Resolution (native format) 854 × 480 pixels, 480p Brightness 1200 lumens (ANSI) Color reproduction 24 bit, 16.8 million colors Contrast ratio 1000:1 Image size 30 to 300 inches (0.
Projection Lamp Type 135 W UHE (Ultra High Efficiency) Part number ELPLP33 Lamp life Approx. 2000 hours (all color modes except Theatre Black) Approx. 3000 hours (Theatre Black mode) Note: Lamp life results vary depending on environmental conditions and usage. Turn the projector off when not in use. Continuous 24-hour-a-day use may reduce the overall life of the product. Dimensions Height 4.4 inches (111 mm), excluding feet Width 14.7 inches (373 mm) Depth 11.6 inches (295 mm) Weight 7.8 lb.
Compatible Video Formats The projector supports digital video (SDTV, HDTV), analog TV (NTSC, PAL, SECAM), and various monitor display formats. Images are automatically resized, if necessary, to display in the projector’s native resolution. Note: To project images from a computer, set the computer’s video card at a refresh rate (vertical frequency) compatible with the projector; see below for compatible formats.
Analog TV formats Mode Refresh Rate (Hz) NTSC NTSC 4:43 PAL N-PAL M-PAL PAL—60 SECAM 60 60 50 50 60 60 50 Important Safety Information Follow these safety instructions when setting up and using the projector: 42 ■ Except as specifically explained in this User’s Guide, do not attempt to service this product yourself. Refer all servicing to qualified service personnel. ■ Never open any cover on the projector, except the lamp and filter covers.
■ The lamp in this projector is under high internal pressure and may make a loud noise if it breaks. If it breaks, ventilate the room to prevent mercury gas inside the lamp from being inhaled or coming into contact with the eyes or mouth. ■ Do not bring your face close to the projector while it is in use, to prevent inhaling or contact with the gases inside the lamp if it breaks.
■ Don’t place the projector or remote control on top of heat-producing equipment or in a heated place, such as a car. ■ Don’t use the projector outside of the required temperature range (see page 40). Doing so may cause an unstable display and could lead to projector damage. ■ Don’t store the projector outside of the required temperature range (see page 40) or in direct sunlight for long periods of time. Doing so may cause damage to the case.
Declaration of Conformity According to 47CFR, Part 2 and 15 for Class B Personal Computers and Peripherals; and/or CPU Boards and Power Supplies used with Class B Personal Computers: We: Located at: Epson America, Inc. 3840 Kilroy Airport Way MS 3-13 Long Beach, CA 90806 Telephone: (562) 290-5254 Declare under sole responsibility that the product identified herein, complies with 47CFR Part 2 and 15 of the FCC rules as a Class B digital device.
exchange of the product or of a part, the item replaced becomes Epson property. The exchanged product or part may be new or previously repaired to the Epson standard of quality, or, at Epson’s option, may be another model of like kind and quality. Exchange or replacement products assume the remaining warranty period of the product covered by this limited warranty, except that each replacement lamp carries the limited 90-day warranty stated above.
Index A A/V Mute button, 7, 15 Accessories, 8, 38 Air filters cleaning and replacing, 26 ordering, 8 Anti-theft device, 8 Aspect button, 7 Aspect ratio, adjusting, 14, 36 Audio problems, 33 Auto button, 7, 37 Contrast, adjusting, 14, 18 Control panel, projector, 7 D Dark image, 37 Declaration of Conformity, 45 Default settings, resetting, 24 Direct Power ON, 22, 33 Distance, projection, 12, 39 Documentation, 9 B E Background Color setting, 21 Blurry picture, 37 Brightness adjusting, 14, 18 lamp, 5, 27,
I Image blurry, 37 distorted, 36 inverted or backwards, 36 noisy, 36 size, 12, 39 too light or dark, 37 wrong colors, 37 Menus adjusting on-screen display, 21 adjusting picture quality, 17 to 20 customizing projector operation, 22 resetting, 24 using, 16 to 17 viewing projector information, 23 Moving projector, 29 N K No Signal message, 34 Kensington anti-theft device, 8 lock port, 6 Keystone correction, 11, 14, 20, 36, 39 O L Lamp brightness, 5, 27, 39 ordering, 8, 27 replacing, 27 to 28 specificatio
Projector choosing location, 11 to 12 cleaning, 25 control panel, 7 dimensions, 40 distance from screen, 12, 39 feet, 14 lights, 31 to 32 maintenance, 25 to 29 menus, 16 to 24 parts, 6 positioning, 11 to 12 problems, 32 to 33 resetting default values, 24 speaker, 39 storing, 29 transporting, 29 R Rear projection, 11, 20 Registration, 5 Remote control buttons, 7 problems, 33 Replacing lamp, 27 to 28 Reset menu, 24 Resetting lamp timer, 29 Resolution, 39 Sound adjusting, 15 problems, 33 turning off, 15 Sour
W Warranty, 5, 45 to 46 Washed-out picture, 37 Z Zoom Caption setting, 14, 19 Zoom ring, 6, 13 Zoom setting, 14 50 Index