
User's Guide


Table Of Contents
- Contents
- Introduction to Your Projector
- Setting Up the Projector
- Using Basic Projector Features
- Turning On the Projector
- Turning Off the Projector
- Selecting the Language for the Projector Menus
- Adjusting the Image Height
- Image Shape
- Resizing the Image
- Focusing the Image Using the Focus Ring
- Remote Control Operation
- Selecting an Image Source
- Projection Modes
- Image Aspect Ratio
- Color Mode
- Controlling the Volume with the Volume Buttons
- Projecting a PC Free Presentation
- Adjusting Projector Features
- Using the Projector on a Network
- Wireless Network Projection
- Setting Up Projector Network E-Mail Alerts
- Setting Up Monitoring Using SNMP
- Controlling a Networked Projector Using a Web Browser
- Adjusting the Menu Settings
- Using the Projector's Menus
- Image Quality Settings - Image Menu
- Input Signal Settings - Signal Menu
- Projector Feature Settings - Settings Menu
- Projector Setup Settings - Extended Menu
- Projector Network Settings - Network Menu
- Projector Setup Settings - ECO Menu
- Projector Information Display - Info Menu
- Projector Reset Options - Reset Menu
- Maintaining and Transporting the Projector
- Solving Problems
- Projection Problem Tips
- Projector Light Status
- Using the Projector Help Displays
- Solving Image or Sound Problems
- Solutions When No Image Appears
- Solutions When Image is Incorrect Using the USB Display Function
- Solutions When "No Signal" Message Appears
- Solutions When "Not Supported" Message Appears
- Solutions When Only a Partial Image Appears
- Solutions When the Image is Not Rectangular
- Solutions When the Image Contains Noise or Static
- Solutions When the Image is Fuzzy or Blurry
- Solutions When the Image Brightness or Colors are Incorrect
- Solutions to Sound Problems
- Solving Projector or Remote Control Operation Problems
- Solving Network Problems
- Where to Get Help
- Technical Specifications
- General Projector Specifications
- Projector Lamp Specifications
- Remote Control Specifications
- Projector Dimension Specifications
- Projector Electrical Specifications
- Projector Environmental Specifications
- Projector Safety and Approvals Specifications
- Supported Video Display Formats
- USB Display System Requirements
- Notices
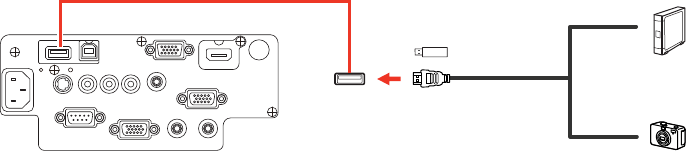
Connecting a USB Device or Camera to the Projector
You can connect your USB device or camera to the projector's USB-A port and use it to project images
and other content.
1. If your USB device came with a power adapter, plug the device into an electrical outlet.
2. Connect the USB cable (or USB flash drive or USB memory card reader) into the projector's USB-A
port shown here.
Note: Do not connect a USB hub or a USB cable longer than 10 feet (3 m), or the device may not
operate correctly.
3. Connect the other end of the cable (if applicable) to your device.
Parent topic: Connecting to External USB Devices
Related topics
Projecting a PC Free Presentation
Selecting the Connected USB Source
You can switch the projector's display to the source you connected to the USB-A port.
1. Make sure the connected USB source is turned on, if necessary.
2. Press the USB button on the remote control.
3. Press the button again to cycle through other USB sources, if available.
Parent topic: Connecting to External USB Devices
Disconnecting a USB Device or Camera From the Projector
When you finish presenting with a connected USB device or camera, you must prepare to disconnect the
device from the projector.
1. If the device has a power button, turn off and unplug the device.
2. Disconnect the USB device or camera from the projector.
37