
User's Guide

Fine-Tuning the Projector 115
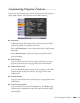
■ Sharpness
Adjusts the sharpness of the image.
If you select
Advanced, you can access more detailed
settings: Adjust
Thin Line Enhancement to enhance or
soften objects like hair or fabric patterns. Adjust
Thick Line
Enhancement
to enhance or soften outlines of objects or
backgrounds. Adjust
Vert. Line Enhancement to enhance
vertical lines in the image. Adjust
Horiz. Line Enhancement
to enhance horizontal lines in the image.
■ Abs. Color Temp.
Sets a color temperature between 5000 and 10000 °K. (Not
available if
sRGB is selected as the Color Mode setting.)
■ Color Adjustment
Adjusts the color values. For Customized color mode, select
R, G, B, C, M, Y to adjust individual red, green, blue, cyan,
magenta, and yellow hue, saturation, and brightness values.
For other color modes, RGB may be selected to adjust red,
green, and blue saturation values. (Not available if
sRGB is
selected as the Color Mode setting.)
Six-Axis Color Adjustment
For special projection material, such as high-quality photographs or
artwork, you can adjust the hue, saturation, and brightness for six
different color axes.
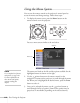
1. Follow the instructions on page 114 to open the Image menu and
select
Color Mode.
2. Press the
Enter button to select Customized, then press Esc to
return to the Image menu.
3. Select
Color Adjustment and press Enter. You see hue,
saturation, and brightness controls on the screen for six colors:
R,
G, B, C, M, Y
(red, green, blue, cyan, magenta, and yellow).
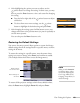
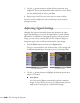
4. Select the color axis you want to adjust and press
Enter. You see
color controls for hue, saturation, and brightness.
Hue changes the balance of color, and saturation changes the
strength of the color.
note
You cannot adjust the
advanced Sharpness settings
if the input signal is RGB or
if the input source is
USB or LAN.