
User's Guide


Using the Projector on a Network 77
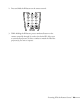
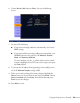
6. Choose Wired LAN and press Enter. You see the following
screen:
7. Do one of the following:
■ If your network assigns addresses automatically, turn on the
DHCP setting.
■ If your network does not assign addresses automatically, turn
off
DHCP and enter the projector’s IP Address, Subnet
Mask
, and Gateway Address.
To enter numbers, use the pointer button on the remote
control to highlight the number you want to input, then press
the
Enter button.
8. To prevent the IP address from appearing on the standby screen,
set the
IP Address Display setting to Off.
9. When you’re done making all necessary changes, highlight the
Return button at the top of the screen, then press Enter. Choose
Setup complete and press Enter, then choose Yes and press
Enter to save the changes.
10. Press
Menu to exit.