
User's Guide


Table Of Contents
- Front
- Contents
- Introduction to Your Projector
- Setting Up the Projector
- Projector Placement
- Projector Connections
- Attaching and Removing the Cable Clips
- Attaching and Removing the Cable Cover
- Installing Batteries in the Remote Control
- Using the Projector on a Network
- Wired Network Projection
- Wireless Network Projection
- Setting Up Projector Network E-Mail Alerts
- Setting Up Monitoring Using SNMP
- Controlling a Networked Projector Using a Web Browser
- Crestron RoomView Support
- Using Basic Projector Features
- Turning On the Projector
- Turning Off the Projector
- Selecting the Language for the Projector Menus
- Adjusting the Image Height
- Image Shape
- Resizing the Image With the Zoom Ring
- Focusing the Image Using the Focus Ring
- Remote Control Operation
- Selecting an Image Source
- Projection Modes
- Image Aspect Ratio
- Color Mode
- Controlling the Volume With the Volume Buttons
- Projecting a Slide Show
- Adjusting Projector Features
- Adjusting the Menu Settings
- Maintaining and Transporting the Projector
- Solving Problems
- Projection Problem Tips
- Projector Light Status
- Using the Projector Help Displays
- Solving Image or Sound Problems
- Solutions When No Image Appears
- Solutions When "No Signal" Message Appears
- Solutions When "Not Supported" Message Appears
- Solutions When Only a Partial Image Appears
- Solutions When the Image is Not Rectangular
- Solutions When the Image Contains Noise or Static
- Solutions When the Image is Fuzzy or Blurry
- Solutions When the Image Brightness or Colors are Incorrect
- Solutions When No Image Appears on an External Monitor
- Solutions When There is No Sound or Low Volume
- Solving Projector or Remote Control Operation Problems
- Solutions When Network Alert E-Mails are Not Received
- Where to Get Help
- Technical Specifications
- Notices
3. Connect the other end to the projector's S-Video port.
1 S-Video port
Parent topic: Connecting to Video Sources
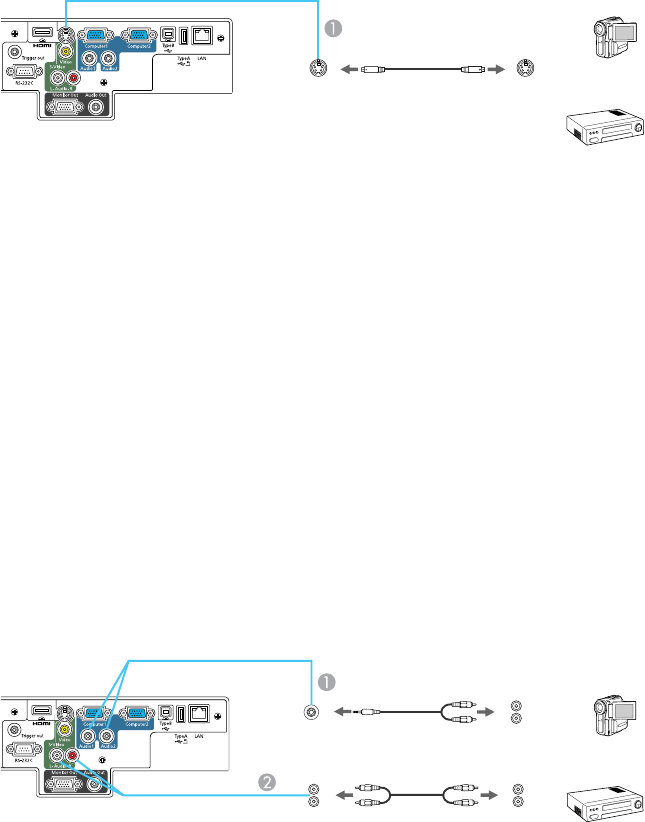
Connecting to a Video Source for Sound
You can play sound through the projector's speaker system if your video source has audio output ports.
If you are projecting video using a Computer port, connect the projector to the video source using an
optional stereo mini-jack audio cable.
If you are projecting video using the Video or S-Video port, connect the projector to the video source
using an optional stereo mini-jack adapter cable (with one 3.5 mm mini-plug and two RCA plugs).
1. Connect the audio cable to your video source's audio-out ports.
2. Do one of the following:
• Connect the other end of the cable to the projector's Audio port that corresponds to the
Computer port you are using for video.
• Connect the red and white plugs on the other end of the cable to the projector's L-Audio-R ports.
1 Audio1 or Audio2 port
35