
User's Guide


70 Using the Projector on a Network
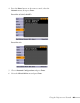
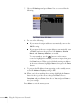
4. Make sure the projector has a unique name, so you can identify it
on your network.
If you need to rename it, highlight the
Projector name text box
then press
Enter.
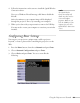
5. Use the buttons on the remote control to select individual
letters; then press
Enter to input a character. To add a blank space
or to navigate backward and forward through the input text,
highlight the arrows and press
Enter. To toggle symbol settings or
capital letters, highlight the option and press
Enter. When you’re
done, highlight
Finish and press Enter.
6. If you want to create a password for using PJLink to control the
projector, highlight
PJLink Password, press Enter, and enter a
password of up to 8 alphanumeric characters. When you’re done,
highlight
Finish and press Enter.
7. If you want to create a password for remote access to the
projector, highlight
Web Control Password, press Enter, and
enter a password of up to 8 alphanumeric characters. When you’re
done, highlight
Finish and press Enter.
8. If you want to set up a security keyword so that only people who
are in the same room as the projector can access it, set the
Projector keyword option to On (PowerLite 85+/825+/826W+
only). Then when you want to connect to the projector, it
displays a randomized four-digit number or “keyword” on the
screen. If you’re using EasyMP Network Projection, you can enter
the keyword on your computer to connect (see the EasyMP
Network Projection Operation Guide for details).
9. When you’re done making these settings, highlight the
Return
button at the top of the screen, then press
Enter. Choose
Complete
and press Enter, then choose Yes and press Enter to
save your settings.