
User's Guide


114 Fine-Tuning the Projector
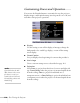
Creating Your Own Startup Screen
You can transfer any image from your computer or video source to the
projector and then use it as your startup screen. You can also use it as
the screen displayed when the projector is not receiving a signal or
when you press the
A/V Mute button. The image can be a company
logo, slogan, photograph, or any other image you want to use.
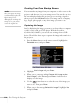
Capturing the Image
Start by displaying the image you want to use from either a computer
or video source, such as a DVD player. With the PowerLite
85+/824+/825+/826W+, you can also use an image from a USB
device. Then follow these steps to capture the image and transfer it to
the projector:
1. Press the
Menu button on the remote control, highlight the
Extended menu, and press Enter.
2. Highlight
User’s Logo and press Enter.
3. When you see a message asking
Choose this image as the
User’s Logo?
, select Yes and press Enter. A selection box
displays over the image.
4. Use the pointer buttons to select the area of the image you
want to use. Then press
Enter.
5. When you see the message
Select this Image?, highlight Yes
and press
Enter.
note
Once you capture an image,
it automatically replaces the
Epson startup screen.
Although you can change the
startup screen, you cannot
restore the original one.