
User's Guide


Solving Problems 93
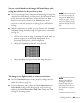
Only part of the computer image is displayed.
■ Press the Auto button on the remote control or the Enter button
on the projector.
■ Make sure the image Position setting is correct in the Signal
menu. See page 59 for more information.
■ Press the Aspect button on the remote control.
■ Press the Esc button on the remote control to cancel the E-Zoom
function.
■ Make sure your computer’s resolution setting is correct. See the
compatible video formats listed on page 109.
■ You also may need to modify existing presentation files if you
created them for a different resolution. See your software
documentation for specific information.
■ If you’re projecting a wide panel computer image, adjust the
Resolution setting (see page 58).
■ If you’re projecting an image from a computer with dual display
activated, turn dual display off.
The image isn’t square, but keystone-shaped.
If the image isn’t square or rectangular, adjust its shape as described on
page 30.
The image contains static or noise.
■ Make sure the cables are securely connected.
■ If you’re using a computer cable longer than 6 feet (1.8 meters),
or an extension cable, the image quality may be reduced.
■ Keep your computer and video cables away from the power cord
as much as possible to prevent interference.
■ The video signal may be split between the computer and the
projector. If you notice a decline in the projected image quality
when the image is displayed simultaneously on your notebook
computer and the projector, turn off the notebook’s LCD display.