Bernslip.
Bernslip.fm Page 2 Friday, December 12, 2003 3:02 PM EPSON is a registered trademark and EasyMP is a trademark of SEIKO EPSON CORPORATION. PowerLite is a registered trademark of Epson America, Inc. General Notice: Other product names used herein are for identification purposes only and may be trademarks of their respective owners. EPSON disclaims any and all rights in those marks. Copyright © 2003 by Epson America, Inc.
Bernslip.fm Page 3 Friday, December 12, 2003 3:02 PM Introduction Your EPSON PowerLite 735c projector includes new features for Macintosh® and Windows® user that are not covered in the User’s Guide.
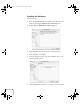
Bernslip.fm Page 4 Friday, December 12, 2003 3:02 PM Installing the Software Follow these steps: 1. Insert the EasyMP software CD-ROM in your drive. You see a window containing the EMP NS Connection.pkg icon. 2. Double-click the EMP NS Connection.pkg icon. 3. Click Continue. You see the software license agreement. 4. Click Continue, then Agree. 5. Select the destination drive, then click Continue. You see the following install window: 6. Click Install. When installation is complete, close the window.
Bernslip.fm Page 5 Friday, December 12, 2003 3:02 PM Configuring Your Network Connection Follow the instructions in your Projector User’s Guide to start EasyMP and insert the EPSON 802.11b card in the projector. Determine whether you will use Ad Hoc mode or Access Point mode to connect to the projector. Follow the instructions in your Projector User’s Guide to configure the projector for the mode you will be using.
Bernslip.fm Page 6 Friday, December 12, 2003 3:02 PM ■ For optimal performance, set your screen resolution to 1024 × 768 or lower with a color depth of Thousands (16 bit). ■ When making Location settings, you can select the desired location and change all the network settings one at a time. 4.
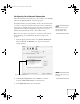
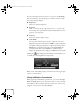
Bernslip.fm Page 7 Friday, December 12, 2003 3:02 PM The first time you start NS Connection in Windows, you see a window asking you to select your network. note If you don’t see your network adapter’s IP address, allow a minute for it to appear. If your access point uses DHCP, sometimes it takes a minute for the server to pick up the IP address. 2. Select the IP address for your computer’s network adapter card and click OK. You see the screen below.
Bernslip.fm Page 8 Friday, December 12, 2003 3:02 PM note The status icon colors may be easier to see on the projected image than on the computer. The color of the status icon indicates the projector’s status: ■ Gray: the projector is not connected ■ Red: the projector is connected to another computer ■ Green: the projector is connected to your computer. 3.
Bernslip.fm Page 9 Friday, December 12, 2003 3:02 PM 5. Type in the four-digit number displayed on the EasyMP Network screen and click OK. Once the connection is established, you see your computer’s image transmitted to the projector, and a floating control bar: 6. If necessary, drag the control bar out of the way, or minimize it. 7. When done with your presentation, click Disconnect on the control bar.
Bernslip.
Bernslip.fm Page 11 Friday, December 12, 2003 3:02 PM Connecting in IP Connect Mode Even if your projector and computer are on a different subnet (Access Point mode only) or connecting over different routers, you can establish a connection manually using IP Connect Mode. 1. Start NS Connection on the computer to which you want to connect. You see this screen: note Depending on your network, your projector and computer may connect over different routers even if they are in the same room.
Bernslip.fm Page 12 Friday, December 12, 2003 3:02 PM 3. Select Use IP connect mode and click OK. You see the following screen: Click here 4. Click IP connection. You see this screen: Enter the IP address and click Search note You can add up to 16 projectors to the list and connect to four projectors at the same time. If you add more, NS Connection begins to delete projectors from the list, starting with the first projector added. 12 5. Enter the projector’s IP address and click Search.
Bernslip.fm Page 13 Friday, December 12, 2003 3:02 PM The IP address appears in the Projector list and a icon displays: searching This icon indicates search is in progress This icon appears if the search fails to find the projector If the search fails to find a projector with the specified IP address, the searching icon turns into a question mark. If this happens, run EasyMP to check the projector’s IP address, then repeat this step. 6.
Bernslip.fm Page 14 Friday, December 12, 2003 3:02 PM tip Use a static IP address when configuring a projector for the network if you plan to use it in a group. If you use DHCP, the projector’s IP address will change every time you turn it off and on again, and you will have to recreate the projector group. Using Projector Groups You can register projectors as a group if you want to provide quick and easy access to other computers.
Bernslip.fm Page 15 Friday, December 12, 2003 3:02 PM 3. Click the Advanced button. You see this screen: 4. Enter a name for the group in the Connection Group box. Then enter the IP address of the projector you want to register in the IP address box: note You cannot use the addresses 0.0.0.0 or 255.255.255.255.
Bernslip.fm Page 16 Friday, December 12, 2003 3:02 PM 5. Click Add. The IP address appears in the list of registered printers, and the searching icon appears beside it. If the projector is found, its name appears in the projector list. note To remove a projector from the group, select it from the projector list and click Delete. 6. Repeat steps 4 and 5 for each projector you want to add to the group. 7. Click OK to save the projectors as a group. When you see a confirmation message, click Yes. 8.
Bernslip.fm Page 17 Friday, December 12, 2003 3:02 PM Connecting to a Projector in a Group Follow these steps to connect to a projector in a group: 1. Start NS Connection. Then click the Extension button on the EMP NS Connection screen. You see this screen: Select these two boxes 2. Select Use IP connect mode and Use Group List.
Bernslip.fm Page 18 Friday, December 12, 2003 3:02 PM 3. From the Connection Group list, choose the group you want to connect to and click OK. You see this screen: If this says IP connect mode, skip step 4. 4. Click IP connection. (If the upper left button on the screen says IP connect mode rather than Automatic search mode, skip this step.) You see this screen: Select the projector Then click Connect 5. Select the projector you want to connect to and click Connect.
Bernslip.fm Page 19 Friday, December 12, 2003 3:02 PM 6. If you want, repeat step 5 to connect to additional projectors. The computer’s image appears on the projector screen. Exporting a Projector Group You can export group information as a file to another computer on the wireless network. This is useful, for example, if you want to share group access with multiple users. 1. Start NS Connection. Then click the Extension button on the EMP NS Connection screen.
Bernslip.fm Page 20 Friday, December 12, 2003 3:02 PM You see this screen. note If you haven’t created any groups, the Export button will be grayed out. You must create at least one group before the Export button is active. 3. Click Export to export a file for all groups in the Connection Group list. 4. Highlight the file name (NSGroup.ini), and then select Save to. Choose a location on the second computer and click Save.
Bernslip.fm Page 21 Friday, December 12, 2003 3:02 PM Importing a Projector Group You can also import group information as a file to another computer on the wireless network. 1. Start NS Connection. Then click the Extension button on the EMP NS Connection screen. You see this screen: Select these two boxes 2. Select Use IP connect mode and Use Group List. Then click the Advanced button. You see this screen. 3. Click Import.
Bernslip.fm Page 22 Friday, December 12, 2003 3:02 PM 4. On the next screen, select the file you want to import and click Open. The names of all of the groups in the file are added to the Connection Group list on the Advanced screen. To connect to the projector from the new computer, follow the steps beginning on page 17. Using E-mail Alerts You can set up e-mail alerts to warn you of problems with the projector on either a wireless network or a wired LAN connection. 1.
Bernslip.fm Page 23 Friday, December 12, 2003 3:02 PM You see the following screen: Select Advanced If you’re connecting over a wired LAN network, go to step 5. If you’re connecting over a wireless network, continue with the next step. 4. Wireless network only: On the Network Screen, select the Advanced button next to the Access point mode box. Press Enter on the remote control. 5. When you see the screen below, select Mail and press Enter.
Bernslip.fm Page 24 Friday, December 12, 2003 3:02 PM You see the following screen: 6. For Mail Notification Settings, select ON and press Enter on the remote control. note Use the up and down buttons on the remote control to enter letters and numbers. You will also see punctuation marks, such as a period (.) and symbols, such as @. When you see the letter or symbol you want, press Enter. Then press the right arrow to move to the next position.
Bernslip.fm Page 25 Friday, December 12, 2003 3:02 PM 12. When done making your settings, highlight the OK button at the top of the screen, then press Enter. Highlight the OK button again and press Enter to return to the main EasyMP Network Screen. Understanding the Notification Messages If a projector experiences a problem, it sends an e-mail message to each of the addresses you provided using EMP NetworkManager. The message includes the heading “EPSON Projector” in the subject line.
Bernslip.fm Page 26 Friday, December 12, 2003 3:02 PM Projecting Movies Through EasyMP Your projector now includes version 1.11 of the SlideMaker2 software (for Windows only). This upgrade allows you to add movies in the MPEG2 format and PNG files to a scenario.
Bernslip.
Bernslip.