
Installation guide


14
V. Reprogram PixiePlus cont’d
One PixiePlus may learn IR commands from remote controls
from different devices. Each button can be configured to send a
single command (normal operation) or multiple commands
(macro mode) with a single button press.
Example: You wish to configure the PixiePlus to send a power
command to a projector and a separate power command to an
amplifier with a single press of the PixiePlus POWER ON
button.
To do so, program the PixiePlus POWER ON button with two
commands, Power On from the projector remote, and Power
On from the amplifier remote. Then configure the PixiePlus
POWER ON button to macro mode.
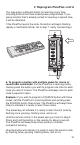
12. To restore the PixiePlus to its default preconfiguration:
Set the device to learning mode by inserting the paper clip.
Then press and hold any two buttons while the device is in
learning mode. The whole keypad will blink, first slowly, then
quickly. The PixiePlus will beep four times, indicating that it has
been restored to its default configuration.
13. To exit learning mode: Gently remove the paper clip to exit
learning mode. Be sure not to hold any buttons while removing
the paper clip, or the unit will be set to cloning mode.
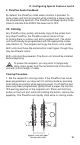
14. To test learned codes: Verify that the IR emitter bud has
been placed directly over the IR detector on the device the
PixiePlus controls. Press the PixiePlus button that you wish to
test. A red LED labeled “IR Activity” will blink when the code is
being sent, but the emitter bud does not illuminate.
15. Troubleshooting: If you cannot control the device, be sure
that the emitter bud is positioned correctly. If some buttons work
but others do not, try re-programming the buttons that do not
work. Make sure you press the button on the remote for at lest
one second during learning.
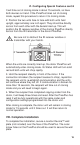
Fluorescent lights can interfere with IR signals. Check if the
projector is close to a fluorescent light source. If so, try turning
off the lights. If this restores control, cover the IR emitter bud
and display device IR receiver window with an IR-opaque
shield, such as gaffer’s tape.
See Section X. Troubleshooting beginning on page 21 for more
tips.