PixiePlus™ Projector Controller for Epson® Installation Guide (Decora™ wall plate not included) Patent US 7,334,067 ELPSP10
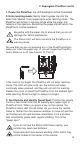
Important Safety Instructions 1) Read these instructions. 2) Keep these instructions. 3) Heed all warnings. 4) Follow all instructions. 5) Do not use this apparatus near water. 6) Clean only with dry cloth. 7) Do not block any ventilation openings. Install in accordance with the manufacturer's instructions. 8) Do not install near any heat sources such as radiators, heat registers, stoves, or other apparatus (including amplifiers) that produce heat.
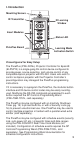
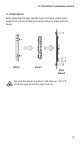
I. Introduction Mounting Screws IR Transmitter IR Learning Window Insert Modules Status LED PixiePlus Board Learning Mode Activation Switch Preconfigured for Easy Setup The PixiePlus (PXE-DCM+) Projector Controller for Epson® (ELPSP10) is a single-gang AV control device configured to provide power, source selection, and volume control of any compatible Epson projector with RS-232.
The PixiePlus is designed for use with a Leviton Decora™ wall plate (not included). The PixiePlus may be installed in a single-gang back box (not included). Bezels are available in black (PXE-BEZEL-BL) and gray (PXE-BEZEL-GR), sold separately. II.
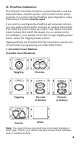
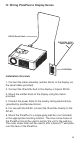
III. PixiePlus Installation The Projector Controller for Epson is preconfigured to use the Discrete Power, 4-Button Source, and Volume Control button modules. To function with the PixiePlus preconfiguration codes, these button modules must be used. If you wish to reconfigure the PixiePlus with alternate controls, you may replace those button modules as needed with buttons that match the control codes you wish to use. Select the button insert modules that match the design of your remote control.
III. PixiePlus Installation cont’d 2. Attach Bezel After selecting the appropriate insert modules, place them against the curcuit board and secure them in place with the bezel. Bezel Insert Pixie Board Be sure the bezel is placed right-side-up. The SP Controls logo should be right-side up.
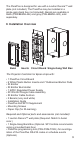
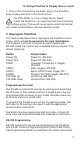
IV. Wiring PixiePlus to Display Device RS-232 Serial Cable PXE-DCM+ 6VDC Power Supply PXE-DCM+ Installation Overview 1. Connect the cable assembly (emitter block) to the display via the serial cable (provided). 2. Connect the IR emitter bud to the display or Epson AP-60. 3. Mount the emitter block to the display using the Velcro provided. 4. Connect the power block to the nearby ceiling electrical box (provided by qualified electrician). 5.
IV. Wiring PixiePlus to Display Device cont’d 7. Once all the connections are made, plug in the PixiePlus power supply wall wart to the electrical box. The PXE-DCM+ is a low-voltage device. Never install the PixiePlus in an electrical back box containing high-voltage wiring. This would cause serious electrical danger and violate United States national electrical codes. V.
V. Reprogram PixiePlus cont’d Toggling Source Module Between 2-Button and 4-Button Mode (optional) By default, the PixiePlus is configured to work with a four-button source module. To use a one- or two-button source module, you must disable four-button mode. To disable four-button mode: Assemble the PixiePlus, including the one- or two-button source module, as described in Section IV above. Press and hold any single source button while inserting a paper clip into the programming aperture.
V. Reprogram PixiePlus cont’d 1. Power the PixiePlus: the LED backlights will be illuminated. 2. Enter learning mode: Gently insert a paper clip into the small hole labeled “insert paperclip to enter learning mode.” The PixiePlus will remain in learning mode while the paper clip remains in the aperture. Removing the paper clip will return the PixiePlus to normal operation. Be gentle with the paper clip to ensure that you do not damage the switch mechanism.
V. Reprogram PixiePlus cont’d 4. Round Robin Codes and Macros Each PixiePlus button may be programmed with either a single command or multiple commands (as many as four). Multiple commands may be sent round robin or as macros. Round robin buttons send one command per button press. Each time the button is pressed, it sends the next code in a series. Macro buttons send all programmed codes each time the button is pressed.
V. Reprogram PixiePlus cont’d You may press a different button for learning at any time, including buttons that have already been programmed. If you press a button that is already armed for learning a second time, it will be disarmed. If the PixiePlus learns the code, the button will begin flashing rapidly in Verification Mode. Go to step 7, Verify Learned Keys. 6. To program a button with multiple codes for macro or round robin commands: Put the PixiePlus in learning mode.
V. Reprogram PixiePlus cont’d Program the button, and it will again beep three times to indicate if the code was successfully learned. Repeat as many times as necessary. When you have programmed the last code in the series, the PixiePlus will beep quickly three times to indicate the code is successfully learned, and then beep slowly three more times to indicate that the button has been fully programmed. Arming will eventually time out if no IR code is received.
V. Reprogram PixiePlus cont’d If the button did not seem to learn correctly, press any other button on the PixiePlus, then press the target button again to rearm it, and repeat the learning procedure. 8. Repeat for each button: While still in learning mode, program and verify each button. 9. Set a button to macro mode: If a button has been programmed with multiple commands, the button may be configured to send all commands with a single button press. By default, buttons are configured to Round Robin mode.
V. Reprogram PixiePlus cont’d One PixiePlus may learn IR commands from remote controls from different devices. Each button can be configured to send a single command (normal operation) or multiple commands (macro mode) with a single button press. Example: You wish to configure the PixiePlus to send a power command to a projector and a separate power command to an amplifier with a single press of the PixiePlus POWER ON button.
VI. Configuring Special Features 1. Inactivity Shutdown timer The Inactivity Shutdown Timer will automatically shut the display device down if it is not used for a configurable length of time. Example: The PixiePlus Inactivity Shutdown Timer is set to three hours. If no button is pressed on the PixiePlus for three hours, it will begin to beep and flash in warning 120 seconds before three hours has elapsed.
VI. Configuring Special Features cont’d To change the active setting: Press VOLUME UP or VOLUME DOWN to cycle to the next setting. The PixiePlus will indicate the new setting with a pattern of beeps, and update its Red LED blinking. When you have reached the desired setting, remove the paper clip to return to normal operation.
VI. Configuring Special Features cont’d If the entered code is not correct, the system emits a long beep and remains locked. Security Keycodes may be one to six button presses long. Codes can use any key on the keypad other than POWER ON. By default the Security Keylock feature is off, and the default Security Keycode is OFF-OFF-OFF. Configure the Security Keylock 1. Press and hold both POWER ON and POWER OFF while gently inserting a paper clip into the PixiePlus programming aperture.
VI. Configuring Special Features cont’d 3. PixiePlus Audio Feedback By default, the PixiePlus clicks when a button is pressed. To mute, press and hold any button while inserting a paper clip into the programming aperture. The PixiePlus will beep quickly three times to indicate that AUDIO has been set to OFF. VII. Cloning Any PixiePlus may quickly and easily copy all the codes from any other PixiePlus. the PixiePlus cannot clone a Pixie. In cloning there is a donor unit and a recipient unit.
VI. Configuring Special Features cont’d It will time out of cloning mode in about 15 seconds, so have both devices on hand. If the PixiePlus times out of cloning mode, repeat this procedure to return it to cloning mode. 2. Position the two units face to face with both units held upright, approximately one inch apart. They should be directly across from each other with the bezels lined up.
IX. Operation Power Power buttons control power on the projector or monitor. The PixiePlus is always on, and its LED backlit buttons remain continually illuminated, unless the Security Keylock is active. By default the PixiePlus is configured with the Epson discrete codes for Power On and Power Off. POWER POWER ON Toggling OFF Discrete Source Source button inserts control input selection on the projector by monitor.
X. Troubleshooting Programming Problems Verify that the PixiePlus is in learning mode for programming. The Status LED continually blinks red when the PixiePlus is in learning mode. The Status LED is solid red and the PixiePlus beeps loudly each time you try to arm a key for learning. The ambient light is too bright. Shield the PixiePlus from ambient light sources and try to re-program.
X. Troubleshooting cont’d Is the PixiePlus display dark, and does it chirp when any button is pressed? If so, the PixiePlus Security Keylock is active. See page 16 for information on how to configure and/or retrieve the Security Keylock code. If the Security Keylock is not set, verify that the projector or monitor powers on normally with its own remote control or settop controls. If it does not, it may not be plugged in or may require service. The PixiePlus does not control the projector/monitor.
Warranty SP Controls warrants all PixiePlus products and accessories against defects in materials and workmanship for a period of five years from the date of purchase. Although SP Controls thoroughly tested and reviewed this documentation, there is no warranty, express or implied, with respect to quality, merchantability, or fitness for a particular purpose. Therefore the PixiePlus and accessories are provided "as-is" and the purchaser assumes the entire risk as to quality and performance.