
Service manual


Epson Stylus NX100/105/SX100/105/TX100/101/102/103/105/106/109/ME 300/ME OFFICE 360/NX110/115/SX110/115/TX110/111/112/113/115/117/119
Revision C
DISASSEMBLY/ASSEMBLY Disassembly/reassembly procedures of NX110 series 109
Confidential
Disassembling the Panel Unit
Panel Board
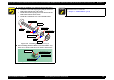
1. Pull out the FFC from the Ferrite Core, and remove the three screws that
secure the Panel Board.
2. Release the hook, and remove the Panel Board from the Panel Unit.
Figure 4-118. Removing the Panel Board
Buttons
1. Remove the Button Power and the Button OP from the Panel Cover.
2. Remove the LED Lens from the Panel Cover.
Figure 4-119. Removing the Buttons
When installing the Panel Board, align the positioning hole of
the Panel Board with the dowels of the Panel Cover. (See
Fig.4-19)
When installing the Panel Unit, align the positioning holes of the
Middle Housing with the dowels of the Panel Cover, then secure
them with five hooks. (See
Fig.4-17, Fig.4-20.)
Panel Board
Positioning Hole
Hook
Panel Unit
SCREW M3x8 P-TITE (5±0.5kgfcm)
Double-sided tape
Ferrite Core
Button PowerButton OP LED Lens
Panel Cover
Dowel