
Service manual


Epson Stylus NX100/105/SX100/105/TX100/101/102/103/105/106/109/ME 300/ME OFFICE 360/NX110/115/SX110/115/TX110/111/112/113/115/117/119
Revision C
DISASSEMBLY/ASSEMBLY Disassembly/reassembly procedures of NX110 series 108
Confidential
4.7 Disassembly/reassembly procedures of NX110
series
4.7.1 Panel Unit
Parts/Components need to be removed in advance:
Scanner Stand/Cover Wire (p 68)
Removal procedure
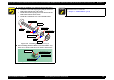
1. Open the Scanner Unit.
2. Slide the Panel Unit back with lifting the rear side slightly. And remove the
Panel Unit.
Figure 4-116. Removing the Panel Unit (1)
3. Disconnect the Panel FFC from connector J2 on the Main Board, and remove
the Panel Unit.
Figure 4-117. Removing the Panel Unit (2)
C H E C K
P O I N T
The disassembly/reassembly procedures for NX100 series differ
from those of NX110 series, see
“ 4.4.1 Panel Unit ” ( p. 72 )
for the
procedures.
C A U T I O N
Be careful when removing the Panel Unit, because the Main
Board and the Panel Board on the rear of the Panel Unit are
connected with the Panel FFC.
Be careful when carrying out the next procedure, because the
hook on the rear of the Panel Unit is fragile and easily gets
damaged or softened.
Make sure to work with both hands.
Panel Unit
Middle Housing
Positioning Hole
Hook
C A U T I O N
When disconnecting the Panel FFC from the connector (J2) on the
Main Board, hold the Panel FFC and pull it directly above from
the connector (J2).
Panel Unit
Panel FFC
J2