
Operating instructions


Special Applications, cont’d
MLC 104 Plus Series • Special Applications
5-12
PRELIMINARY
g. Click on a different combination of button light color and blink frequency.
h. Click the green Add Operation arrow next to the Release area.
6. Click the Monitor tab ( ) and click Add
Monitor (near the bottom of the GC window). The Monitor Conditions
Wizard window appears.
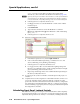
7. Type in the name of the monitored condition: Help Desk Request, as shown in
the following picture.
8. Select Conditions in the
Monitored Conditions area.
9. In the Subject Port area,
locate and select Input #3.
10. Select Input 3: Release
from the Available Options
area.
11. Click Apply Condition.
Input #3: Input 3: Release
appears in the Monitored
Conditions area.
12. Click Emails in the
Monitored Conditions
area. The right side of
the window changes to
show selections for e-mail
messages and contacts.
13. Create the e-mail file that
the input 3 button will send.
a. Click near the bottom of the Monitor Conditions Wizard
window. The Email Manager window opens.