English TM-L90 with Peeler User’s Manual. . . . . . . . . . . . . . . . . . . . 1 Bedienungsanleitung . . . . . . . . . . . . . . 13 Gebruikershandleiding . . . . . . . . . . . . . 21 Manuel de l’utilisateur . . . . . . . . . . . . . . 29 Manual do utilizador . . . . . . . . . . . . . . . 37 Manual del usuario. . . . . . . . . . . . . . . . 45 Manuale dell’utente . . . . . . . . . . . . . . .
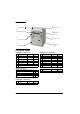
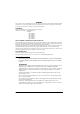
English Printer Parts 5 power switch 4 cutter cover 6 3 peeler open lever label peeler detector 2 peeler cover 7 cover open lever 1 8 control panel roll paper cover DIP Switch Tables Serial interface (DIP switch 1) SW Function ON 1-1 Power switch function Disabled 1-2 Interface condition selection Parallel interface (DIP switch 1) OFF SW Function Enabled 1-1 Power switch function Disabled 1-2 Reserved Fixed to ON -- 1-3 Reserved -- Fixed to OFF 1-4 Reserved -- Fixed to OFF
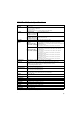
English TM-L90 with Peeler Specifications .
English iv
English English TM-L90 with Peeler User’s Manual All rights reserved. No part of this publication may be reproduced, stored in a retrieval system, or transmitted in any form or by any means, electronic, mechanical, photocopying, recording, or otherwise, without the prior written permission of Seiko Epson Corporation. No patent liability is assumed with respect to the use of the information contained herein.
English WARNING The connection of a non-shielded printer interface cable to this printer will invalidate the EMC standards of this device. You are cautioned that changes or modifications not expressly approved by Seiko Epson Corporation could void your authority to operate the equipment.
English CAUTION: Do not connect cables in ways other than those mentioned in this manual. Different connections may cause equipment damage and burning. Be sure to set this equipment on a firm, stable, horizontal surface. The product may break or cause injury if it falls. Do not use in locations subject to high humidity or dust levels. Excessive humidity and dust may cause equipment damage or fire. Do not place heavy objects on top of this product. Never stand or lean on this product.
English Power Switch and Power Switch Cover The power switch is on the top left of the printer. Press it to turn on the printer, and press and hold it for more than 3 seconds to turn off the printer. Power Switch Cover You can use the enclosed power switch cover to make sure that the power switch is not accidentally pressed. Peel off the backing tape and press the cover into place to install it.
English CAUTION: Never install the printer in locations that receive direct sunlight. The diffuse reflection from the roll paper may cause the label peeler detector to malfunction. When a malfunction occurs, the PAPER OUT LED starts flashing. Press the FEED button to resume using the printer. Note: To hang the printer on the wall, see the Wall Hanging Bracket Set Installation Manual provided with the WH-10 for instructions.
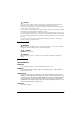
English 5. Make sure that the mode switch is set to the mode you are going to use. (To the right for the label peeler issuing mode, or to the left for the label continuous issuing mode.) Left: label continuous issuing mode 6. 7. Right: label peeler issuing mode Pull out the paper until the end exactly reaches the guideline (indicated with arrows) shown in the illustration below. Eliminate any slack in the roll paper, and then close the roll paper cover.
English 8. When using the label continuous issuing mode (not using the peeler), close the peeler cover now. When using the peeler (the label peeler issuing mode), pass the paper through the peeler, and close the peeler cover. label peeler issuing mode label continuous issuing mode Press the PAPER FEED button. The paper is automatically fed backward, and the PAPER OUT LED goes off.
English CAUTION: When installing roll paper, be careful not to injure your hands on the manual cutter. Troubleshooting ERROR LED is on or flashing ❏ ❏ ❏ Make sure that the roll paper cover is closed and the PAPER OUT LED is not on. Close the cover or replace the paper if necessary. If the printer has been printing a lot and the print head gets too hot, the ERROR LED starts flashing, and printing stops. When its temperature cools down to the normal range, printing resumes automatically.
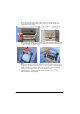
English Cleaning the Platen Roller/Roll Paper End Sensor When paper dust accumulates on the platen roller or the roll paper end sensor, follow the steps below to clean them. To maintain good functional capabilities, clean them regularly (every 6 months). 1. Turn off the printer, open the peeler cover, and then the roll paper cover. 2. Clean the platen roller and roll paper end sensor with a cotton swab lightly moistened with water or an alcohol, as shown in the illustration. . 3.
English Using Different Paper Widths Be sure to set the paper width with the memory switch to match printing to the print width. (For detailed information on the memory switch, see the TM-L90 with Peeler Technical Reference Guide.) Also, do not increase the paper width after you have used a narrower width. For example, do not use 60 mm {2.36"} and then change to 80 mm {3.15"}.
English 3. Slide the roll paper spacer to the appropriate width, as shown above. You can use the measurement printed inside the printer, aligning the inside edge of the spacer with the desired measurement. Width note: When you want to set the roll paper width from 61 mm to 70 mm, break off by hand the two tabs of the spacer shown in the illustration. (You can tabs still also use widths from 38 mm to 60 mm with the spacer with the tabs broken off.) 4.
English To place cables, first break off by hand any of the three portions indicated by circles in the illustration (the other portion is on the right). Then put the cables through the holes and replace the bottom of the cover.