
Operation Manual
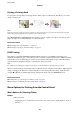


6. Make the following settings.
❏ Paper Source: Select the paper source in which you loaded the paper.
❏ Document Size: Select the paper size you loaded in the printer.
❏ Borderless: Select to print with no margins around the image.
In borderless printing, the print data is enlarged slightly more than the paper size so that no margins are
printed around the edges of the paper. Click Settings to select the amount of enlargement.
❏ Orientation: Select the orientation you set in the application.
❏ Paper Type: Select the type of paper you loaded.
❏ Color: Select Grayscale when you want to print in black or shades of gray.
Note:
When printing on envelopes, select Landscape as the Orientation setting.
7. Click OK to close the printer driver window.
8.
Click Print.
Related Information
& “Available Paper and Capacities” on page 22
& “Loading Paper in the Paper Cassette 1” on page 24
& “Loading Paper in the Paper Cassette 2” on page 28
& “Loading Paper in the Rear Paper Feed Slot” on page 31
& “Guide to Windows Printer Driver” on page 121
& “List of Paper Types” on page 23
Printing Basics - Mac OS X
Note:
Explanations in the section use TextEdit as an example. Operations and screens dier depending on the application. See the
application's help for details.
1. Load paper in the printer.
c
Important:
❏ When loading in the paper cassette, make the paper settings on the control panel.
❏ When loading in the rear paper feed slot, select Rear Paper Feed Slot as the Paper Source setting on the
printer driver, and then start printing before loading paper. Start printing, click the printer icon in the Dock
to display the print screen. Follow the printer's on-screen instructions to load paper.
2.
Open the le you want to print.
User's Guide
Printing
56