
Operation Manual


4-18 Maintenance and Troubleshooting
7. Follow the instructions on the screen.
Note:
If the EPSON Scanners Driver Disk is requested, insert the Scanner
Software CD in the CD-ROM drive and make sure to specify the correct
drive letter, the EPSON folder, the folder of your preferred language,
and the Win98 or Win2000 folder as the location respectively.
Changing USB connections ports
When you want to change the scanner to a different USB port (on
your computer or hub), for example when you are adding other
USB devices, follow the procedure below.
1. Connect the scanner to your computer.
2. Turn on the scanner and then your computer.
Note:
❏ Before turning on your computer, if you have any other
scanners, in addition to EPSON Expression 1640XL, or
cameras listed in the Control Panel’s Scanner and Cameras
Properties dialog box, be sure to connect them to your
computer or hub and turn them on.
❏ If you do not follow these steps, your scanner or computer may
not operate correctly.
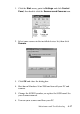
3. Click the Start menu, point to Settings and click Control
Panel, then double-click the Scanners and Cameras icon.
4. Select EPSON Expression1640XL and click Remove.
Note:
❏ Be sure you have selected the correct device to remove. Since
there is no Cancel button, there is no way to stop removal of a
device once you click the Remove button.