
User's Guide


Table Of Contents
- Contents
- Product Basics
- Wi-Fi or Wired Networking
- Loading Paper
- Loading Paper for Documents in the Cassette
- Loading Paper for Photos in the Cassette
- Loading Envelopes in the Cassette
- Loading Paper and Envelopes in the Rear Feed Slot
- Paper Loading Capacity
- Available Epson Papers
- Borderless Paper Type Compatibility
- Selecting the Paper Settings for Each Source - Control Panel
- Selecting Default Paper Settings - Administrator
- Placing Originals on the Product
- Copying
- Printing From a Computer
- Printing with Windows
- Selecting Basic Print Settings - Windows
- Selecting Double-sided Printing Settings - Windows
- Selecting Additional Layout and Print Options - Windows
- Selecting a Printing Preset - Windows
- Selecting Extended Settings - Windows
- Printing Your Document or Photo - Windows
- Selecting Default Print Settings - Windows
- Changing Automatic Update Options
- Printing with OS X
- Cancelling Printing Using a Product Button
- Printing with Windows
- Scanning
- Faxing
- Connecting a Telephone or Answering Machine
- Setting Up Fax Features
- Setting Up Fax Features Using the Product Control Panel
- Selecting Your Country or Region
- Selecting the Date and Time
- Using the Fax Setup Wizard
- Selecting the Line Type
- Setting the Number of Rings to Answer
- Selecting Fax Output Settings
- Output Settings - Fax
- Selecting Advanced Fax Settings
- Basic Settings - Fax
- Send Settings - Fax
- Receive Settings - Fax
- Security Settings - Fax
- Printing Fax Reports
- Fax Report Options
- Setting Up Fax Features Using the Fax Utility - Windows
- Setting Up Fax Features Using the Fax Utility - OS X
- Setting Up Fax Features Using the Product Control Panel
- Setting Up Contacts and Contact Groups
- Sending Faxes
- Receiving Faxes
- Viewing a Fax on the LCD Screen
- Checking Fax Status
- Using Memory Cards and USB Devices With Your Product
- Replacing Ink Cartridges and Maintenance Boxes
- Adjusting Print Quality
- Cleaning and Transporting Your Product
- Solving Problems
- Checking for Software Updates
- Product Status Messages
- Status Menu Error Codes
- Running a Product Check
- Resetting Control Panel Defaults
- Solving Setup Problems
- Solving Network Problems
- Solving Copying Problems
- Solving Paper Problems
- Solving Problems Printing from a Computer
- Solving Page Layout and Content Problems
- Solving Print Quality Problems
- Solving Scanning Problems
- Solving Scanned Image Quality Problems
- Image Consists of a Few Dots Only
- Line of Dots Appears in All Scanned Images
- Straight Lines in an Image Appear Crooked
- Image is Distorted or Blurry
- Image Colors are Patchy at the Edges
- Image is Too Dark
- Back of Original Image Appears in Scanned Image
- Ripple Patterns Appear in an Image
- Scanned Image Colors Do Not Match Original Colors
- Scan Area is Not Adjustable in Thumbnail Preview
- Scanned Image Edges are Cropped
- Solving Faxing Problems
- Solving Memory Card Problems
- When to Uninstall Your Product Software
- Where to Get Help
- Technical Specifications
- Windows System Requirements
- OS X System Requirements
- Printing Specifications
- Scanning Specifications
- Automatic Document Feeder (ADF) Specifications
- Fax Specifications
- Paper Specifications
- Printable Area Specifications
- Ink Cartridge Specifications
- Memory Card Specifications
- Dimension Specifications
- Electrical Specifications
- Environmental Specifications
- Interface Specifications
- Network Interface Specifications
- Safety and Approvals Specifications
- Notices
4. Select Wi-Fi Setup Wizard.
Note: If you need to disable the wireless network to set up your product on an Ethernet network,
scroll down and select Disable Wi-Fi instead. Then follow the instructions on changing to a wired
network connection in this manual.
5. Select the name of your wireless network or enter the name manually.
Note: To enter the wireless network name manually, select Other Networks, then select the
Network (SSID) field. Use the displayed keypad to enter your network name.
6. Select the Password field, and enter your wireless password using the displayed keypad.
7. Press when you’re finished entering your password, then select Proceed.
8. Confirm the displayed network settings and select OK to save them.
Note: If you need to change a setting, press the back button.
9. If you want to print a network setup report, press one of the buttons. (Otherwise, select Done.)
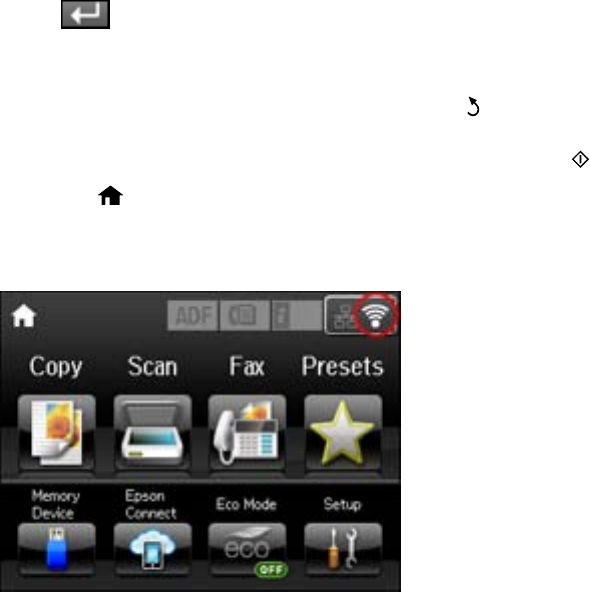
10. Press the home button to return to the Home screen.
If the network connection is successful, the Wi-Fi icon in the upper-right corner of the LCD screen is
lit as shown.
Parent topic: Wi-Fi Infrastructure Mode Setup
41