
User's Guide


Table Of Contents
- Contents
- Product Basics
- Wi-Fi or Wired Networking
- Loading Paper
- Loading Paper for Documents in the Cassette
- Loading Paper for Photos in the Cassette
- Loading Envelopes in the Cassette
- Loading Paper and Envelopes in the Rear Feed Slot
- Paper Loading Capacity
- Available Epson Papers
- Borderless Paper Type Compatibility
- Selecting the Paper Settings for Each Source - Control Panel
- Selecting Default Paper Settings - Administrator
- Placing Originals on the Product
- Copying
- Printing From a Computer
- Printing with Windows
- Selecting Basic Print Settings - Windows
- Selecting Double-sided Printing Settings - Windows
- Selecting Additional Layout and Print Options - Windows
- Selecting a Printing Preset - Windows
- Selecting Extended Settings - Windows
- Printing Your Document or Photo - Windows
- Selecting Default Print Settings - Windows
- Changing Automatic Update Options
- Printing with OS X
- Cancelling Printing Using a Product Button
- Printing with Windows
- Scanning
- Faxing
- Connecting a Telephone or Answering Machine
- Setting Up Fax Features
- Setting Up Fax Features Using the Product Control Panel
- Selecting Your Country or Region
- Selecting the Date and Time
- Using the Fax Setup Wizard
- Selecting the Line Type
- Setting the Number of Rings to Answer
- Selecting Fax Output Settings
- Output Settings - Fax
- Selecting Advanced Fax Settings
- Basic Settings - Fax
- Send Settings - Fax
- Receive Settings - Fax
- Security Settings - Fax
- Printing Fax Reports
- Fax Report Options
- Setting Up Fax Features Using the Fax Utility - Windows
- Setting Up Fax Features Using the Fax Utility - OS X
- Setting Up Fax Features Using the Product Control Panel
- Setting Up Contacts and Contact Groups
- Sending Faxes
- Receiving Faxes
- Viewing a Fax on the LCD Screen
- Checking Fax Status
- Using Memory Cards and USB Devices With Your Product
- Replacing Ink Cartridges and Maintenance Boxes
- Adjusting Print Quality
- Cleaning and Transporting Your Product
- Solving Problems
- Checking for Software Updates
- Product Status Messages
- Status Menu Error Codes
- Running a Product Check
- Resetting Control Panel Defaults
- Solving Setup Problems
- Solving Network Problems
- Solving Copying Problems
- Solving Paper Problems
- Solving Problems Printing from a Computer
- Solving Page Layout and Content Problems
- Solving Print Quality Problems
- Solving Scanning Problems
- Solving Scanned Image Quality Problems
- Image Consists of a Few Dots Only
- Line of Dots Appears in All Scanned Images
- Straight Lines in an Image Appear Crooked
- Image is Distorted or Blurry
- Image Colors are Patchy at the Edges
- Image is Too Dark
- Back of Original Image Appears in Scanned Image
- Ripple Patterns Appear in an Image
- Scanned Image Colors Do Not Match Original Colors
- Scan Area is Not Adjustable in Thumbnail Preview
- Scanned Image Edges are Cropped
- Solving Faxing Problems
- Solving Memory Card Problems
- When to Uninstall Your Product Software
- Where to Get Help
- Technical Specifications
- Windows System Requirements
- OS X System Requirements
- Printing Specifications
- Scanning Specifications
- Automatic Document Feeder (ADF) Specifications
- Fax Specifications
- Paper Specifications
- Printable Area Specifications
- Ink Cartridge Specifications
- Memory Card Specifications
- Dimension Specifications
- Electrical Specifications
- Environmental Specifications
- Interface Specifications
- Network Interface Specifications
- Safety and Approvals Specifications
- Notices
5. Click Start to begin the cleaning cycle.
The power light flashes throughout the cleaning cycle and stays on when the cleaning cycle is
finished.
Caution: Never turn off the product during a cleaning cycle or you may damage it.
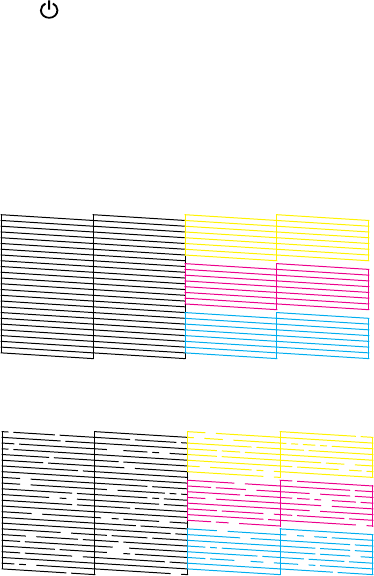
6. Check the printed pattern to see if there are gaps in the lines.
Print head is clean
Print head needs cleaning
• If there are no gaps, click Finish.
• If there are gaps or the pattern is faint, click Clean to clean the print head again.
If you don’t see any improvement after cleaning the print head up to 4 times, wait at least 6 hours. Then
try cleaning the print head again. If quality still does not improve, one of the ink cartridges may be old or
damaged and needs to be replaced.
Parent topic: Print Head Cleaning
Related tasks
Cleaning the Print Head Using the Product Control Panel
Checking the Nozzles Using the Product Control Panel
Removing and Installing Ink Cartridges
261