
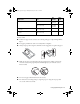
Quick Guide and Warranty

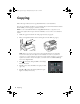

Copying 9
6. To change copy settings, press the d arrow, select
Paper and Copy Settings and
press
OK. The Layout setting should be With Border and the Paper Size should be
Letter.
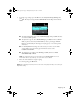
■ To make double-sided copies, select 2-Sided Copying, then press OK and select
one of the available options.
■ To adjust the copy size, select Reduce/Enlarge, press OK, then choose Actual
Size
(to print at actual size), Custom Size (to select a percentage), Auto Fit
Page
(to automatically size the image to fit your paper), or one of the specific
sizes listed.
■ For the Paper Source setting, select the cassette you want to use. To make
a large number of copies and use paper from both cassettes, select
Cassette 1>Cassette 2.
■ To change the copy quality, select Quality, press OK, then choose Draft,
Standard Quality, or Best.
Note: To clear previously used copy settings, press y Stop/Reset. For more
information about copy settings, see your online User’s Guide.
7. Press one of the x buttons to begin copying.
To cancel copying, press y
Cancel.
Note: When printing two-sided, if ink on the front of the paper smears, select a longer
Dry Time setting.
Cindy_FG_QG.book Page 9 Thursday, February 14, 2013 11:41 AM