
Quick Guide and Warranty

Printing Photos From the LCD Screen 11
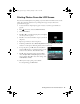
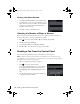
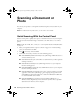
Printing Photos From the LCD Screen
You can select individual photos for printing as you view them on the LCD screen. See the
online User’s Guide for instructions on printing various types of layout sheets and
personalized note paper.
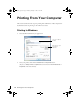
1. Load several sheets of Epson photo paper in cassette 1 (various types available; see
page 4).
2. Press , if necessary, and select
More Functions.
3. Select
Print Photos.
4. Press l or r to scroll through your photos and display
one that you want to print.
5. Press
+ or – to select the number of copies you want of
that photo.
6. Repeat steps 4 and 5 to select more photos.
7. If desired, press d, then select
Photo Adjustments and press OK to turn on red-eye
reduction or other photo enhancing features. Press y when done.
8. To crop the photo, press d, then select
Crop/Zoom
and press OK. Press + or – to frame the image; use the
arrows to move the frame. Press
OK when done.
9. Press d, then select Print Settings and press
OK to
select the
Paper Size and Paper Type you want to
use for printing. Press d to select other settings, such
as
Borderless, or Date.
10. When you’re ready to print, press x
Color.
To cancel printing, press y
Cancel.
Cindy_FG_QG.book Page 11 Thursday, February 14, 2013 11:41 AM