WF-2530 Quick Guide Your WF-2530. . . . . . . . . . . . . . . . . . . . . . . . . . . . . . . . . . . . . . . . . . . . . . . . . . 2 Using Special Papers . . . . . . . . . . . . . . . . . . . . . . . . . . . . . . . . . . . . . . . . . . . . 4 Placing Originals for Copying, Scanning, or Faxing. . . . . . . . . . . . . . . . . . . . . . 6 Copying a Photo or Document . . . . . . . . . . . . . . . . . . . . . . . . . . . . . . . . . . . . . 8 Printing From Your Computer. . . . . . . . . . . . . . . . . . . .
Your WF-2530 After you set up your WF-2530 (see the Start Here sheet), turn to this Quick Guide and your online User’s Guide for instructions on using your product. Features Where to find information Copy, scan, and fax from the easy-to-use control panel See this Quick Guide for the basics. See the online User’s Guide for details. Wireless printing and scanning from mobile devices with EPSON Connect™ See www.epson.com/connect. Easy Wi-Fi networking See the online User’s Guide.
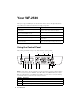
Number Description 4 Enter numbers, letters, and symbols 5 Select fax dialing settings 6 Stop printing/copying/scanning/faxing or reset settings 7 View wireless network status 8 Access your product’s Copy mode 9 Access your product’s Fax mode 10 Access your product’s Scan mode 11 Display detailed settings for each mode 12 Cancel/return to the previous menu 13 Select Wi-Fi settings 14 Start printing/copying/scanning/faxing Using the Control Panel 3
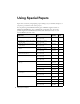
Using Special Papers Epson offers a wide array of high quality papers, making it easy to maximize the impact of your photos, presentations, and creative projects. You can purchase genuine EPSON ink and paper at EPSON® Supplies Central® at www.epson.com/ink3 (U.S. sales) or www.epson.ca (Canadian sales). You can also purchase supplies from an EPSON authorized reseller. To find the nearest one, call 800-GO-EPSON (800-463-7766). Part number Sheet count Letter (8.
Part number Sheet count 4 × 6 inches (102 × 152 mm) S041809 S042038 50 100 Letter (8.5 × 11 inches [216 × 279 mm]) S041141 S041649 S041271 20 50 100 EPSON Photo Quality Self-adhesive Sheets A4 (8.3 × 11.7 inches [210 × 297 mm]) S041106 10 EPSON Iron-on Cool Peel Transfer paper Letter (8.5 × 11 inches [216 × 279 mm]) S041153 10 Paper name Size EPSON Photo Paper Glossy Note: Media availability varies by country.
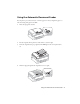
Placing Originals for Copying, Scanning, or Faxing Before you copy, scan, or fax, place your documents on the scanner glass or in the Automatic Document Feeder (ADF). Place photos on the scanner glass only and not in the ADF. Using the Scanner Glass You can place a photo or a document up to letter-size (or A4-size) on the scanner glass. 1. Raise the document cover. 2. Place your original facedown on the front right corner of the scanner glass, with the top of your original against the right side. 3.
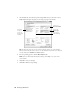
Using the Automatic Document Feeder You can place up to 30 sheets of letter- or A4-size paper or 10 sheets of legal-size paper at a time. Load only plain paper in the ADF. 1. Move the edge guide outward. 2. Fan the originals, then tap them on a flat surface to even the edges. 3. Insert the originals faceup, top edge first. The ADF light on the control panel turns on. 4. Slide the edge guide against the originals, but not too tight.
Copying a Photo or Document Follow the steps in this section to copy black-and-white or color documents. If you use the Automatic Document Feeder (ADF), you can copy up to 30 sheets of letteror A4-size paper or 10 sheets of legal-size paper at a time. Load only plain paper in the ADF. 1. Load paper in the sheet feeder. 2. Place your original document on the scanner glass, or load your documents in the ADF (see page 6). 3. Press the r Copy button. 4.
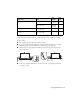
Printing From Your Computer This section describes the basic steps for printing from a Windows® or Mac computer. For detailed instructions on printing, see the online User’s Guide. Printing in Windows 1. Select the print command in your application. Select your EPSON product Click here to open your printer software 2. Make sure your EPSON product is selected, then click the Preferences or Properties button. (If you see a Setup, Printer, or Options button, click it.
3. On the Main tab, select the basic print settings. Make sure you choose the correct Paper Type setting for the paper you are using (see page 12 for details). Select your Document Size Click here for quick access to preselected settings Select your Paper Type Click here for 2-Sided Printing Tip: For quick access to the most common settings, select one of the Printing Presets on the left side of the screen. You can delete these presets or create your own by clicking the Add/Remove Presets button. 4.
Printing With a Mac Follow the steps below to print from Mac OS X. 1. Open the File menu and select Print. 2. Select your EPSON product as the Printer setting. Select your EPSON product 3. Click the arrow or Show Details to expand the print window, if necessary. 4. Select basic copy and page settings. For borderless printing, choose a Paper Size setting with a Borderless option. You can also select a custom setting to create a custom paper size.
5. Choose Print Settings from the pop-up menu, and select the following print settings: Choose Print Settings Select your Media Type (see below) Select higher quality or faster printing (if available) 6. Choose any other printing options you may need from the pop-up menu. See the online User’s Guide for details. 7. Click Print. 8. To monitor your print job, click the printer icon in the Dock.
Scanning a Document or Photo You can use your product to scan original documents and photos and save them on your computer. Note: For detailed scanning instructions, see the online User’s Guide. Quick Scanning With the Scan Button Use the u Scan button to quickly scan a document or photo and save it on your computer. You can even scan a photo and have it automatically included in an email message. 1. Place your original document or photo as shown on page 6. 2. Press the u Scan button. 3.
Scanning With EPSON Scan Software You can scan original documents and photos and save them as files on your computer using the EPSON Scan software. You can also launch EPSON Scan from any TWAINcompliant application. Note: For Mac OS X 10.6/10.7, see “Scanning With Mac OS X 10.6/10.7” on page 15. 1. Place your original document or photo as shown on page 6. 2. Do one of the following to start EPSON Scan: ■ ■ Windows: Double-click the EPSON Scan icon on your desktop. Mac OS X 10.
Scanning With Mac OS X 10.6/10.7 You can scan original documents and photos and save them as files on your computer. 1. Place your original document or photo as shown on page 6. 2. Open an image editing application such as Image Capture and select your product from the DEVICES or SHARED list, if necessary. 3. In the Mode pop-up menu, select the setting indicating where you placed your original. 4.
Faxing a Document Your product lets you send faxes by entering fax numbers or selecting entries from a speed dial or group dial list. If you use the Automatic Document Feeder (ADF), you can fax up to 30 sheets of letter- or A4-size paper or 10 sheets of legal-size paper at a time. Load only plain paper in the ADF. Note: You can also send or receive a fax from your computer using the Epson FAX Utility. For more information, see the online User’s Guide.
In Auto Answer mode, if the incoming call is a fax and you pick up the phone or the answering machine answers, the product automatically begins receiving the fax. If the other party is a caller, the phone can be used as normal or a message can be left on the answering machine. Note: Any phone or answering machine must be connected to the EXT. port for your product to detect an incoming fax call when the phone is picked up.
Entering Your Phone Number 1. From the Fax Header screen, press u or d to select Your Phone Number, then press OK. You see the phone number input screen. 2. Use the numeric keypad to enter your phone number (up to 20 digits). 3. When you’re done, press OK. 4. Press x Menu to exit the Fax Settings menu. Using the Keypad to Enter Numbers and Characters When entering phone numbers and text in Fax mode, follow these guidelines: ■ To enter a fax number, use the numeric keypad.
Sending a Fax From the Control Panel You can send a fax by manually entering a fax number, as described below. Note: To dial the number using a telephone, by redialing, or by selecting from your speed dial list, see the next section. To send a fax from your computer using the Epson FAX Utility, see your online User’s Guide. 1. Press the K Fax button. 2. Place your original(s) for faxing (see page 6). 3.
■ To use a group dial entry, press the Speed Dial/Group Dial button twice, select or type the number of a group dial entry, and press OK. Note: For more information on setting up group dial entries, see the online User’s Guide. ■ If you’ve connected a telephone to the product, dial the number from the phone. Select Send, then press the B&W or Color x Start button. Note: Don’t hang up the phone until you begin transmitting the fax.
Maintaining Your Product Follow the instructions in this chapter to check and clean the print head nozzles, check ink levels, and replace ink cartridges. If you need to align the print head, see the online User’s Guide. Caution: To keep your product looking like new, don’t place anything on top of the cover or use it as a writing surface. If you need to clean the cover, use only a soft, nonabrasive microfiber-type cloth.
Cleaning the Print Head If print quality has declined and the nozzle check pattern indicates clogged nozzles, you can clean the print head. Print head cleaning uses ink, so clean it only if necessary. Note: You cannot clean the print head if an ink cartridge is expended, and may not be able to clean it when a cartridge is low. You must replace the cartridge first (see page 24). 1. Load a few sheets of letter- or A4-size paper in the sheet feeder. 2. Press the x Menu button. 3.
4. The ink cartridge status is displayed. See page 24 to replace a cartridge, if necessary. In Windows, a window may appear on your computer screen if you try to print when ink is low. This window can optionally display ink offers and other updates from Epson. Note: To disable checking for ink offers or updates from Epson, see the instructions in your online User’s Guide. Purchasing EPSON Ink Cartridges You can purchase genuine EPSON ink and paper at EPSON Supplies Central at www.epson.com/ink3 (U.S.
Replacing Ink Cartridges Make sure you have a new ink cartridge before you begin. Caution: Do not open ink cartridge packages until you are ready to install the ink. Cartridges are vacuum packed to maintain reliability. Leave the expended cartridge installed until you have obtained a replacement, or the ink remaining in the print head nozzles may dry out. 1. Turn on the product. 2. If an ink cartridge is expended, you see a message on the LCD screen indicating which color to replace.
5. Before you open the new cartridge package, shake it gently four or five times. Then remove it from the package. Caution: Do not touch the green chip or the small window on the ink cartridge. This can damage the cartridge. 6. Remove the yellow tape from the side of the ink cartridge. Caution: Do not remove any other labels or seals, or ink will leak. 7. Insert the new ink cartridge into the holder and push it down until it clicks into place. 8. Lower the scanner unit. 9.
Solving Problems If you have a problem with your EPSON product, check the messages on the LCD screen to diagnose the cause. You can also check the basic troubleshooting suggestions below, or see your online User’s Guide for more detailed help. Note: Breakdown or repair of this product may cause loss of fax and network data and settings. Epson is not responsible for backing up or recovering data and settings during or after the warranty period.
Connect the Printer to Your Wireless Network If you are unable to connect to your wireless network using the product CD and the Start Here sheet, you can use the control panel on your product. Before you start, make sure you know your network name (SSID) and password. 1. Press the 2. Press OK to select Wi-Fi Setup Wizard. 3. Press u or d to select the name of your wireless network, then press OK. Continue with step 6. Wi-Fi Setup button.
■ If you cannot scan from the product’s control panel, make sure you restarted your computer after installing the product software. Make sure EPSON Event Manager is not being blocked by your firewall or security software. ■ If you are scanning a large document at high resolution, a communication error may occur. If the scan did not complete, lower the resolution. ■ Check the Connection setting and test the connection using EPSON Scan Settings.
■ If paper has jammed, follow the steps on the LCD screen. If necessary, follow these steps: 1. Lift the scanner unit. 2. Carefully remove any paper trapped inside, including any torn pieces. Caution: Do not touch the flat white cable inside the product. 3. ■ Lower the scanner unit. If documents don’t feed correctly in the Automatic Document Feeder (ADF), make sure the paper is not bent, folded, or curled. If paper has jammed: 1. Open the ADF cover and remove any jammed paper.
3. Raise the ADF input tray and carefully remove the jammed paper. 4. Return the ADF input tray to its original position and close the ADF cover. Faxing Problems ■ Make sure the recipient’s fax machine is turned on and working. ■ Make sure the LINE port on the product is connected to a telephone wall jack. Verify that the telephone wall jack works by connecting a phone to it. ■ Make sure the Auto Answer feature is turned on to receive faxes automatically (see page 20).
■ If you notice light or dark bands across your printouts or they are too faint, run a nozzle check (see page 21) to see if the print head needs cleaning. ■ If you notice jagged vertical lines, you may need to align the print head. See the online User’s Guide for instructions. ■ The ink cartridges may be low on ink. Check your cartridge levels (see page 22) and replace cartridges, if necessary (see page 24).
Notices Important Safety Instructions Before using your EPSON product, read and follow these safety instructions: ■ Be sure to follow all warnings and instructions marked on the product. ■ Use only the type of power source indicated on the product label. ■ Use only the power cord that comes with the product. Use of another cord may cause fires or electric shock. Do not use the cord with any other equipment. ■ Place the product near a wall outlet where the plug can be easily unplugged.
■ Do not use aerosol products that contain flammable gases inside or around the product. Doing so may cause fire. ■ Do not press too hard on the scanner glass when placing the originals. ■ Do not open the scanner section while the product is copying, printing, scanning, or performing any other functions. ■ Be careful not to trap your fingers when closing the document cover or scanner. ■ Do not touch the flat white cable inside the product. ■ Do not spill liquid on the product.
■ Do not try to move the print head by hand, or you may damage the product. ■ Before transporting the product, make sure the print head is in the home (far right) position and the ink cartridges are in place. ■ Install a new ink cartridge immediately after removing a used one. Leaving cartridges uninstalled can dry out the print head and may prevent the product from printing. ■ Do not shake ink cartridges too vigorously or after opening their packages; this can cause them to leak.
Declaration of Conformity According to 47CFR, Part 2 and 15 for: Class B Personal Computers and Peripherals; and/or CPU Boards and Power Supplies used with Class B Personal Computers: We: Located at: Epson America, Inc. MS 3-13 3840 Kilroy Airport Way Long Beach, CA 90806 Telephone: (562) 290-5254 Declare under sole responsibility that the product identified herein, complies with 47CFR Part 2 and 15 of the FCC rules as a Class B digital device.
part of the product identifier that has the format US:AAAEQ##TXXXX. The digits represented by ## are the REN without a decimal point (e.g., 03 is a REN of 0.3). For earlier products, the REN is separately shown on the label. If this equipment causes harm to the telephone network, the telephone company will notify you in advance that temporary discontinuance of service may be required. But if advance notice isn't practical, the telephone company will notify the customer as soon as possible.
interference will not occur in a particular installation. If this equipment does cause interference to radio and television reception, which can be determined by turning the equipment off and on, the user is encouraged to try to correct the interference by one or more of the following measures: ■ Reorient or relocate the receiving antenna. ■ Increase the separation between the equipment and receiver.
What Epson Will Do To Correct Problems: Should your EPSON printer prove defective during the warranty period, please call the EPSON ConnectionSM at (562) 276-4382 (U.S.) or (905) 709-3839 (Canada) for warranty repair instructions and return authorization. An EPSON service technician will provide telephone diagnostic service to determine whether the printer requires service. If service is needed, Epson will, at its option, exchange or repair the printer without charge for parts or labor.
ANY OTHER LEGAL THEORY. IN NO EVENT SHALL EPSON OR ITS AFFILIATES BE LIABLE FOR DAMAGES OF ANY KIND IN EXCESS OF THE ORIGINAL RETAIL PURCHASE PRICE OF THE PRODUCT. In Canada, warranties include both warranties and conditions. Some jurisdictions do not allow limitations on how long an implied warranty lasts, and some jurisdictions do not allow the exclusion or limitation of incidental or consequential damages, so the above limitations and exclusions may not apply to you.
Trademarks EPSON and Supplies Central are registered trademarks, EPSON Connect is a trademark, and EPSON Exceed Your Vision is a registered logomark of Seiko Epson Corporation. EPSON Connection is a service mark of Epson America, Inc. General Notice: Other product names used herein are for identification purposes only and may be trademarks of their respective owners. Epson disclaims any and all rights in those marks. This information is subject to change without notice. © 2013 Epson America, Inc.