
User's Guide
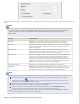


Contrast Adjusts the difference between the light and dark areas of the overall image.
Click the
Image Adjustment icon to access the Contrast setting.
Saturation Adjusts the density of colors in the overall image.
Click the
Image Adjustment icon to access the Saturation setting.
Unsharp Mask Turn on to make the edges of image areas clearer for an overall sharper image.
The level of sharpness is adjustable. Turn off to leave softer edges.
Descreening Removes the rippled pattern that can appear in subtly shaded image areas, such
as skin tones. Also improves results when scanning magazine or newspaper
images that include screening in their original print processes. The results of
descreening do not appear in the preview, only in your scanned image. The level
of descreening is adjustable.
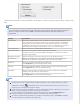
Color Restoration Restores the colors in faded photos automatically.
Backlight Correction Removes shadows from photos that have too much background light. The level of
backlight correction is adjustable.
Dust Removal Removes dust marks from your originals automatically. The results of Dust
Removal do not appear in the preview, only in your scanned image. The level of
dust removal is adjustable.
Threshold Adjusts the level at which the black areas in text and line art are delineated,
improving text recognition in OCR programs. (Available only when you select Black
& White as the Image Type setting.)
Note:
To view red, green, and blue levels at particular points in your preview image as you make
adjustments, click the
densitometer icon in the Preview window and move your cursor over
an image area. See Epson Scan Help for details.
Certain settings may not be available, or may be automatically selected, depending on the type of
image you are previewing and other settings you have selected.
You can customize how certain Epson Scan settings behave by clicking Configuration and
changing settings in the window that appears. See Epson Scan Help for details.
To undo any image quality adjustments you make to the preview image, click Reset if available,
turn off the setting, or preview your image again.
Top
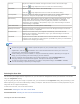
Selecting the Scan Size
You can scan your images at their original size, or you can reduce or enlarge their size as you scan them. You do this
using the Target Size setting.
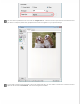
If you are going to scan your image to a specific size, you should select the Target Size setting after previewing it, but
before adjusting your scan area indicated by creating a marquee. This sets the scan area to correct proportions so your
image will not be cropped unexpectedly.
To select the scan size, see one of these sections.
Home Mode: Selecting the Scan Size in Home Mode
Professional Mode: Selecting the Scan Size in Professional Mode
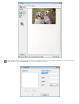
Selecting the Scan Size in Home Mode