
User's Guide
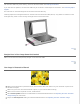

If your original is printed on thin paper, images on the back may be visible to the scanner and appear in your scanned
image. Try scanning the original with a piece of black paper placed on the back of it. Also make sure the Document
Type and Image Type settings are correct for your original. See Scanning in Home Mode or Scanning in Professional
Mode for instructions.
Top
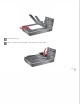
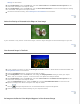
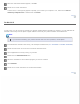
Ripple Patterns Appear in Your Scanned Image
A ripple or cross-hatch pattern (called moiré) may appear in a scanned image of a printed document. It is caused by
interference from the differing pitches in the scanner’s screen and the halftone screen in your original.
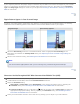
Original image Descreening applied
Select the Descreening check box. In Professional Mode, select an appropriate Screen Ruling for the
Descreening and deselect the Unsharp Mask setting. See Adjusting the Color and Other Image Settings for
instructions.
Select a lower resolution setting. See Selecting the Scan Resolution for instructions.
Note:
You cannot remove ripple patterns when you are scanning using a resolution higher than 600 dpi.
Top
Characters Are Not Recognized Well When Converted into Editable Text (OCR)
Make sure the document lies perfectly straight on the document table.
In Office Mode or Home Mode, select the Text Enhancement check box.
Adjust the Threshold setting.
Office Mode or Home Mode: Select Black&White as the Image Type setting. Then try adjusting the
Threshold setting. See Converting Scanned Documents Into Editable Text for instructions.
Professional Mode: Click the + (Windows) or
(Mac OS X) button next to Image Type and make the
appropriate Image Option setting. Then try adjusting the Threshold setting. See Converting Scanned
Documents Into Editable Text for instructions.
Check your OCR software manual to see if there are any settings you can adjust in your OCR software.