
User's Guide

Home > Scanning Special Projects
Removing Dust Marks
Dust Removal in Home Mode
Dust Removal in Professional Mode
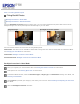
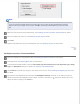
Using the Dust Removal feature in Epson Scan, you can virtually “clean” the dust marks from your originals as you scan
them.
Original image Dust Removal applied
Note:
Before scanning your originals, carefully remove any dust that you can see on them.
Do not use Dust Removal to scan your originals that do not contain dust or scratch marks;
otherwise your scanned image may be distorted or blurred.
See one of these sections for instructions on removing dust marks from your original(s).
Office Mode: This feature is not available in Office Mode. Change the scan mode to Home Mode or Professional Mode.
See Changing the Scan Mode for instructions.
Home Mode: Dust Removal in Home Mode
Professional Mode: Dust Removal in Professional Mode
Dust Removal in Home Mode
Place your original(s) on the document table. See Placing Documents or Photos for instructions.
Start Epson Scan. See Starting Epson Scan for instructions.
In the Home Mode window, select the Document Type, Image Type, and Destination settings. For details, see
Scanning in Home Mode.
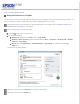
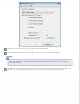
Click Preview to preview your image(s), then select your scan area. See Previewing and Adjusting the Scan Area
for details.