WorkForce® 545/645 Series Quick Guide Your WorkForce 545/645 Series. . . . . . . . . . . . . . . . . . . . . . . . . . . . . . . . . . . . 2 Using Special Papers . . . . . . . . . . . . . . . . . . . . . . . . . . . . . . . . . . . . . . . . . . . . 4 Placing Originals for Copying, Scanning, or Faxing. . . . . . . . . . . . . . . . . . . . . . 6 Copying a Document . . . . . . . . . . . . . . . . . . . . . . . . . . . . . . . . . . . . . . . . . . . . 8 Printing From a Memory Card . . . . . . . . . . . . .
Your WorkForce 545/645 Series After you set up your WorkForce® 545/645 Series (see the Start Here sheet), turn to this Quick Guide and your online User’s Guide for instructions on using your product. Features Where to find information Copy, scan, and fax from the easy-to-use control panel See this Quick Guide for the basics. See the online User’s Guide for details. Process large documents with the 30-page capacity Automatic Document Feeder See this Quick Guide for the basics.
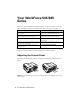
Using the Control Panel The control panel makes it easy to use all the features of your product. To save energy, the screen goes dark after several minutes of inactivity. Press any button to wake it up. 1 9 2 3 4 WorkForce 645 only 5 6 7 8 10 Tip: To turn off the “beep” heard when you press a button on the screen, or to reduce its volume, press F Setup, select Printer Setup, select Sound, and finally select Off.
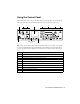
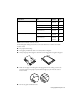
Using Special Papers Epson offers a wide array of high quality papers, making it easy to maximize the impact of your documents, photos, presentations, and other projects. You can purchase genuine Epson ink and paper at Epson Supplies Central® at www.epson.com/ink3 (U.S. sales) or www.epson.ca (Canadian sales). You can also purchase supplies from an Epson authorized reseller. To find the nearest one, call 800-GO-EPSON (800-463-7766). Part number Sheet count Letter (8.
Part number Sheet count 4 × 6 inches (102 × 152 mm) S041808 S041727 40 100 5 × 7 inches (127 × 178 mm) S041464 20 8 × 10 inches (203 × 254 mm) S041465 20 Letter (8.5 × 11 inches [216 × 279 mm]) S042183 S041667 25 50 4 × 6 inches (102 × 152 mm) S041809 S042038 50 100 Letter (8.5 × 11 inches [216 × 279 mm]) S041141 S041649 S041271 20 50 100 Paper name Size Epson Premium Photo Paper Glossy Epson Photo Paper Glossy Note: Media availability varies by country.
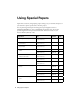
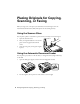
Placing Originals for Copying, Scanning, or Faxing Before you copy, scan, or fax, place your documents on the scanner glass or in the Automatic Document Feeder (ADF). Place photos on the scanner glass only. Using the Scanner Glass You can place a photo or a document up to letter-size (or A4-size) on the scanner glass. 1. Open the document cover. 2. Place your original facedown on the scanner glass, with the top against the back left corner. 3. Close the cover gently to keep your original in place.
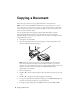
3. Insert the originals faceup, top edge first. The ADF icon appears on the screen. Note: If you’re using the 2-up Copy layout, make sure the originals are loaded as shown below. 4. Slide the edge guide against the originals, but not too tight.
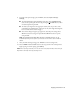
Copying a Document Follow the steps in this section to copy black-and-white or color documents. Note: You can use the Copy/Restore Photos option to copy photos onto 4 × 6-inch (102 × 152 mm), 5 × 7-inch (127 × 178 mm), 8 × 10-inch (203 × 254 mm), letter-size, or A4-size Epson photo paper (various types available) for instant photo reprints. See the online User’s Guide for details.
8. To change other print settings, press x Menu, then select Paper and Copy Settings. ■ To make double-sided copies (WorkForce 645 only), select 2-Sided Printing. (You can also quickly open this menu by pressing the 2-Sided button.) Select the desired option and press OK. ■ To reduce your originals so that pages print side-by-side, two per sheet, select 2-up Copy as the Layout setting. This is for use only with single-sided originals; be sure to load them as shown on page 7.
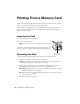
Printing From a Memory Card Your product lets you print photos directly from your digital camera’s memory card; just insert it into the memory card slot and you’re ready to print. See the online User’s Guide for a list of compatible memory cards and instructions on copying memory card files between your product and a computer, and printing photos directly from your camera. Inserting the Card 1. Make sure your printer is turned on. 2. Insert your card as shown.
Printing Photos From the LCD Screen You can select individual photos for printing as you view them on the LCD screen. See the online User’s Guide for instructions on printing photo greeting cards, layout sheets, and proof sheets. 1. Load several sheets of Epson photo paper. 2. Press the Photo button, then select View and Print Photos. You see this screen: 3. Press l or r to scroll through your photos and display one that you want to print. Note: To crop the photo, press the Display/Crop button.
Printing From Your Computer This section describes the basic steps for printing from a Windows or Mac computer. For detailed instructions on printing, see the online User’s Guide. Printing in Windows 1. Select the print command in your application. You see a window like this one. Select your Epson product Click here to open your printer software 2. Make sure your product is selected, then click the Preferences or Properties button. (If you see a Setup, Printer, or Options button, click it.
3. On the Main tab, select basic print settings. Make sure you choose the correct Paper Type setting for your paper (see page 15). Select your Document Size Select your document Orientation Click here for quick access to settings Select your Paper Type Click here for 2-sided printing Tip: For more information about print settings, click Help. 4. For automatic duplex printing with the WorkForce 645, select 2-sided Printing, then select Auto. 5.
3. Select your product as the Printer setting. Select your Epson product Click to expand, if necessary 4. Select basic copy and page settings. For borderless photos, choose a Paper Size setting with a Borderless option. Note: If the setting you want isn’t shown (for example, Scale), check for it in your application before printing or check for it at the bottom of this window. Copy and page settings Application settings Pop-up menu 5.
Selecting the Correct Paper Type Select the correct Paper Type (Windows) or Media Type (Mac OS X) setting in your printer software so the ink coverage can be adjusted accordingly.
Faxing a Document Your product lets you send faxes by entering fax numbers, selecting entries from a speed dial or group dial list, or using the one-touch dial buttons. Using the Automatic Document Feeder (ADF), you can fax up to 30 letter- or A4- size or 10 legal-size pages at a time. Note: You can also send or receive a fax from your computer using the Epson FAX Utility. See the online User’s Guide for more information. Breakdown or repair of this product may cause loss of fax data and settings.
In Auto Answer mode, if the incoming call is a fax and you pick up the phone or the answering machine answers, the product automatically begins receiving the fax. If the other party is a caller, the phone can be used as normal or a message can be left on the answering machine. Note: Any phone or answering machine must be connected to the EXT. port for your product to detect an incoming fax call when the phone is picked up.
Entering Your Phone Number 1. From the Header screen, press u or d to select Your Phone Number, then press OK. You see the phone number input screen. 2. Use the numeric keypad to enter your phone number (up to 20 digits). 3. When you’re done, press OK. 4. Press x Menu to exit the Fax Menu. Using the Keypad to Enter Numbers and Characters When entering phone numbers and text in Fax mode, follow these guidelines: ■ To enter a fax number, use the numeric keypad.
Sending a Fax From the Control Panel You can send a fax by manually entering a fax number, as described below. Note: To dial the number using a telephone, by redialing, or by selecting from your speed dial list, see the next section. To send a fax from your computer using the Epson FAX Utility, see your online User’s Guide. 1. Press the Fax button. 2. Place your original(s) for faxing (see page 6). Note: To scan a two-sided document (WorkForce 645 only), press the button and select On. 2-Sided 3.
Receiving Faxes Before receiving faxes, make sure you load plain paper and select the correct settings for the paper you’ve loaded. 1. Press the Fax button. 2. Press x Menu and select Fax Print Settings. 3. Select Paper Size and make sure the setting matches the size of paper you loaded. Note: If the incoming fax is larger than the paper you loaded, it is reduced to fit or printed on multiple pages, depending on the Auto Reduction setting you select. 4. Press x Menu when done.
Scanning a Document or Photo You can use your product to scan original documents and photos and save them on your computer. Quick Scanning With the Scan Button Use the Scan button to quickly scan a photo or document and save it on your computer. You can even scan a photo and have it automatically included in an email message. Note: For Mac OS X 10.6, see “Scanning With Mac OS X 10.6” on page 23. 1. Place your original document or photo as shown on page 6. 2. Press the Scan button. 3.
Scanning With Epson Scan Software You can scan from any TWAIN-compliant application using Epson Scan. Or you can start Epson Scan directly from your computer and save your image to a file. Note: For Mac OS X 10.6, see “Scanning With Mac OS X 10.6” on page 23. For detailed scanning instructions, see the online User’s Guide. 1. Place your original document or photo as shown on page 6. 2. Do one of the following to start Epson Scan: ■ ■ Windows: Double-click the EPSON Scan icon on your desktop.
Scanning With Mac OS X 10.6 You can scan original documents and photos and save them as files on your computer. 1. Open an image editing application such as Image Capture, select your product, if necessary, then press the Scan button. 2. If you would like to select scan settings, such as Color Restoration and file save settings, click Show Details. 3. Click the Scan button to begin scanning. Your image is saved to the folder selected in the Scan To pop-up menu.
Maintaining Your Product Follow the instructions in this chapter to check and clean the print head nozzles, check ink levels, and replace ink cartridges. If you need to align the print head, see the online User’s Guide. Caution: To keep your product looking like new, don’t place anything on top of the cover or use it as a writing surface. If you need to clean the cover, use only a soft, nonabrasive microfiber-type cloth.
Cleaning the Print Head If print quality has declined and the nozzle check indicates clogged nozzles, you can clean the print head. Print head cleaning uses ink, so clean it only if necessary. Note: You cannot clean the print head if an ink cartridge is expended, and may not be able to clean it when a cartridge is low. You must replace the cartridge first (see page 27). 1. Load letter- or A4-size paper. 2. Press F Setup. 3. Press u or d to select Maintenance, then press OK. 4.
Checking Ink Levels You can check the ink levels anytime right on the LCD screen. To check the ink levels with your Windows or Mac OS X software, see the instructions in your online User’s Guide. Note: Printing stops when an ink cartridge is expended. If a color cartridge is expended, you may be able to continue printing temporarily with black ink; see the online User’s Guide for more information. If the black cartridge is expended, you must replace it to continue printing. 1. Press F Setup. 2.
Note: We recommend that you use genuine Epson cartridges and do not refill them. The use of other products may affect your print quality and could result in product damage. Yields vary considerably based on images printed, print settings, paper type, frequency of use, and temperature. For print quality, a small amount of ink remains in the cartridge after the “replace cartridge” indicator comes on.
4. Squeeze the tab on the cartridge and lift it up. Dispose of it carefully. Do not take the used cartridge apart or try to refill it. Warning: If ink gets on your skin, wash it off thoroughly with soap and water. If it gets in your eyes, flush them immediately with water. If you still have discomfort or vision problems, see a doctor immediately. Keep ink cartridges out of the reach of children and don’t allow them to drink the ink. 5.
Solving Problems If you have a problem with your Epson product, check the messages on the LCD screen to diagnose the cause. You can also check the basic troubleshooting suggestions below, or in your online User’s Guide. Problems and Solutions Check the solutions below if you’re having trouble using your Epson product. Network Problems If you have a poor wireless connection, try moving the product to a different location. Avoid placing it next to a microwave oven, 2.
■ Make sure that the product is within range of your router or access point.Contact your router manufacturer for details. The product does not appear in the printer window (Mac OS X) ■ Make sure the printer driver was installed correctly and that your computer’s TCP/IP settings are configured correctly. ■ Make sure the product is connected to the same network as your Mac.
Printing Is Slow or the Print is Cut Off Print a Network Status Sheet (see below) and check the signal strength. If it’s poor, try moving the product closer to your wireless router or access point. Avoid placing the product next to a microwave oven, 2.4 GHz cordless phone, or large metal objects such as a filing cabinet. Cannot Scan Over the Network ■ Epson Scan is not available in Mac OS X 10.6; see page 23 for scanning instructions.
Paper Feeding Problems ■ If paper doesn’t feed correctly, remove the paper and fan the sheets, then reload them and make sure the edge guides are against the paper. ■ Don’t load too many sheets at once. You can load up to 250 sheets of plain paper or 20 sheets of photo paper. Some papers should be loaded one sheet at a time; see your online User’s Guide for information on paper loading limits. Don’t load paper above the tabs on the edge guides. ■ If paper has jammed, follow the steps on the LCD screen.
■ If documents don’t feed correctly in the Automatic Document Feeder (ADF), make sure the paper is not bent, folded, or curled. If paper has jammed: 1. Open the ADF cover and remove any jammed paper. Caution: Do not try to remove the paper without opening the ADF cover or you could damage the mechanism. 2. Lift the document cover and remove any paper caught beneath it. Faxing Problems ■ Make sure the recipient’s fax machine is turned on and working.
■ If you notice light or dark bands across your printouts or they are too faint, run a nozzle check (see page 24) to see if the print head needs cleaning. ■ If you notice jagged vertical lines, you may need to align the print head. See the online User’s Guide for instructions. ■ The ink cartridges may be low on ink. Check your cartridge levels (see page 26) and replace cartridges, if necessary (see page 27).
Purchase Supplies and Accessories You can purchase genuine Epson ink and paper at Epson Supplies Central at www.epson.com/ink3 (U.S. sales) or www.epson.ca (Canadian sales). You can also purchase supplies from an Epson authorized reseller. To find the nearest one, call 800-GOEPSON (800-463-7766) Other Software Technical Support ABBYY® FineReader® Phone: (408) 457-9777 www.abbyyusa.com support@abbyyusa.
Notices Important Safety Instructions Before using your Epson product, read and follow these safety instructions: ■ Be sure to follow all warnings and instructions marked on the product. ■ Use only the type of power source indicated on the product’s label. ■ Use only the power cord that comes with the product. Use of another cord may cause fires or shock. Do not use the cord with any other equipment. ■ Place the product near a wall outlet where the plug can be easily unplugged.
■ When connecting the product to a computer or other device with a cable, ensure the correct orientation of the connectors. Each connector has only one correct orientation. Inserting a connector in the wrong orientation may damage both devices connected by the cable. ■ Do not touch the flat white cable inside the product. ■ Do not move the print head by hand; this may damage the product. ■ Do not spill liquid on the product. Do not use the product near water. Do not use with wet hands.
Ink Cartridge Safety ■ Keep ink cartridges out of the reach of children and don’t allow them to drink the ink. ■ Be careful when you handle used ink cartridges; there may be ink remaining around the ink supply port. If ink gets on your skin, wash it off thoroughly with soap and water. If it gets in your eyes, flush them immediately with water. If you still have discomfort or vision problems, see a doctor immediately. ■ Do not put your hand inside the product or touch any cartridges during printing.
Declaration of Conformity According to 47CFR, Part 2 and 15 for: Class B Personal Computers and Peripherals; and/or CPU Boards and Power Supplies used with Class B Personal Computers: We: Located at: Epson America, Inc. MS 3-13 3840 Kilroy Airport Way Long Beach, CA 90806 Telephone: (562) 290-5254 Declare under sole responsibility that the product identified herein, complies with 47CFR Part 2 and 15 of the FCC rules as a Class B digital device.
Should this equipment cause harm to the telephone network, the telephone company may discontinue your service temporarily. If possible they will notify you in advance that temporary discontinuance of service may be required. But if advanced notice isn’t practical, the telephone company will notify you as soon as possible. You will be informed of your right to file a complaint with the FCC.
■ Increase the separation between the equipment and receiver. ■ Connect the equipment into an outlet on a circuit different from that to which the receiver is connected. ■ Consult the dealer or an experienced radio/TV technician for help. WARNING The connection of a non-shielded equipment interface cable to this equipment will invalidate the FCC Certification of this device and may cause interference levels which exceed the limits established by the FCC for this equipment.
needed, Epson will, at its option, exchange or repair the printer without charge for parts or labor. If Epson authorizes an exchange for the defective unit, Epson will ship a replacement printer to you, freight prepaid, so long as you use an address in the United States, Canada, or Puerto Rico. Shipments to other locations will be made freight collect. You are responsible for securely packaging the defective unit and returning it to Epson within five (5) working days of receipt of the replacement.
Some jurisdictions do not allow limitations on how long an implied warranty lasts, and some jurisdictions do not allow the exclusion or limitation of incidental or consequential damages, so the above limitations and exclusions may not apply to you. This warranty gives you specific legal rights and you may have other rights which vary from jurisdiction to jurisdiction. To find the Epson Authorized Reseller nearest you, visit our website at: http://www.epson.com.
General Notice: Other product names used herein are for identification purposes only and may be trademarks of their respective owners. Epson disclaims any and all rights in those marks. This information is subject to change without notice. © 2011 Epson America, Inc.