Quick Reference Guide EPSON Stylus Pro 10000 ® EPSON Stylus Pro 10000 ® Printed in USA CPD-12209
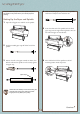
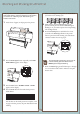
Loading Roll Paper First you attach the paper roll to the spindle and place the spindle in the printer. Then you load the paper for printing. 4 Slide the movable paper stop back onto the spindle and insert it firmly into the end of the roll. 5 Insert the white end of the spindle (with the fixed paper stop) into the right mounting bracket. You can use either the upper or lower bracket. 6 Place the black end of the spindle into the left mounting bracket inside the printer.
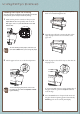
Loading Roll Paper (Continued) Loading Roll Paper for Printing 3 Feed the paper into the paper slot and then pull it down so it extends through the slot. 4 Turn the paper roll back to remove the slack. Then align the paper with the two rows of holes at the paper exit. 5 Push the paper set lever all the way in, then close the roll paper cover. Once the roll paper is attached to the spindle and inserted in the printer, you’re ready to load it for printing. 1 Make sure the printer is turned on.
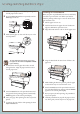
Loading and Using Cut Sheet Paper 1 Make sure roll paper is not loaded for printing, and the roll paper cover is closed. 2 Press the Paper Source button repeatedly until the Sheet light comes on. 3 Printing on Posterboard When you print on posterboard (more than 19 mil thick), you need to open the lower cover before you feed the board for printing. Follow steps 1 and 2 to the left, then open the lower cover. 5 Pull the paper set lever out. 3 Align the board with the scale on the roll paper cover.
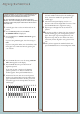
Checking and Cleaning the Print Head If dots are missing from the pattern, as shown below, you need to run a cleaning cycle. First you print a nozzle check pattern to see if the print head needs cleaning. If dots are missing from the pattern, you need to run a cleaning cycle. After cleaning, run another nozzle check. 1 2 Load a sheet of paper (or roll paper) in the printer. 5 Make sure that all of the Ink Out lights on the printer’s control panel are off.
Aligning the Print Head 7 You can use EPSON roll paper to print the alignment patterns. Two rows consisting of sets of 15 bars are printed across the width of the paper. It takes about 10 minutes to print both rows. Look at the other patterns in the first row to see if the same number consistently has the smallest gaps. If not, choose the number that generally has the smallest gaps. 8 Check the control panel display. Use the + or – button to select the best aligned bar for row #1.
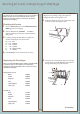
Checking Ink Levels and Replacing Ink Cartridges When one of the INK OUT lights stays on and INK OUT is displayed, the cartridge is empty. To replace the cartridge, first make sure the printer is on. Before you begin a large print job, you should check your ink levels. If one of your cartridges is low, you can replace it before you start. Or, you can wait until the ink runs out, replace the cartridge, and then continue the job without any loss of print quality.
Replacing Ink Cartridges (Continued) 3 Carefully pull the empty cartridge straight out of the printer. If you can’t insert the cartridge smoothly, you may have the wrong cartridge. Check the package and product code. 6 If ink gets on your hands, wash them thoroughly with soap and water. If ink gets into your eyes, flush them immediately with water. 4 If the Ink Out light remains on, the cartridge may not be installed correctly. Remove the cartridge and then reinsert it as described above.
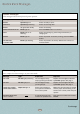
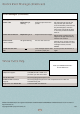
Control Panel Messages Status messages These messages indicate normal phases of printer operation. Message Light Explanation or response READY Operate light on Printer is ready to print. PRINTING Operate light flashing Printer is receiving data. RESET All lights flash briefly Printer is resetting. PRESS PAUSE BUTTON Pause light on Press the Pause button to continue. WAIT Pause light on or flashing Printer is warming up, performing maintenance, or charging ink.
Control Panel Messages (Continued) Error messages (Continued) Message Light Explanation Response PAPER JAM Paper Out light flashing Paper has jammed in the printer. Pull the paper set lever all the way out and open the lower cover if necessary. Then remove the jammed paper, close the lower cover, and push the lever in. Turn the printer off and then back on. PAPER NOT STRAIGHT Paper Out light on Paper was fed at an angle.
Quick Reference Guide EPSON Stylus Pro 10000 ® EPSON Stylus Pro 10000 ® Printed in USA CPD-12209