
Basic Guide


Table Of Contents
- Front Matter
- Contents
- Welcome!
- Copying
- Making Prints From Your Digital Camera
- Printing on CDs and DVDs
- Scanning to a Memory Card
- Saving and Storing Photos
- Maintaining Your RX700
- Solving Problems
- Notices
- Index
- How to Copy, Print, and Scan Without a Computer
- How To Order Epson Ink and Paper
- Warranty
Printing a CD/DVD Without a Computer 59
You see your memory card’s first photo displayed on the screen:
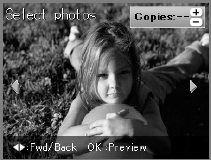
7. Select your photo(s) for printing:
■ Use the l and r arrow buttons to preview your photos.
■ While a photo is displayed, use the + and – buttons to select how many
copies of it you’d like.
■ Press OK when done.
8. At the preview screen, press the x
Color button to print in color, or the
x
B&W button to print in grayscale. Your insert is printed.
To cancel printing, press the y
Stop button.
9. After the insert finishes printing, use the crop marks on the sheet as guides for
cutting out the insert in the shape of a rectangle. Then fold the rectangle in
half and insert it into your jewel case.