sprx680_qg.
sprx680_qg.book Page 2 Wednesday, June 6, 2007 8:40 AM Contents Introduction . . . . . . . . . . . . . . . . . . . . . . . . . . . . . . . . . . . . . . . . . . . 4 Printer Parts . . . . . . . . . . . . . . . . . . . . . . . . . . . . . . . . . . . . . . . . . . . . . 5 Loading Paper . . . . . . . . . . . . . . . . . . . . . . . . . . . . . . . . . . . . . . . . . 6 Loading in the Front Paper Cassette . . . . . . . . . . . . . . . . . . . . . . . . . . . . . 6 Loading in the Rear Sheet Feeder . . . . . . .
sprx680_qg.book Page 3 Wednesday, June 6, 2007 8:40 AM Maintaining Your All-in-One . . . . . . . . . . . . . . . . . . . . . . . . . . . 31 Checking the Print Head Nozzles . . . . . . . . . . . . . . . . . . . . . . . . . . . . . . Cleaning the Print Head . . . . . . . . . . . . . . . . . . . . . . . . . . . . . . . . . . . . Checking the Ink Cartridge Status . . . . . . . . . . . . . . . . . . . . . . . . . . . . . Replacing Ink Cartridges . . . . . . . . . . . . . . . . . . . . . . . . . . . . . . . . .
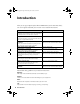
sprx680_qg.book Page 4 Wednesday, June 6, 2007 8:40 AM Introduction After you set up your Epson Stylus® Photo RX680 Series (see the Start Here sheet), turn to this Quick Guide and your on-screen User’s Guide for instructions. Features Where to find information Copy documents or photos (including red-eye reduction, automatic restoration of faded photos, and instant photo reprints) See this Quick Guide.
sprx680_qg.book Page 5 Wednesday, June 6, 2007 8:40 AM Printer Parts Paper support Edge guide Rear sheet feeder Display screen Control panel buttons Front paper cassette Document cover Scanner glass EXT.
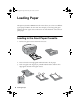
sprx680_qg.book Page 6 Wednesday, June 6, 2007 8:40 AM Loading Paper The Epson Stylus Photo RX680 Series all-in-one allows you to have two different types of paper loaded at the same time. For example, you can keep plain paper loaded in the front paper cassette and use the rear sheet feeder for various sizes of photo paper. Loading in the Front Paper Cassette 1. Pull out the paper cassette and remove the cover. 2. Press in the tab on the edge guides and slide them to fit the paper. 3.
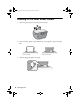
sprx680_qg.book Page 7 Wednesday, June 6, 2007 8:40 AM 4. Replace the paper cassette cover and insert the cassette back into the printer. 5. Open the output tray and its extensions. Always load paper face-down, with the short edge facing the back of the paper cassette. Load letterhead or pre-printed paper with the top edge facing the back of the cassette. Do not load envelopes in the paper cassette.
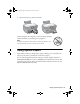
sprx680_qg.book Page 8 Wednesday, June 6, 2007 8:40 AM Loading in the Rear Sheet Feeder 1. Open the paper support and pull up the extension. 2. Insert the paper, glossy or printable side up, short edge first, against the right side. Letter-size paper 3. Slide the edge guide against the paper.
sprx680_qg.book Page 9 Wednesday, June 6, 2007 8:40 AM 4. Open the output tray and its extensions. Always load paper short edge first, even for landscape printing. Load letterhead or pre-printed paper top edge first. Note: For details on paper and instructions on loading envelopes in the rear sheet feeder, see your on-screen User’s Guide. Using Special Papers Epson offers a wide array of high quality papers, making it easy to maximize the impact of your photos, presentations, and creative projects.
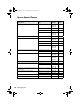
sprx680_qg.book Page 10 Wednesday, June 6, 2007 8:40 AM Epson Special Papers Part number Sheet count Borderless 4 × 6 inches S041934 S042181 S042174 50 60 100 Borderless 5 × 7 inches S041945 20 Paper name Size Epson Ultra Premium Photo Paper Glossy Borderless 8 × 10 inches S041946 20 Letter (8.5 × 11 inches) S041935 S042182 S042175 20 25 50 Epson Ultra Premium Photo Paper Luster Letter (8.
sprx680_qg.book Page 11 Wednesday, June 6, 2007 8:40 AM Copying a Photo or Document Follow the instructions in this section to position your originals correctly on the glass, and make color or black-and-white copies. To copy directly onto ink jetprintable CDs or DVDs, see the on-screen User’s Guide. Placing the Original on the Glass 1. Open the document cover and place your original face-down on the scanner glass, with the top against the back left corner. 2.
sprx680_qg.book Page 12 Wednesday, June 6, 2007 8:40 AM Copying a Document You can copy documents using your all-in-one just like a copy machine. Select Copy mode Select number of copies Select special settings 1. Make sure you have letter- or A4-size plain paper loaded in the front paper cassette. For instructions, see page 6. 2. Place the document on the glass (see page 11) and close the cover. 3. Press the Copy mode button. 4. Press + or – to select the number of copies you want. 5.
sprx680_qg.book Page 13 Wednesday, June 6, 2007 8:40 AM Copying a Photo You can make copies of your photos on 4 × 6-inch, 5 × 7-inch, 8 × 10-inch, letter-size, or A4-size photo paper using a variety of layouts. 1. Load Epson photo paper in the rear sheet feeder. See page 8 for instructions. 2. Place your photo on the glass (see page 11) and close the cover. 3. Press the Copy button. 4. Press + or – to select the number of copies you want. 5. Press l or r to select Color or B&W. 6.
sprx680_qg.book Page 14 Wednesday, June 6, 2007 8:40 AM 9. When you’re ready to copy, press x Start. If you need to cancel copying, press y Stop/Clear Settings. Note: Do not pull out paper as it is printing; it ejects automatically. Editing Photos While You Copy You can restore colors in faded photos, correct poorly exposed photos, reduce redeye, and even crop while you copy photos. 1. Load Epson photo paper in the rear sheet feeder. See page 10 for a list of the papers and sizes available. 2.
sprx680_qg.book Page 15 Wednesday, June 6, 2007 8:40 AM To auto-correct your photo, reduce red-eye, or select different paper settings, press x Menu. (See page 13 for a list of paper types; you can’t select Plain Paper when you’re copying photos.) ■ To correct a photo that is too light or too dark, press d until Enhance is highlighted, then press r to select PhotoEnhance and press OK. See page 16 for more information about automatic photo correction.
sprx680_qg.
sprx680_qg.
sprx680_qg.book Page 18 Wednesday, June 6, 2007 8:40 AM Inserting the Card 1. Make sure your RX680 Series is turned on. Note: If you see a message on your computer screen when you insert a card, cancel the operation and close the message window. 2. Open the memory card door. 3. Insert your card into the correct slot (see page 17); it won’t go in all the way. The memory card access light flashes, then stays on.
sprx680_qg.book Page 19 Wednesday, June 6, 2007 8:40 AM Printing From a USB Flash Drive When your photos are saved on a USB flash drive, you can print directly from the drive. 1. Make sure the RX680 Series is turned on and there are no memory cards inserted in its memory card slots. Note: If a memory card is inserted, the RX580 Series will not recognize the external USB drive. 2. Plug the flash drive directly into the EXT.I/F RX680 Series. port on the front of the 3.
sprx680_qg.book Page 20 Wednesday, June 6, 2007 8:40 AM Viewing and Selecting Photos After you insert your memory card or USB flash drive as described above, you’re ready to select and print your photos. 1. Load Epson photo paper in the rear sheet feeder. See page 8 for instructions. 2. Press the Memory Card mode button. 3. Press l or r to select View and Print Photos. Note: To print all the photos on your card, select Print All Photos. To select and print photos by date, select Print by Date.
sprx680_qg.book Page 21 Wednesday, June 6, 2007 8:40 AM Automatically Correcting Photos Your RX680 Series automatically analyzes your photos, and, if necessary, adjusts the brightness, contrast, and saturation. Auto Photo Correction (also called PhotoEnhance) is enabled by default. To preview the correction on the display screen: 1. Follow the instructions on page 20 to view your photos. You see Preview Auto Correct in the lower left corner of the screen.
sprx680_qg.book Page 22 Wednesday, June 6, 2007 8:40 AM 4. Press l or r to select Print Photo Greeting Card. 5. Press OK. 6. Make sure Select Photo and Print Template is highlighted and press OK. 7. Press l or r to select the photo you want, then press OK. 8. Select the Paper Type, Paper Size, Layout, and Frame you want to use. 9. Press x Start to print the greeting card template. Printing the Cards 1.
sprx680_qg.book Page 23 Wednesday, June 6, 2007 8:40 AM Printing From a Digital Camera You can connect a digital camera to the RX680 Series and print your photos directly from the camera. Check your camera manual to see if it supports PictBridge™ or USB DIRECTPRINT™ printing. Also make sure your photos are in JPEG format and sized from 80 × 80 to 9200 × 9200 pixels. Note: Epson cannot guarantee the compatibility of any cameras.
sprx680_qg.book Page 24 Wednesday, June 6, 2007 8:40 AM Printing From Your Computer This section describes basic printing from your Windows or Macintosh computer. To install your software, see the Start Here sheet. For detailed instructions, see the on-screen User’s Guide. You can also print on ink jet-printable CDs or DVDs using your printer software. See the on-screen User’s Guide for details. Tip: It’s a good idea to check for updates to your Epson Stylus Photo RX680 Series software.
sprx680_qg.book Page 25 Wednesday, June 6, 2007 8:40 AM 3. On the Main tab, select the basic print settings. Make sure you choose the correct paper Type setting for your paper (see page 28). Select the type of document you’re printing (choose Photo or Best Photo for photos) Select your paper Source, Type, and Size Click here for borderless photos Select your document or photo Orientation 4. Make sure you select the source for the paper you want to print on.
sprx680_qg.book Page 26 Wednesday, June 6, 2007 8:40 AM 6. Select other layout settings as necessary. 7. For more printing options, click the Advanced tab. Note: For more information about print settings, click Help or see your on-screen User’s Guide. 8. Click OK to save your settings. 9. Click OK or Print to start printing. This window appears and shows the progress of your print job. Check ink cartridge status Cancel printing Pause or resume printing Printing With a Macintosh 1.
sprx680_qg.book Page 27 Wednesday, June 6, 2007 8:40 AM 5. Select Stylus Photo RX680, choose Print Settings from the pop-up menu, and select the following print settings: Pop-up menu Select your Paper Source, Media Type (see page 28), and Color or Grayscale printing Select higher quality or faster printing (if available) Select Automatic mode Note: In certain programs, you may need to select Advanced before you can select Print Settings. For more information about printer settings, click the ? button.
sprx680_qg.book Page 28 Wednesday, June 6, 2007 8:40 AM 10. To monitor your print job, click the printer icon in the dock (or click the Print Center icon and double-click SP RX680 Series on the next screen). Cancel printing Pause or resume printing Select the print job Selecting the Correct Paper Type Select the correct Type (see page 25) or Media Type (see page 27) setting in your printer software so the ink coverage can be adjusted accordingly.
sprx680_qg.book Page 29 Wednesday, June 6, 2007 8:40 AM Scanning a Photo or Document You can use your Epson Stylus Photo RX680 Series all-in-one to scan a photo or document and save it on your computer or other device. You can even restore and correct photographs as you scan (see page 30). The Epson Scan software provides three scanning modes: ■ Full Auto Mode scans quickly and easily using automatic settings. ■ Home Mode previews your image and provides preset options for scanning.
sprx680_qg.book Page 30 Wednesday, June 6, 2007 8:40 AM You see the Epson Scan standby window: 3. If the Mode is set to Full Auto Mode, click the Scan button. If you are in Home or Professional Mode, you see a different Epson Scan window. (To change the mode, select it in the upper right corner.) 4. To restore color in a faded photo or make other corrections, click Customize and follow the instructions below. 5. Click OK. The image is scanned and you see its icon in Windows Explorer or Macintosh Finder.
sprx680_qg.book Page 31 Wednesday, June 6, 2007 8:40 AM Maintaining Your All-in-One Follow the steps here to check and clean the print head, and replace ink cartridges. To align the print head, if necessary, see your on-screen User’s Guide. You can also perform these maintenance tasks through your RX680 Series software. See your on-screen User’s Guide for instructions. Note: If you need to clean the document cover, use only a soft, non-abrasive microfiber-type cloth.
sprx680_qg.book Page 32 Wednesday, June 6, 2007 8:40 AM Cleaning the Print Head If print quality has declined and the nozzle check indicates clogged nozzles, you can clean the print head. Print head cleaning uses ink, so clean it only if necessary. Note: You cannot clean the print head if an ink cartridge is expended, and may not be able to clean it when a cartridge is low. You must replace the cartridge first (see page 35). 1. Load letter-size paper in the rear sheet feeder. 2. Press the Setup button. 3.
sprx680_qg.book Page 33 Wednesday, June 6, 2007 8:40 AM Checking the Ink Cartridge Status Your RX680 Series will let you know when an ink cartridge is low or expended by displaying a message on its display screen or your computer. Note: You cannot print or copy when an ink cartridge is expended even if the other cartridges are not expended. Replace any expended cartridges before printing or copying. To check ink cartridge status from the display screen anytime, follow these steps: 1.
sprx680_qg.book Page 34 Wednesday, June 6, 2007 8:40 AM Purchasing Epson Ink Cartridges You can purchase genuine Epson ink and paper at Epson Supplies Central at www.epson.com/ink3 (U.S. sales) or www.epson.ca (Canadian sales). You can also purchase supplies from an Epson authorized reseller. To find the nearest one, call 800-GO-EPSON (800-463-7766).
sprx680_qg.book Page 35 Wednesday, June 6, 2007 8:40 AM Replacing Ink Cartridges Make sure you have a new ink cartridge before you begin. You must install new cartridges immediately after removing the old ones. Caution: Do not open ink cartridge packages until you are ready to install the ink. Cartridges are vacuum packed to maintain reliability. Leave your old cartridges in the RX680 Series until you are ready to replace them to prevent the print head nozzles from drying out.
sprx680_qg.book Page 36 Wednesday, June 6, 2007 8:40 AM 4. Remove the cartridge from the package, but be careful not to touch the green chip on the edge. 5. Remove the yellow tape from the bottom of the ink cartridge. Caution: Do not remove any other labels or seals, or ink will leak. 6. Insert the new ink cartridge into the holder and push it down until it clicks into place. 7. Once you replace all the cartridges that need replacing, close the cartridge cover and push it down until it clicks into place.
sprx680_qg.book Page 37 Wednesday, June 6, 2007 8:40 AM Solving Problems Check the messages on the display screen to diagnose the cause of most problems. You can also check the basic troubleshooting suggestions beginning on page 38 or check the on-screen User’s Guide for more detailed help. Checking for Software Updates Periodically, it’s a good idea to check Epson’s support website for free updates to your Epson Stylus Photo RX680 Series software.
sprx680_qg.book Page 38 Wednesday, June 6, 2007 8:40 AM Display screen message Problem and solution Data error. The document may not be printed correctly. A photo you’re printing from a connected camera or other device has a problem. Check your device and the photo you’re trying to print. Cannot recognize the memory card or disc. The memory card is not inserted correctly (see page 18) or there is a problem with the card. Remove it and check the card. Cannot recognize the device.
sprx680_qg.book Page 39 Wednesday, June 6, 2007 8:40 AM ■ Make sure your paper is loaded short edge first against the right side of the rear sheet feeder with the edge guide against it. Don’t load paper above the arrow mark inside the guide. ■ Make sure the paper size settings are correct for the paper you loaded. Paper Feeding Problems ■ If paper doesn’t feed, remove it and flip through the stack to separate the sheets.
sprx680_qg.book Page 40 Wednesday, June 6, 2007 8:40 AM 3. If you see paper jammed in the lower rear area or in the auto duplexer, slowly pull it out. ■ If you see a message that paper is jammed in the bottom of the all-in-one, see your on-screen User’s Guide for instructions on clearing the jam. Print Quality Problems ■ Make sure the document is placed flat against the document table glass and the all-in-one is not tilted or placed on an uneven surface.
sprx680_qg.book Page 41 Wednesday, June 6, 2007 8:40 AM Where To Get Help Epson Technical Support Epson provides these technical support services: Internet Support Visit Epson’s support website at epson.com/support and select your product for solutions to common problems. You can download drivers and documentation, get FAQs and troubleshooting advice, or e-mail Epson with your questions.
sprx680_qg.book Page 42 Wednesday, June 6, 2007 8:40 AM Notices Important Safety Instructions Before using your all-in-one, read and follow these safety instructions: ■ Be sure to follow all warnings and instructions marked on the RX680 Series. ■ Use only the type of power source indicated on the RX680 Series label. ■ Use only the power cord that comes with the RX680 Series. Use of another cord may cause fires or shock. Do not use the cord with any other equipment.
sprx680_qg.book Page 43 Wednesday, June 6, 2007 8:40 AM ■ Do not spill liquid on the RX680 Series. ■ Use only a dry, soft cloth to clean the LCD screen. Do not use liquid or chemical cleansers. ■ If the LCD screen is damaged, contact Epson. If the liquid crystal solution gets on your hands, wash them thoroughly with soap and water. If the liquid crystal solution gets into your eyes, flush them immediately with water.
sprx680_qg.book Page 44 Wednesday, June 6, 2007 8:40 AM Epson America, Inc., Limited Warranty What Is Covered: Epson America, Inc. (“Epson”) warrants to the original retail purchaser that the Epson printer covered by this limited warranty statement, if purchased and operated only in the United States or Canada, will be free from defects in workmanship and materials for a period of one (1) year from the date of original purchase. For warranty service, you must provide proof of the date of original purchase.
sprx680_qg.book Page 45 Wednesday, June 6, 2007 8:40 AM abuse, improper installation, neglect, improper shipping, damage caused by disasters such as fire, flood, and lightning, improper electrical current, software problems, interaction with non-Epson products, or service other than by an Epson Authorized Servicer. If a claimed defect cannot be identified or reproduced, you will be held responsible for the costs incurred.
sprx680_qg.book Page 46 Wednesday, June 6, 2007 8:40 AM Declaration of Conformity According to 47CFR, Part 2 and 15 for: Class B Personal Computers and Peripherals; and/or CPU Boards and Power Supplies used with Class B Personal Computers: We: Located at: Epson America, Inc. MS 3-13 3840 Kilroy Airport Way Long Beach, CA 90806 Telephone: (562) 290-5254 Declare under sole responsibility that the product identified herein, complies with 47CFR Part 2 and 15 of the FCC rules as a Class B digital device.
sprx680_qg.book Page 47 Wednesday, June 6, 2007 8:40 AM WARNING The connection of a non-shielded equipment interface cable to this equipment will invalidate the FCC Certification of this device and may cause interference levels which exceed the limits established by the FCC for this equipment. It is the responsibility of the user to obtain and use a shielded equipment interface cable with this device.
sprx680_qg.book Page 48 Wednesday, June 6, 2007 8:40 AM CPD-23846 Printed in XXXXXX XX.