
Setup Guide
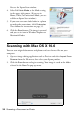
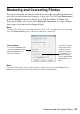
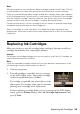
Table Of Contents
- Front Cover
- Contents
- Wireless Network Setup
- Loading Paper
- Copying a Document or Photo
- Printing From a Memory Card
- Printing From Your Computer
- Scanning a Document or Photo
- Maintaining Your Printer
- Solving Problems
- Notices
- Important Safety Instructions
- FCC Compliance Statement
- Declaration of Conformity
- Epson America, Inc. Limited Warranty
- Copyright Notice

Restoring and Correcting Photos 35
Restoring and Correcting Photos
You can automatically transform a faded, dusty, or badly exposed color photo into
one with true-to-life color and sharpness as you scan. Use the
Color Restoration
and
Dust Removal options in Epson Scan’s Full Auto Mode. In Home and
Professional Mode, you can also select
Backlight Correction to remove shadows
from images with too much background light.
Note:
For Mac OS X 10.6, see “Scanning with Mac OS X 10.6” on page 34 to start scanning,
click the Show Details button, and select settings as necessary.
Note:
For more information, see the online User’s Guide. You can also click Help on the
Epson Scan screen for information about all the available settings.
Full Auto Mode
Click the Customize button,
click Dust Removal and/or
Color Restoration, click
OK, and click Scan.
Automatically orients
your photos based
on detected faces
and other features.
If your photo is not
oriented correctly,
turn off Auto Photo
Orientation and try
again.