
User's Manual

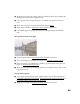
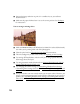
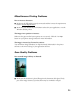


Table Of Contents
- Front Matter
- EPSON Stylus CX5400 User’s Guide
- EPSON Stylus CX5400 Parts
- Loading Paper
- Copying
- Printing With Windows
- Printing With Macintosh OS X
- Printing With Macintosh OS 8.6 to 9.x
- Selecting Your Paper Type
- Scanning
- Cleaning the Print Head
- Purchasing Ink Cartridges
- Replacing an Ink Cartridge
- Aligning the Print Head
- Cleaning the Stylus CX
- Transporting the Stylus CX
- Solving Problems
- Uninstalling Your Software
- Setting Up Network Printing
- Where To Get Help
- Specifications
- System Requirements
- Important Safety Instructions
- Legal Notices

70
■ Increase the image resolution or print it in a smaller size; see your software
documentation.
■ Make sure the paper thickness lever is set to the correct position. See Envelopes
for instructions.
You see wrong or missing colors.
■ Make sure Black Ink Only is off (Windows) or Color ink is selected (Macintosh),
even when you’re printing black and white photographs.
■ Clean the print head; see Cleaning the Print Head for instructions.
■ The ink cartridges may be old or low on ink; see Replacing an Ink Cartridge.
■ Try turning off PhotoEnhance. Also check if you’re using a special effect that
alters image colors, like Sepia.
■ Try using Automatic mode (Macintosh); see Printing With Macintosh OS X or
Printing With Macintosh OS 8.6 to 9.x
.
■ Try changing the Gamma setting; see Customizing Windows Print Settings,
Customizing Print Settings (Mac OS X) or Customizing Print Settings (Mac OS
8.6 to 9.x).
■ Your printed colors can never exactly match your on-screen colors. However, you
can use a color management system, such as ICM or ColorSync to get as close as
possible. See Customizing
Windows Print Settings, Customizing Print Settings
(Mac OS X), or Customizing Print Settings (Mac OS 8.6 to 9.x).