
User's Manual
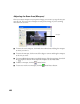
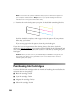
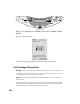
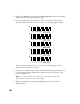
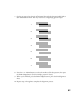
Table Of Contents
- Front Matter
- EPSON Stylus CX5400 User’s Guide
- EPSON Stylus CX5400 Parts
- Loading Paper
- Copying
- Printing With Windows
- Printing With Macintosh OS X
- Printing With Macintosh OS 8.6 to 9.x
- Selecting Your Paper Type
- Scanning
- Cleaning the Print Head
- Purchasing Ink Cartridges
- Replacing an Ink Cartridge
- Aligning the Print Head
- Cleaning the Stylus CX
- Transporting the Stylus CX
- Solving Problems
- Uninstalling Your Software
- Setting Up Network Printing
- Where To Get Help
- Specifications
- System Requirements
- Important Safety Instructions
- Legal Notices

57
7. On the test page, select the pair of horizontal bars with the least noticeable light or
dark band between them. You may need to use a magnifying glass or loupe.
8. Press the
+ or – Value buttons to select the number of the best pattern, then press
the Color Copy button. (In this example, pattern 4 is best.)
9. When you’re finished, press the Color Copy button to print the third alignment
sheet.
10. Repeat steps 7 through 8 to complete the alignment process.
2
1
3
4
5
6
7