Quick Reference Guide Using Your Stylus CX Without a Computer Maintaining Your Stylus CX Solving Problems Requirements and Notices CPD-16737 4046294-00
Copyright Notice All rights reserved. No part of this publication may be reproduced, stored in a retrieval system, or transmitted in any form or by any means, electronic, mechanical, photocopying, recording, or otherwise, without the prior written permission of SEIKO EPSON CORPORATION. The information contained herein is designed only for use with this EPSON product. EPSON is not responsible for any use of this information as applied to other equipment.
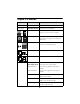
USING YOUR STYLUS CX . . . . . . . . . . . . . . . . . . . . . . . . 5 Stylus CX Buttons . . . . . . . . . . . . . . . . . . . . . . . . . . . . . . . . . . . . . 6 Stylus CX Menus . . . . . . . . . . . . . . . . . . . . . . . . . . . . . . . . . . . . . 7 Copying Documents . . . . . . . . . . . . . . . . . . . . . . . . . . . . . . . . . . . 9 Copying Photographs . . . . . . . . . . . . . . . . . . . . . . . . . . . . . . . . . 11 Loading Paper and Placing Your Photo . . . . . . . . . . . . . . . . . . .
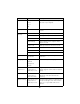
SOLVING PROBLEMS . . . . . . . . . . . . . . . . . . . . . . . . . . . 28 Checking the Stylus CX Messages . . . . . . . . . . . . . . . . . . . . . . . . . Problems and Solutions . . . . . . . . . . . . . . . . . . . . . . . . . . . . . . . . Copying Problems . . . . . . . . . . . . . . . . . . . . . . . . . . . . . . . . . Paper Feeding Problems . . . . . . . . . . . . . . . . . . . . . . . . . . . . . Copy Quality Problems . . . . . . . . . . . . . . . . . . . . . . . . . . . . . Where To Get Help . . . .
Using Your Stylus CX You can use your EPSON Stylus® CX5400 to make color copies without turning on your computer. All you have to do is place your original on the glass and press the button. You can also make special copies—such as 4 × 6 glossy photos—by using the Stylus CX menus. In addition, the menus let you run maintenance programs and check your ink levels, as described on page 19.
Stylus CX Buttons Button Function P On Turn the Stylus CX on and off. ] Scan Start EPSON Smart Panel™ on your computer. N Recall/Save (3 sec) Press and hold for 3 seconds to save settings. Press and release to select saved settings. Reset/Reset All (3 sec) Press to return menu setting to the default. Press and hold for 3 seconds to return all settings to their defaults. l r Menu Select menus on the LCD screen. + – Copies/Value Select the number of copies or menu settings.
Stylus CX Menus Menu Options* Description Normal display 1–99 Press + or – to set the number of copies. Copy Mode Standard Margins Copy with normal margins. Border Free Size photos as necessary to fit to the edges of your 4 x 6 or 5 x 7 paper. Small Margins Copy with only a 1.5-mm margin around the edges. For copies on 4 x 6 or 5 x 7 paper only. Repeat Copy an image multiple times on one sheet (for small images only). 2-up Copy two originals onto one sheet.
Menu Options* Description Paper size Letter Select the size paper you are using (not the size of your original). 4x6 5x7 A4 Lighter/Darker – NnnonnO + Press + for darker copies or – for lighter copies. Reduce/ Enlarge 4 x 6 > Letter Enlarge a 4 x 6 photo to letter size. 5 x 7 > Letter Enlarge a 5 x 7 photo to letter size. Actual: 100% Same size copy. Auto Fit Page Automatically resize original to fit the paper selected. Letter > A4 Enlarge a letter-size document to A4.
Menu Options* Description Change Cartridge Press the x Color Copy button to start the process. Replace the cartridge when you see a message that one of your ink colors is low or empty. Ink Levels C = cyan M = magenta Y = yellow K = black Display the percentage of ink remaining in each cartridge. Load/Eject Press the x Color Copy button to load or eject the paper. Feed or eject paper after clearing a paper jam. *Default settings are shown in bold. Copying Documents 1.
5. Slide the left edge guide against the paper (but not too tightly). 6. Flip the feeder guard back over the paper. (Make sure you didn’t insert the paper in front of the feeder guard.) 7. Open the scanner lid. 8. Place your document face-down on the glass, in the upper left corner. Move your document about 0.1 inch from the top and side edge so your entire document is scanned. Then close the scanner lid. Move the document in about 0.
■ For multiple copies, press the + Copies button to select the number you want. 9. Press the x Color Copy button (for color copies) or x B&W Copy button (for black and white copies). Your document is copied. Note: Your copied image size may not be the exact same size as your original. Copying Photographs You can use the EPSON Stylus CX5400 to copy your favorite photos so they look just like professional photo reproductions.
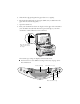
Loading Paper and Placing Your Photo 1. Flip the feeder guard forward. 2. Open the output tray and its extension. 3. Insert up to 20 sheets of EPSON Photo Paper, Glossy Photo Paper, or DURABrite Ink Glossy Photo Paper against the right edge of the sheet feeder. Load the paper with the shiny side face-up, short edge first (even for landscape-oriented photos). 4. Slide the left edge guide against the paper (but not too tightly). 5. Flip the feeder guard back over the paper.
6. Open the scanner lid and place your photo face-down on the glass, in the upper left corner. Make sure you place the short edge of the photo next to the left side of the glass. Move the photo about 0.1 inch from the top and side edge so the entire photo is scanned. Move the photo in about 0.1 inch from the edges Right menu button 7. Close the scanner lid. Selecting Photo Settings 1. Press the right Menu button to display Copy mode on the LCD screen.
5. For multiple copies, press the + Copies button to select the number you want. 6. Press the x Color Copy button. Your photo is scanned and printed. Improving Copy Quality You can use the Quality&Paper menu on the Stylus CX to improve the quality of your copies on plain paper, EPSON Premium Bright White Paper, Photo Quality Ink Jet Paper, or Matte Paper Heavyweight. 1. Load paper and place your document on the glass as described on pages 9 and 10. 2.
3. Press the right Menu button until you see Lighter/ Darker on the LCD screen. Lighter/Darker – NnnonnO + 4. Press the – Value button to select a lighter setting, or the + Value button to select a darker setting. 5. Press the y Stop button to save your settings. 6. For multiple copies, press the + Copies button to select the number you want. 7. Press the x Color Copy or B&W Copy button. Your document is copied.
7. Press the y Stop button to save your settings. 8. For multiple copies, press the + Copies button to select the number you want. 9. Press the x Color Copy or B&W Copy button. Your document is copied. Note: If you select Auto Fit Page as the Reduce/Enlarge setting to copy a document with white or very light colored edges, the original size may not be recognized correctly. If this occurs, select 100% as the Reduce/Enlarge setting and use the Zoom In/Out setting to adjust the size of your copy.
Two or Four Pages on a Sheet 1. Make sure letter-size paper is loaded in the Stylus CX. 2. Place the first page on the glass, with the top of the page at the left side. 3. Press the right Menu button to display Copy mode on the LCD screen. Copy mode Standard Margins 4. Press the – Value button to select the mode you want: ■ ■ To place two pages on a single sheet of paper, select 2-up. Copy mode To place four pages on a single sheet of paper, select 4-up. Copy mode 2-up 4-up 5.
Saving and Reusing Copy Settings You can save your custom copy settings so you can quickly reuse them for similar copying jobs. For example, you might want to save settings for copying a 4 × 6 snapshot on EPSON DURABrite Ink Glossy Photo Paper. You can then “reprint” photos by pressing a single button. 1. After selecting settings, press and hold the Recall button until you see Stored on the LCD screen. Stored 2.
Maintaining Your Stylus CX You can use the buttons on the Stylus CX to run maintenance programs and see how much ink you have left. View instructions and ink levels Select maintenance programs Start maintenance programs Checking Ink Levels Press the left Menu button until you see Ink Levels on the LCD screen. This shows an approximate percentage of the ink remaining in each cartridge.
Replacing an Ink Cartridge If the Error light on the Stylus CX is flashing and you see an ink out message on the screen, you need to replace an ink cartridge. When a cartridge is more than six months old, you may need to replace it if printouts don’t look their best. If the quality doesn’t improve after cleaning and aligning the print head, you can replace the cartridge. Be sure you have a new ink cartridge before you begin.
Caution: To avoid damaging the EPSON Stylus CX5400, never move the print head by hand. You cannot print if any ink cartridge is empty. Leave the empty cartridge installed until you have obtained a replacement. Otherwise the ink remaining in the print head nozzles may dry out. Removing and Installing Ink Cartridges 1. Make sure the Stylus CX is turned on and not printing. Check the LCD screen to see which ink cartridge is empty. Then press the x Color Copy button.
3. Pinch the tabs on the front and back of the cartridge, lift it out of the printer, and dispose of it carefully. 4. Before you remove the new cartridge from its package, shake it four or five times.
5. Unwrap the new ink cartridge and lower it into its holder, then press down on the top of the cartridge until it clicks in place. Caution: Don’t touch the green circuit board on the back of the cartridge; you may inhibit normal operation and printing. If you need to replace other ink cartridges, repeat steps 3 through 5 before continuing with step 6. 6. Carefully lower the scanner and press it down until it clicks into place. The Stylus CX begins charging the ink delivery system.
3. When the On light stops flashing, run a nozzle check to confirm the print head nozzles are clean. Running a Nozzle Check 1. Press the left Menu button until you see Nozzle Check on the screen, then press the x Color Copy button. 2. Examine the nozzle check pattern you print. It should look something like this, with the lines on the right colored cyan, magenta, and yellow: Each staggered line should be complete, with no gaps in the dot pattern. ■ If your printout looks okay, you’re done.
Aligning the Print Head If your printouts look grainy or vertical lines appear jagged, you may need to align the print head. 1. Make sure the Stylus CX is turned on and not printing, and the Error light is off. 2. Load plain, letter-size paper in the sheet feeder. 3. Press the left Menu button until you see Head Alignment, then press the x Color Copy button to print an alignment page. 4. On the test page, select the pattern with the two vertical lines most precisely printed on top of each other.
5. Press the + or – button to select the number of the best pattern for the first row, then press the x Color Copy button. Repeat this step for the second, third, fourth, and fifth rows. Note: If you select a pattern other than 8 in any row, that pattern becomes pattern #8 the next time you align the print head. 6. When you’re finished, press the x Color Copy button to print the second alignment sheet. Or, if you want to end the alignment process at this point, press the y Stop button. 7.
8. Press the + or – Value buttons to select the number of the best pattern, then press the x Color Copy button. (In this example, pattern 4 is best.) 9. When you’re finished, press the x Color Copy button to print the third alignment sheet. Or, if you want to end the alignment process at this point, press the y Stop button. 10. Repeat steps 7 through 8 to complete the alignment process.
Solving Problems If you have a problem with the Stylus CX, check the messages on the LCD screen (as described below) or run a nozzle check (as described on page 24). Check for solutions beginning on page 29. Checking the Stylus CX Messages Here is a list of error messages and what you should do when you see them. Error message Solution Quality&Paper setting is not acceptable for B&W copy. Press the Stop button. Press the y Stop button, then change the Quality&Paper settings.
Error message Solution Scanner unit open – – > Close the scanner unit. Carefully close the scanner and press it down until it clicks securely into place. Scanner error – – > See your documentation and call service if necessary. Press the On button to turn off the Stylus CX. Unlock the transportation lock (on the left side of the scanner glass) if necessary. Turn on your Stylus CX again. If the error message still appears, contact your dealer or EPSON as described on page 32.
■ Make sure your original is positioned in the top left corner of the glass, with the short edge at the left. ■ Make sure you select the Copy mode you want: Standard Margins, Small Margins, or BorderFree. See page 11 for instructions. ■ If you select Auto Fit Page to copy a document with white or very light edges, the original size may not be recognized correctly. Select 100% as the Reduce/ Enlarge setting and use the Zoom In/Out setting to adjust the size of your copy.
Paper doesn’t eject fully or is wrinkled. ■ If the paper doesn’t eject fully, you may have selected the wrong paper size. Press the x Color Copy button to eject the paper, then press the right Menu button until you see Paper size on the LCD screen. Make sure you select the correct paper size, as described on page 11. ■ If it’s wrinkled when it ejects, the paper may be damp or too thin. Load new paper.
Where To Get Help If you need help with copying, see the contact information below. Double-click the EPSON Information Center icon on your computer desktop or see the Start Here sheet if you need help with other software that came on your EPSON Stylus CX5400 CD-ROM.
Requirements and Notices Windows System Requirements To use your EPSON Stylus CX5400 and its software, your system should have: ■ A Microsoft® Windows® compatible PC with a Pentium® 300 MHz or better processor ■ Microsoft Windows XP, Windows 2000, Windows Me, or Windows 98 ■ 128MB RAM (256MB or more recommended) ■ VGA monitor or better with at least 256 colors ■ At least 200MB of free hard disk space (300MB or more recommended) ■ CD-ROM or DVD drive for installing the software ■ Windows-complia
Important Safety Instructions Before using your EPSON Stylus CX5400, read and follow these safety instructions: ■ Be sure to follow all warnings and instructions marked on the Stylus CX. ■ Use only the type of power source indicated on the Stylus CX label. ■ Connect all equipment to properly grounded power outlets. Avoid using outlets on the same circuit as air control systems or other high-load devices that regularly switch on and off.
■ Unplug the Stylus CX and refer servicing to qualified service personnel under the following conditions: if the power cord or plug is damaged; if liquid has entered the product; if the product has been dropped or the case damaged; if the product does not operate normally or exhibits a distinct change in performance. Adjust only those controls that are covered by the operating instructions.
■ If you remove an ink cartridge for later use, protect the ink supply area from dirt and dust and store it in the same environment as the Stylus CX. Note that there is a valve in the ink supply port, making covers or plugs unnecessary, but care is needed to prevent the ink from staining items that the cartridge touches. Do not touch the ink cartridge ink supply port or surrounding area. LCD Panel Safety Instructions ■ Use only a dry soft cloth to clean the LCD display.
FCC Compliance Statement For United States Users This equipment has been tested and found to comply with the limits for a Class B digital device, pursuant to Part 15 of the FCC Rules. These limits are designed to provide reasonable protection against harmful interference in a residential installation. This equipment generates, uses, and can radiate radio frequency energy and, if not installed and used in accordance with the instructions, may cause harmful interference to radio or television reception.
Declaration of Conformity According to 47CFR, Part 2 and 15 for: Class B Personal Computers and Peripherals; and/or CPU Boards and Power Supplies used with Class B Personal Computers: We: Located at: EPSON AMERICA, INC. MS 3-13 3840 Kilroy Airport Way Long Beach, CA 90806 Telephone: (562) 290-5254 Declare under sole responsibility that the product identified herein, complies with 47CFR Part 2 and 15 of the FCC rules as a Class B digital device.
Epson America, Inc. Limited Warranty What Is Covered: Epson America, Inc. (“Epson”) warrants to the first retail purchaser that the EPSON product covered by this limited warranty statement, if purchased and used in the United States or Canada, conforms to the manufacturer’s specifications and will be free from defects in workmanship and materials for a period of one (1) year from the date of original purchase.
label or serial number be removed or should the product fail to be properly maintained or fail to function properly as a result of misuse, abuse, improper installation, neglect, improper shipping, damage caused by disasters such as fire, flood, and lightning, improper electrical current, software problems, interaction with non-Epson products, or service other than by an Epson Authorized Servicer. If a claimed defect cannot be identified or reproduced, you will be held responsible for the costs incurred.