® Epson Stylus CX5000 Series Quick Guide Basic Copying, Printing, and Scanning Maintaining Your Epson Stylus CX5000 Series All-in-One Solving Problems
Contents Loading Paper . . . . . . . . . . . . . . . . . . . . . . . . . . . . . . . . . . . . . . . . . 5 Copying a Photo or Document . . . . . . . . . . . . . . . . . . . . . . . . . . 7 Placing the Original on the Glass . . . . . . . . . . . . . . . . . . . . . . . . . . . . . . . 7 Copying . . . . . . . . . . . . . . . . . . . . . . . . . . . . . . . . . . . . . . . . . . . . . . . . 9 Printing From a Memory Card . . . . . . . . . . . . . . . . . . . . . . . . . .
Solving Problems . . . . . . . . . . . . . . . . . . . . . . . . . . . . . . . . . . . . . 40 Error Indicators . . . . . . . . . . . . . . . . . . . . . . . . . . . . . . . . . . . . . . . . . . 40 Problems and Solutions . . . . . . . . . . . . . . . . . . . . . . . . . . . . . . . . . . . . . 42 Where To Get Help . . . . . . . . . . . . . . . . . . . . . . . . . . . . . . . . . . . . . . . 44 Notices. . . . . . . . . . . . . . . . . . . . . . . . . . . . . . . . . . . . . . . . . . . . . . .
Introduction After you have set up your Epson Stylus® CX5000 Series all-in-one as described on the Start Here sheet, turn here to: ■ Load paper ■ Make a quick copy of a document or photo ■ Print photos stored on a memory card ■ Print photos directly from your camera ■ Get the basic steps for printing from your computer ■ Scan a document or photo, including restoring a color photo as you scan ■ Perform routine maintenance ■ Solve simple problems This book tells you how to do most of these thi
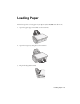
Loading Paper Follow the steps here to load paper in your Epson Stylus CX5000 Series all-in-one. 1. Open the paper support and slide out the extensions. 2. Open the output tray and pull out the extension. 3. Flip the feeder guard forward.
4. Insert the paper, printable side up, against the right edge guide and beneath the tabs. (The printed side is whiter or brighter on some papers.) Always load paper short edge first, even for landscape printing. Place paper beneath the tabs You can load up to 100 sheets of plain paper and up to 20 sheets of photo or matte paper (see the User’s Guide for capacity guidelines on other paper types).
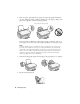
Copying a Photo or Document Follow the instructions in this section to: ■ Position your photo or document correctly on the glass (see below) ■ Make copies of a photo or document (see page 9) Placing the Original on the Glass 1. Open the document cover and place your original face-down on the glass, in the upper left corner. 2. Close the cover gently so you don’t move the original.
If you need to copy or scan a thick or large document, you can remove the document cover. Just open it and pull it straight up. If you need to press the document flat while you copy or scan it, do not press too hard and be careful not to move it. Note: Do not use excessive force on the document cover, and do not twist it. You may damage the document cover. When you are done, replace the document cover by inserting the tabs back into the slots.
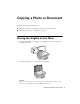
Copying You can make copies using letter-size (8.5 × 11-inch), 4 × 6-inch, and 5 × 7-inch plain, photo, or matte paper. Copying a Document 1. Make sure the Epson Stylus CX5000 Series all-in-one is turned on. 2. Place the document on the glass as described on page 7. Be sure to close the document cover. 3. Load up to 100 sheets of letter-size plain paper (see page 5 if you need instructions). 4. Press the Copies button until you see the desired number of copies in the Copies window.
Copying a Photo 1. Make sure the Epson Stylus CX5000 Series all-in-one is turned on. 2. Place the photo on the glass as described on page 7. Be sure to close the document cover. 3. Load up to 20 sheets of letter-size, 4 × 6-inch, or 5 × 7-inch photo or matte paper (see page 5 if you need instructions). 4. Press the Copies button until you see the correct number of copies in the Copies window. You can select up to 9 copies at a time this way. To make more than 9 copies, see page 11. 5.
Making 10 or More Copies 1. Make sure the Epson Stylus CX5000 Series all-in-one is turned on. 2. Place the photo on the glass as described on page 7. Be sure to close the document cover. 3. Press the Copies button until you see “–” in the Copies window. This tells the CX5000 Series to print up to 100 copies. 4. Load enough paper for the number of copies (up to 100) you want to make. For example, to print 12 copies, load 12 sheets of paper. 5. Press the paper type button to select Plain Paper or Photo Paper.
Printing From a Memory Card The Epson Stylus CX5000 Series all-in-one lets you print color photos directly from your digital camera’s memory card; just insert it into a memory card slot on the CX5000 Series and you’re ready to print. If your digital camera supports DPOF (Digital Print Order Format), you can pre-select the photos you want to print while the card is still in the camera. Then, when you insert the card in the CX5000 Series, it knows which photos to print and how many copies of each.
Compatible Cards and Image Formats You can use the following types of cards with your Epson Stylus CX5000 Series all-in-one: Right slot Slot Type of card Right slot CompactFlashTM MicrodriveTM Left slot SDTM SDHC miniSDTM* miniSDHC* microSD* microSDHC* MultiMediaCard Memory StickTM Memory Stick DuoTM* Memory Stick PROTM Memory Stick Pro DuoTM* MagicGateTM Memory Stick MagicGate Memory Stick Duo* xD-Picture Card xD-Picture Card Type H xD-Picture Card Type M Memory card access light Left slot * Adapte
Inserting the Card 1. Make sure the Epson Stylus CX5000 Series all-in-one is turned on. Note: When you print directly from a memory card, it is best if the CX5000 Series is not connected to your computer (or your computer should be turned off). If you see a message on your computer screen when you insert a card in the CX5000 Series, just cancel the operation and close the screen. 2. Open the memory card door. 3. Make sure the memory card access light is off and that no cards are in any of the slots.
Printing an Index Sheet to Select Photos You can print an index sheet (which is like a photographer’s contact or proof sheet) to see small “thumbnail” images of all the pictures on your card. Then you can mark the pictures on the index sheet that you want to print, scan the sheet, and let the Epson Stylus CX5000 Series all-in-one automatically print the selected photos. Printing the Index Sheet 1. Make sure your CX5000 Series is not connected to your computer (or your computer is turned off ). 2.
Selecting Photos on the Index Sheet 1. Once you have printed the index sheet, use a dark pen or pencil to fill in one of the circles beneath each photo you want to print to indicate how many copies you want (1, 2, or 3). OK: No good: Make sure just one circle is filled in for each selected photo and mark the sheet carefully; once it has been scanned you will not be able to change your selections.
6. Select Plain Paper or Photo Paper (whichever you loaded). If you select Plain Paper, your photos print with a white border. If you select Photo Paper, your photos print borderless, to the edge of the paper. 7. Select Letter, 4"x6", or 5"x7" for the paper size. 8. Press the x Start Color button to start printing. Note: If you need to stop printing, press the y Stop button.
Printing From a Digital Camera If your camera is PictBridge- or USB DIRECT-PRINT™-compatible, you can print your JPEG photos by connecting your digital camera directly to your Epson Stylus CX5000 Series all-in-one. Your photos must be sized from 80 × 80 pixels to 9200 × 9200 pixels. 1. Make sure your CX5000 Series is not printing. 2. Remove any memory cards from the slots. 3. Press the Memory Card button until the Print All/PictBridge light comes on. 4. Load the type of paper you want to use (see page 5).
9. Select the photos you want to print with your camera. Then adjust any necessary settings and print your photo as explained in your camera manual. Note: If your camera is not supported, a flashing P appears in the Copies window, and the b Error light and Print All/PictBridge lights flash. Epson cannot guarantee the compatibility of any camera. Depending on the CX5000 Series settings and your digital camera settings, some combinations of paper type, size, and layout may not be supported.
Printing From Your Computer This section describes the basic steps for printing a photo or document stored on your Windows or Macintosh computer. Note: For detailed instructions on printing, see the on-screen User’s Guide. Before you start, make sure you’ve installed your printer software and connected the Epson Stylus CX5000 Series all-in-one to your computer as described on the Start Here sheet.
3. Open the File menu and select Print. You see a window like this one: Select EPSON Stylus CX5000 Series Click here to open your printer software 4. Make sure Epson Stylus CX5000 Series is selected, then click the Preferences or Properties button. (If you see a Setup, Printer, or Options button, click it. Then click Preferences or Properties on the next screen.) 5.
Make sure you choose the correct paper Type setting for the paper you are using (see page 26 for details). Note: For more information about print settings, click the ? or Help button. 6. For more printing options, click the Advanced button.
8. Click OK to save your settings, then click OK or Print to start printing. This window appears and shows the progress of your print job. Check ink cartridge status Pause or resume printing Cancel printing Printing with a Macintosh Follow the steps below to print with a Macintosh: 1. Load paper (see page 5). 2. Open the photo or document in your application. 3. Select Page Setup from the File menu.
5. Select Print from the File menu. You see a window like this one: Select Stylus CX5000 Select Print Settings 6. Choose Print Settings from the pop-up menu and select the following settings as necessary: Select your Media Type (see page 26) Select Color or Black ink Select higher quality or faster printing (if available) Select Automatic mode Note: In certain programs, you may need to select Advanced before you can select Print Settings. For more information about printer settings, click the ? button.
■ ColorSync or Color Management: Select ColorSync® or adjust the color controls, change the gamma setting, or turn off color adjustments in the printer software. ■ Cover Page (OS X 10.4.x only): Add a cover page before or after the document. ■ Expansion: Reduce or enlarge the image size for borderless printing. ■ Summary: View a list of all your selections. 8. Click the Advanced button to change additional settings.
You see a screen like this: Cancel printing Select the print job 11. When you’re finished, close the printer window or Print Center. Using Special Papers Epson offers a wide array of high quality papers, making it easy to maximize the impact of your photos, presentations, and creative projects. Paper category Description Photo Papers For lab quality photos—from everyday snapshots to professional portraits. Available in glossy, semi-gloss, and luster finishes.
You can purchase genuine Epson ink and paper from an Epson authorized reseller. To find the nearest reseller, call 800-GO-EPSON (800-463-7766). Or you can purchase online at www.epsonstore.com (U.S. sales) or www.epson.ca (Canadian sales). Paper name Size Part number Epson Ultra Premium Photo Paper Glossy Epson Ultra Premium Glossy Photo Paper Borderless 4 × 6 inches S041934 Letter (8.
Select the correct Type (see page 21) or Media Type (see page 24) setting in your printer software: For this paper Select this setting Plain paper Epson Bright White Paper Epson Premium Bright White Paper Plain Paper/Bright White Paper Epson Ultra Premium Photo Paper Glossy Epson Ultra Premium Glossy Photo Paper Ultra Premium Photo Paper Glossy Epson Premium Photo Paper Glossy Epson Premium Glossy Photo Paper Premium Photo Paper Glossy Epson Photo Paper Glossy Epson Glossy Photo Paper Photo Paper G
Scanning a Photo or Document You can use your Epson Stylus CX5000 Series all-in-one to scan a photo or document and save it on your computer or other device, or to fax or e-mail it to someone else. You can even automatically restore faded color photographs as you scan (see page 31 for details). The Epson Scan software provides three scanning modes for progressive levels of control over your scanned image: ■ Full Auto Mode scans quickly and easily using automatic settings.
Note: If you need to scan a thick document, you can remove the document cover (see page 8). 2. Close the cover gently so you don’t move the original. 3. Do one of the following to start Epson Scan: ■ Windows: Double-click the EPSON Scan icon on your desktop. ■ Macintosh: Double-click EPSON Scan in the Applications folder. ■ If you are scanning from an application, start your application. Then open the File menu, choose Import or Acquire, and select Epson Stylus CX5000 Series.
Restoring Color in Faded Photos You can automatically transform an old, faded, or badly exposed color photo into one with true-to-life color and sharpness as you scan. Look for the Color Restoration option in Epson Scan’s Full Auto, Home, and Professional Mode screens: Full Auto Mode Click the Customize button, click the Color Restoration button, click OK, and click Scan. Home Mode Click the Color Restoration button, preview your image, and click Scan.
Maintaining Your CX5000 Series All-in-One If you notice a decline in print quality, follow the instructions in this chapter for: ■ “Checking the Print Head Nozzles” (see below) ■ “Cleaning the Print Head” on page 33 ■ “Checking the Ink Cartridge Status” on page 34 ■ “Replacing Ink Cartridges” on page 35 Checking the Print Head Nozzles If your printouts are faint or have gaps in them, some of the nozzles in the print head may be clogged or ink may be running low in one or more of the ink cartridges.
Cleaning the Print Head If your printouts are unexpectedly light or faint, or you notice light or dark bands across your printout, you may need to clean the print head. This unclogs the nozzles so they can deliver ink properly. Run a nozzle check as described on page 32 to see if the print head needs cleaning. Note: Print head cleaning uses ink, so clean it only if quality declines and the nozzle check indicates that the print head needs to be cleaned.
Checking the Ink Cartridge Status When the red B ink light starts flashing, one or more cartridges are low on ink. When the red B ink light stays on, you need to replace the cartridge(s). You’ll also see a message on your screen when you print, telling you which cartridge is low or expended. (You cannot print when a cartridge is expended.) Tip: If a cartridge is more than six months old, print quality may decline. If necessary, try cleaning the print head (see page 33).
Replacing Ink Cartridges Make sure you have a new ink cartridge before you begin. Once you start replacing a cartridge, you must complete all the steps in one session. Caution: Do not open ink cartridge packages until you are ready to install the ink. Cartridges are vacuum packed to maintain reliability. 1. Make sure the Epson Stylus CX5000 Series all-in-one is on. 2. Make sure that the document cover is closed, then open the scanner. Caution: Do not open the scanner when the document cover is open. 3.
4. Press the B ink button again. ■ If more than one cartridge is low or expended, the next cartridge moves to the _ expended ink mark. ■ Once the CX5000 Series identifies all of the low or expended ink cartridges, the print head moves to the ink cartridge replacement position. 5. Open the cartridge cover. Caution: Never attempt to open the cartridge cover when the print head is moving. Wait until the cartridges have moved to the replacement position. 6.
Warning: If ink gets on your hands, wash them thoroughly with soap and water. If ink gets into your eyes, flush them immediately with water. 7. Before you open the new ink cartridge package, shake it four or five times. Then remove it from the package. Caution: Do not touch the green chip on the front of the cartridge. This can damage the ink cartridge. 8. Remove the yellow tape from the bottom of the ink cartridge.
9. Place the new ink cartridge into the cartridge holder and push it down until it clicks into place. 10. Replace any other cartridges that need to be replaced. 11. Close the ink cartridge cover and press it until it clicks into place. 12. Close the scanner.
13. Press the B ink button. The CX5000 Series begins charging ink and the On light starts flashing. This takes about one minute. When it’s finished, the On light stops flashing and remains on, and the B ink light goes out. Caution: Never turn off the CX5000 Series while the On light is flashing or you’ll waste ink. If you removed a low or expended ink cartridge, you cannot reinstall and use the cartridge. Note: If the B ink light stays on (not flashing), the ink cartridge may not be installed correctly.
Solving Problems If you have a problem with your Epson Stylus CX5000 Series all-in-one, check the lights on the control panel and the number or letter in the Copies window to diagnose the cause. You can also check “Problems and Solutions” on page 42 for basic troubleshooting suggestions, or double-click the User’s Guide icon on your computer desktop for more detailed help.
Light: status Copies window status b Error: Flashing 1 Cause Solution An unsupported memory card is inserted. Remove the incompatible memory card; see page 13. The inserted memory card does not contain any valid images. See page 13 for a list of compatible card and image types. 2 An index sheet was not recognized because it is not positioned correctly. Position the index sheet correctly on the glass, aligning the top of it with the left edge of the glass.
Light: status Copies window status b Error: Flashing H fast b Error: On Cause Solution The paper thickness lever is set to the ^ H position. ^ H position because you are printing envelopes, press x Start Color to continue. Otherwise, set the lever to the m L position. E A CX5000 Series part needs to be replaced. Contact your local authorized servicer or contact Epson for a referral; see page 44. E There is a problem with the CX5000 Series. Turn the CX5000 Series off and then back on.
Paper Feeding Problems ■ If paper doesn’t feed, remove it from the sheet feeder. Flip through the stack to separate the sheets a little. Then reload the paper against the right edge guide, and slide the left edge guide against the paper (but not too tightly). Make sure the paper is not in front of the feeder guard. ■ Do not load too many sheets at once (up to 20 sheets of photo or matte paper and 100 sheets of plain paper). See the User’s Guide for more information.
■ If you notice light or dark bands across your printouts or they are too faint, you may need to clean the print head. This unclogs the nozzles so they can deliver ink properly. Run a nozzle check as described on page 32 to see if the print head needs cleaning. ■ Clean the print head as described on page 33. ■ If you notice jagged vertical lines, you may need to align the print head. See your User’s Guide for instructions.
Then call: ■ U.S.: (562) 276-4382, 6 AM to 6 PM, Pacific Time, Monday through Friday. ■ Canada: (905) 709-3839, 6 AM to 6 PM, Pacific Time, Monday through Friday. Toll or long distance charges may apply. Purchase Supplies and Accessories You can purchase genuine Epson ink and paper from an Epson authorized reseller. To find the nearest reseller, call 800-GO-EPSON (800-463-7766). Or you can purchase online at www.epsonstore.com (U.S. sales) or www.epson.ca (Canadian sales).
Notices Important Safety Instructions Before using your Epson Stylus CX5000 Series all-in-one, read and follow these safety instructions: ■ Be sure to follow all warnings and instructions marked on the CX5000 Series. ■ Use only the type of power source indicated on the CX5000 Series label. ■ Use only the power cord that comes with the CX5000 Series. Use of another cord may cause fires or shock. Do not use the cord with any other equipment.
■ Unplug the CX5000 Series and refer servicing to qualified service personnel under the following conditions: if the power cord or plug is damaged; if liquid has entered the product; if the product has been dropped or the case damaged; if the product does not operate normally or exhibits a distinct change in performance. Adjust only those controls that are covered by the operating instructions.
FCC Compliance Statement For United States Users This equipment has been tested and found to comply with the limits for a Class B digital device, pursuant to Part 15 of the FCC Rules. These limits are designed to provide reasonable protection against harmful interference in a residential installation. This equipment generates, uses, and can radiate radio frequency energy and, if not installed and used in accordance with the instructions, may cause harmful interference to radio or television reception.
Declaration of Conformity According to 47CFR, Part 2 and 15 for: Class B Personal Computers and Peripherals; and/or CPU Boards and Power Supplies used with Class B Personal Computers: We: Located at: Epson America, Inc. MS 3-13 3840 Kilroy Airport Way Long Beach, CA 90806 Telephone: (562) 290-5254 Declare under sole responsibility that the product identified herein, complies with 47CFR Part 2 and 15 of the FCC rules as a Class B digital device.
Epson America, Inc., Limited Warranty What Is Covered: Epson America, Inc. (“Epson”) warrants to the original retail purchaser that the Epson printer covered by this limited warranty statement, if purchased and operated only in the United States or Canada, will be free from defects in workmanship and materials for a period of one (1) year from the date of original purchase. For warranty service, you must provide proof of the date of original purchase.
fail to be properly maintained or fail to function properly as a result of misuse, abuse, improper installation, neglect, improper shipping, damage caused by disasters such as fire, flood, and lightning, improper electrical current, software problems, interaction with nonEpson products, or service other than by an Epson Authorized Servicer. If a claimed defect cannot be identified or reproduced, you will be held responsible for the costs incurred.
Copyright Notice All rights reserved. No part of this publication may be reproduced, stored in a retrieval system, or transmitted in any form or by any means, electronic, mechanical, photocopying, recording, or otherwise, without the prior written permission of Seiko Epson Corporation. The information contained herein is designed only for use with this Epson product. Epson is not responsible for any use of this information as applied to other equipment.
General Notice: Other product names used herein are for identification purposes only and may be trademarks of their respective owners. Epson disclaims any and all rights in those marks. © 2006 Epson America, Inc.
Notices
CPD-21812R2 Printed in XXXXXX XX.