XP-400 Small-in-One Printer TM Quick Guide Your XP-400 . . . . . . . . . . . . . . . . . . . . . . . . . . . . . . . . . . . . . . . . . . . . . . . . . . . 2 Using Special Papers . . . . . . . . . . . . . . . . . . . . . . . . . . . . . . . . . . . . . . . . . . . . 4 Copying a Document or Photo . . . . . . . . . . . . . . . . . . . . . . . . . . . . . . . . . . . . . 6 Printing From a Memory Card . . . . . . . . . . . . . . . . . . . . . . . . . . . . . . . . . . . . . 7 Printing From Your Computer. . .
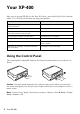
Your XP-400 After you set up your XP-400 (see the Start Here sheet), turn to this Quick Guide and your online User’s Guide for instructions on using your product. Features Where to find information Wireless printing from mobile devices with EPSON Connect™ See www.epson.com/connect. Print photos without a computer See page 7 for instructions. Crop photos and print in various layouts directly from your camera’s memory card See the online User’s Guide for instructions.
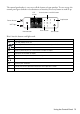
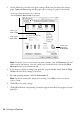
The control panel makes it easy to use all the features of your product. To save energy, the control panel goes dark after several minutes of inactivity. Press any button to wake it up.
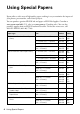
Using Special Papers Epson offers a wide array of high quality papers, making it easy to maximize the impact of your photos, presentations, and creative projects. You can purchase genuine EPSON ink and paper at EPSON® Supplies Central® at www.epson.com/ink3 (U.S. sales) or www.epson.ca (Canadian sales). You can also purchase supplies from an EPSON authorized reseller. To find the nearest one, call 800-GO-EPSON (800-463-7766).
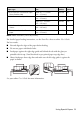
Part number Sheet count Letter (8.5 × 11 inches [216 × 279 mm]) S041568 50 Letter (8.5 × 11 inches [216 × 279 mm]) S041062 100 Legal (8.5 × 14 inches [216 × 356 mm]) S041067 100 EPSON Photo Quality Self-adhesive Sheets A4 (8.3 × 11.7 inches [210 × 297 mm]) S041106 10 EPSON Iron-on Cool Peel Transfer paper Letter (8.
Copying a Document or Photo Follow the instructions in this section to position your originals correctly on the scanner glass and make color or black-and-white copies. You can also restore color in old photos as you copy them; see the online User’s Guide for more information. 1. Make sure paper is loaded. 2. Raise the document cover and place your original facedown on the scanner glass, with the top facing into the front right corner. 3. Close the cover gently so you don’t move the original. 4.
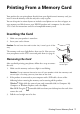
Printing From a Memory Card Your product lets you print photos directly from your digital camera’s memory card; just insert it into the memory card slot and you’re ready to print. You can also print in various layouts to include several photos on one sheet of paper, or copy memory card files between your EPSON product and a computer. See the online User’s Guide for instructions and a list of compatible memory cards. Inserting the Card 1. Make sure your product is turned on. 2. Insert your card as shown.
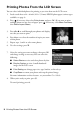
Printing Photos From the LCD Screen You can select individual photos for printing as you view them on the LCD screen. 1. Load several sheets of 4 × 6-inch (102 × 152 mm) EPSON photo paper (various types available; see page 4). 2. Press if necessary, then select Print photos and press OK. (If you want to print multiple photos on one sheet of paper, press if necessary, select More Functions, then Photo Layout Sheet.) 3. Press l or r to scroll through your photos and display one that you want to print.
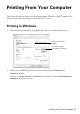
Printing From Your Computer This section describes the basic steps for printing from a Windows or Mac® computer. For detailed instructions on printing, see the online User’s Guide. Printing in Windows 1. Select the print command in your application. You see a window like this one: Select your EPSON product Click here to open your product software 2. Make sure your EPSON product is selected, then click the Preferences or Properties button. (If you see a Setup, Printer, or Options button, click it.
3. On the Main tab, select the basic print settings. Make sure you choose the correct paper Type and Size settings for the paper you are using (see page 12 for details). Select the type of document you’re printing (choose Photo or Best Photo for pictures) Select your paper Type Select your paper Size Select your document Orientation Note: For quick access to the most common settings, click the Shortcuts tab and select one of the presets.
Printing With a Mac Follow the steps below to print from Mac OS X 10.5 to 10.7. 1. Open the File menu and select Print. 2. Select your EPSON product as the Printer setting. Select your EPSON product 3. Click the arrow or Show Details to expand the Print window, if necessary. 4. Select basic copy and page settings. If you are printing a borderless photo, select a paper size with a Sheet Feeder-Borderless option. You can also select a custom setting to create a custom paper size.
For borderless printing, choose a Media Type other than Plain Paper or Envelope and select Borderless. Note: If the setting you want isn’t shown (for example, Scale), check for it in your application before printing. Or check for it in the settings for your application at the bottom of this window. 6. Choose any other printing options you may need from the pop-up menu. See the online User’s Guide for details. 7. Click Print. 8. To monitor your print job, click the printer icon in the Dock.
Scanning a Document or Photo You can use your product to scan a photo or document and save it on your computer. The u Scan function lets you scan quickly using preselected settings, or you can use the EPSON Scan software to access more advanced features. For example, you can use EPSON Scan to restore faded colors in old photos (see page 15). Note: For detailed scanning instructions, see the online User’s Guide.
5. Do one of the following: ■ If your printer is connected directly to your computer with a USB cable, press x to select USB Connection. ■ If your printer is connected to a wireless network, select your computer name, then press x. Once your image is scanned, you see its icon in Windows Explorer or Mac OS X Finder, or as an attachment in your email application, depending on the option you selected.
Scanning with Mac OS X 10.6/10.7 You can scan original documents and photos and save them as files on your computer. 1. Open an image editing application such as Image Capture, select your EPSON product if necessary, then click the Scan button to preview your image. 2. If you would like to select scan settings, such as Color Restoration and file save settings, click Show Details. 3. Click the Scan button to begin scanning. Your image is saved to the folder selected in the Scan To pop-up menu.
Maintaining Your Printer Follow the instructions in this chapter for checking and cleaning the print head nozzles and replacing ink cartridges. To align the print head, if necessary, see your online User’s Guide. Caution: To keep your printer looking like new, don’t place anything on top of the cover or use it as a writing surface. If you need to clean the cover, use only a soft, nonabrasive microfiber-type cloth.
Cleaning the Print Head If print quality has declined and the nozzle check pattern indicates clogged nozzles, you can clean the print head. Print head cleaning uses ink, so clean it only if necessary. Note: You cannot clean the print head if an ink cartridge is expended, and may not be able to clean it when a cartridge is low. You must replace the cartridge first (see page 19). 1. Load letter- or A4-size paper in the sheet feeder. 2. Press 3. if necessary and select F Setup.
A window may also appear on your computer screen when you try to print when ink is low. This window can optionally display ink offers and other updates from Epson. Note: To disable checking for ink offers or updates from Epson, see the instructions in your online User’s Guide. Purchasing EPSON Ink Cartridges You can purchase genuine EPSON ink and paper from EPSON Supplies Central at www.epson.com/ink3 (U.S. sales) or www.epson.ca (Canadian sales).
Replacing Ink Cartridges Make sure you have a new ink cartridge before you begin. You must install new cartridges immediately after removing the old ones. Caution: Do not open ink cartridge packages until you are ready to install the ink. Cartridges are vacuum packed to maintain reliability. Note: Leave the expended cartridge installed until you have obtained a replacement, or the ink remaining in the print head nozzles may dry out. 1. Turn on your printer. 2.
5. Before you open the new cartridge package, shake it gently four or five times. Then remove the cartridge from the package. Caution: Do not touch the green chip or the small window on the side of the cartridge. This can damage the ink cartridge. 6. Remove the yellow tape from the bottom of the ink cartridge. Caution: Do not remove any other labels or seals, or ink may leak. 7. Insert the new ink cartridge into the holder and push it down until it clicks into place.
8. Lower the scanner unit. 9. Press OK to begin charging the ink. This takes about 2 minutes. When you see a completion message on the LCD screen, ink charging is finished. Caution: Never turn off the EPSON printer while ink is charging or you’ll waste ink. If you see an ink replacement message on the LCD screen, press OK and press down all the cartridges securely. Then press OK again.
Solving Problems If you have a problem with your product, check the messages on the control panel to diagnose the cause. You can also check “Problems and Solutions” below for basic troubleshooting suggestions, or see your online User’s Guide for more detailed help. Note: Breakdown or repair of this product may cause loss of network data and settings. Epson is not responsible for backing up or recovering data and settings during or after the warranty period.
Cannot scan over the network ■ In order to use EPSON Scan with Mac OS X 10.6 or 10.7, you must first download it from the Epson support site. For more information, see page 15. ■ If you cannot scan from the product’s control panel, make sure you restarted your computer after installing the product software. Make sure EPSON Event Manager is not being blocked by your firewall or security software. Try turning off the firewall.
■ Do not load too many sheets at once. See your online User’s Guide for more information. ■ If paper is jammed, follow these steps: 1. Gently pull out jammed paper from the output tray or sheet feeder. 2. If paper is stuck inside, lift up the scanner, remove the jammed paper and torn pieces, then lower the scanner. 3. Press x to resume printing. If the error message does not clear, turn the printer off and then back on.
■ If you notice jagged vertical lines, you may need to align the print head. See your online User’s Guide for instructions. ■ The ink cartridges may be low on ink. Check your cartridge status (see page 17) and replace cartridges, if necessary (see page 19). ■ If a dotted line appears in the image, clean the scanner glass with a soft, dry, lint-free cloth (paper towels are not recommended and may permanently scratch the surface), or use a small amount of glass cleaner on a soft cloth, if necessary.
Notices Important Safety Instructions Before using your EPSON product, read and follow these safety instructions: ■ Be sure to follow all warnings and instructions marked on the product. ■ Use only the type of power source indicated on the product label. ■ Use only the power cord that comes with the product. Use of another cord may cause fires or shock. Do not use the cord with any other equipment. ■ Place the product near a wall outlet where the plug can be easily unplugged.
■ When connecting the printer to a computer or other device with a cable, ensure the correct orientation of the connectors. Each connector has only one correct orientation. Inserting a connector in the wrong orientation may damage both devices connected by the cable. ■ Do not touch the flat white cable inside the product. ■ Do not move the print head by hand; this may damage the product. ■ Do not spill liquid on the product or use the product with wet hands.
Ink Cartridge Safety Instructions ■ Keep ink cartridges out of the reach of children. ■ Be careful when you handle used ink cartridges; there may be ink remaining around the ink supply port. If ink gets on your skin, wash it off with soap and water. If it gets in your eyes, flush them immediately with water. If ink gets in your mouth, spit it out and see a doctor right away. ■ Do not shake ink cartridges after opening their packages; this can cause leakage.
■ Connect the equipment into an outlet on a circuit different from that to which the receiver is connected. ■ Consult the dealer or an experienced radio/TV technician for help. WARNING The connection of a non-shielded equipment interface cable to this equipment will invalidate the FCC Certification of this device and may cause interference levels which exceed the limits established by the FCC for this equipment.
Epson America, Inc. Limited Warranty What Is Covered: Epson America, Inc. (“Epson”) warrants to the original retail purchaser that the EPSON printer covered by this limited warranty statement, if purchased and operated only in the United States, Canada, or Puerto Rico, will be free from defects in workmanship and materials for a period of one (1) year from the date of original purchase. For warranty service, you must provide proof of the date of original purchase.
IDENTIFIED ABOVE. UNLESS STATED HEREIN, ANY STATEMENTS OR REPRESENTATIONS MADE BY ANY OTHER PERSON OR FIRM ARE VOID. IN NO EVENT SHALL EPSON OR ITS AFFILIATES BE LIABLE FOR ANY SPECIAL, INCIDENTAL OR CONSEQUENTIAL DAMAGES RESULTING FROM THE USE OR INABILITY TO USE THE EPSON PRODUCT, WHETHER RESULTING FROM BREACH OF WARRANTY OR ANY OTHER LEGAL THEORY. IN NO EVENT SHALL EPSON OR ITS AFFILIATES BE LIABLE FOR DAMAGES OF ANY KIND IN EXCESS OF THE ORIGINAL RETAIL PURCHASE PRICE OF THE PRODUCT.
Responsible Use of Copyrighted Materials Epson encourages each user to be responsible and respectful of the copyright laws when using any Epson product. While some countries’ laws permit limited copying or reuse of copyrighted material in certain circumstances, those circumstances may not be as broad as some people assume. Contact your legal advisor for any questions regarding copyright law.